How Putt Putt Engines Work

Though relatively simple construction (no moving parts, unless you count the deflection of the bottom of the boiler), putt putt engines ingeniously harness several principles of physics to push the boat and make raucous boat noises. And instead of just ejecting the water until the boiler is dry--as intuition seems to tell us it should be-- the water keeps coming back in a continuously repeating cycle. Understanding the cycle uses all of Newton's laws of motion.

Tip 1: Water expands a lot when it turns to steam.

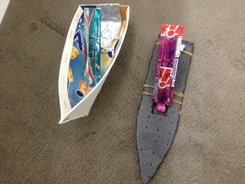
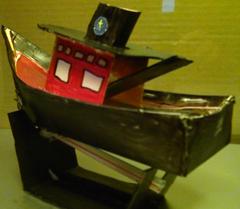
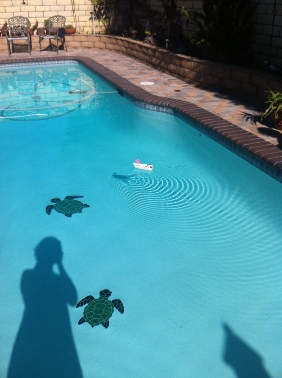
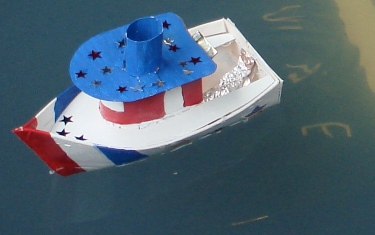
Most people know this, but did you know steam can occupy more than a thousand times more volume than the water it came from? If it is prevented from expanding, it builds up pressure instead. That's what happens with popcorn, which ideally has a 14% moisture content inside. The hard shell keeps the bit of moisture contained. The steam pressure builds until the kernel explodes. If it has dried out to 9% moisture, you can hardly pop it. Interestingly, putt putt boats are sometimes called "pop pop" boats.

Both popcorn and the putt putt engines employ violent expansions of steam, yet both are pretty safe because such a small amount of water is involved. Don't ever try to bake an unopened coconut in the oven, though!
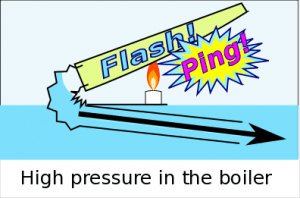
If you put a spoonful or two of water in a ziplock bag (or any plastic bag that can be sealed) and heat it in a microwave oven, you can see how the steam occupies many times more volume than the water it came from. It can't explode because the plastic becomes so soft it can't contain any pressure. Balloons with bit of water and tied also work.

Phase 1:
Explosive, expansion.

The aluminum boiler does not fill full with water.

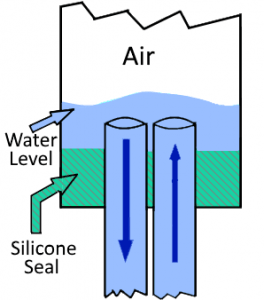
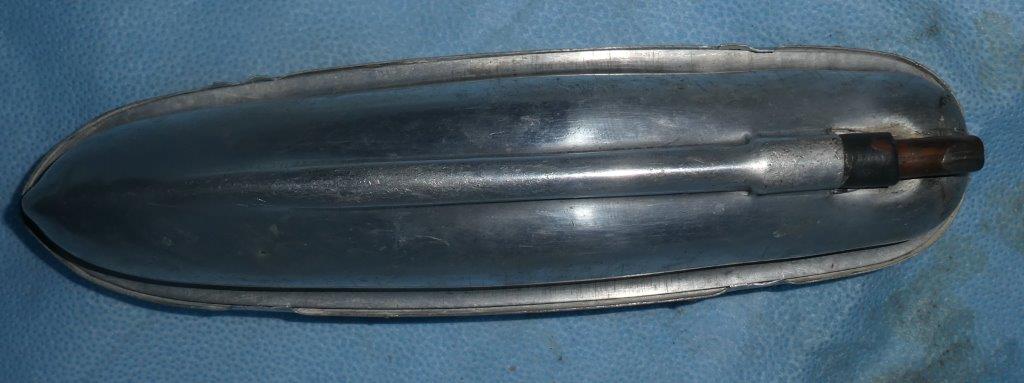
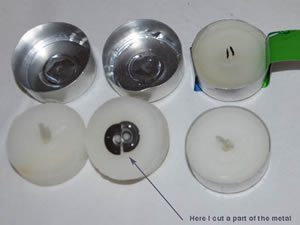
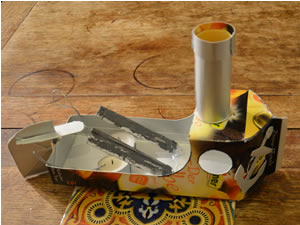
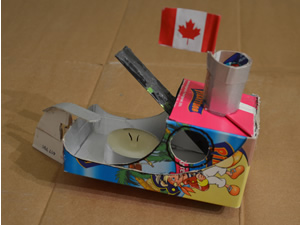
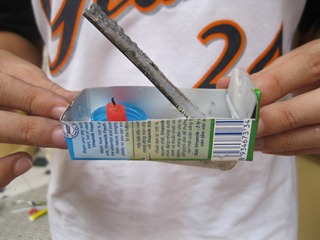
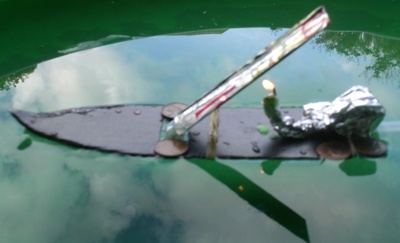
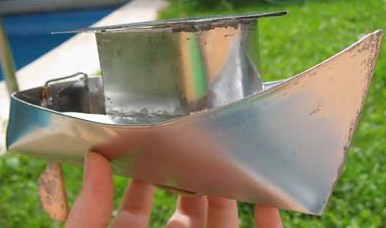
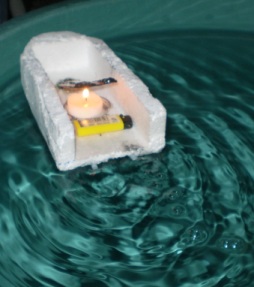
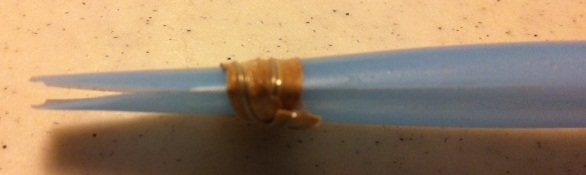
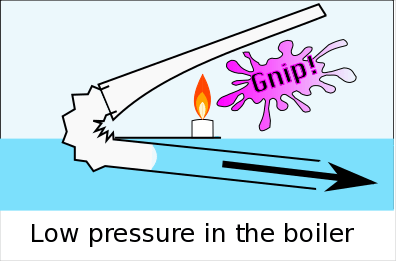
Let's first establish that the aluminum boiler does not fill full with water. Tilting the boiler to prime it makes the boiler stand up in such a way as to fill the straws and just a bit of the bottom of the boiler. If you had x-ray vision, you would see that when you prime the engine with water, the water comes in one straw and runs back out the other straw without putting much water in the aluminum boiler. This is as it should be. The "wetting" step deposited tiny droplets of water on the inside walls of the boiler. Once the aluminum is heated, even the tiny candle can flash boil those small droplets of water almost instantly, and they expand enough to run the engine.

Two things happen as the droplets flash explosively into steam: The bottom of the boiler pushes out with a ping. And the the water in the straws is pushed out.

If you measured the pressure inside the boiler, it would be higher than atmospheric pressure

Tip #2: A moving water column has momentum.

Sir Isaac Newton's First Law of Motion states that things in motion tend to stay in motion until something stops them. Even if you turn off the engine of a moving train, momentum alone can keep it going for miles.

A moving column of water in a pipe also has momentum, just like a train. When a column of water is suddenly stopped --as when someone closes a valve abruptly-- the momentum of the water is transferred to the plumbing. It can make noise or even tear plumbing loose. Hydraulic engineers and plumbers call this phenomenon"water hammer". It was more common on older plumbing before fixtures were designed to minimize it.

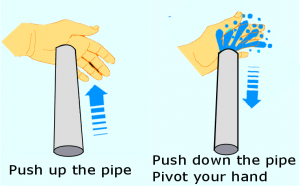
You can make a crude water pump that works because of the momentum of a water column. You need only your hands and a pipe. The pipe can be any diameter that you can seal one end of with the palm of your hand and it can't have holes or cracks in it. I have used the rigid metal extension of a vacuum cleaner that connects the flexible hose with the inlet attachment. A cheap PVC pipe around 1" or so is perfect. It should be at least a few feet long.

With at least 2 feet of the bottom of the pipe in water, cover and seal the top opening with the palm of your hand. Quickly jerk the pipe up. With the top sealed, the water in the pipe will lift up with the pipe. After the pipe has gone up a foot or so, jerk the pipe back down, while at the same time pivoting your hand to open up the top.

Back to the steam engine, the fast-moving water columns in the straws has momentum. That momentum tends to make the water want to charge ahead even when the boiler is no longer pushing it. That's good! It gives the engines an instability that keeps the cycles repeating over and over.

Tip 3: When steam condenses, it leaves a void.


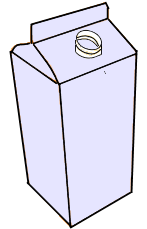
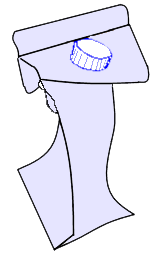
I know this sort of an obvious corollary of tip #1, but when most people think of condensation, they think of water droplets on the glass of an iced drink. The following demonstration is far more dramatic. Take one of those 1/2 gallon orange juice cartons with the screw-on lid and put a small amount of water (1/2" inch at the bottom, or several tablespoons). Put the carton in a microwave oven (you'll probably have to put it on its side) but do not put the lid on yet!!! If you put the lid on tightly now, the carton will explode. Set the power on high. The idea is to get the water inside boiling, then keep it boiling for about a minute. When it has--carefully so you don't get burned--take the carton out of the microwave and screw the lid on all the way.

The carton is now filled with steam. You can just let it condense slowly, but it's really dramatic if you spray the carton with cold water. Atmospheric pressure--about 14 pounds per square inch--easily crushes the carton.

Phase 2:
Rarified, momentous expansion.

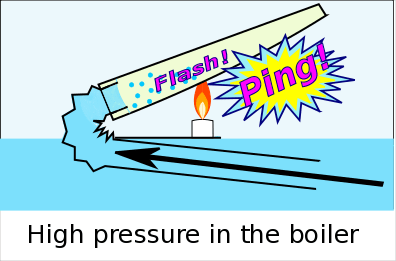
Although the water is still jetting out the ends of the straws because of momentum, the situation inside the boiler is very different from phase 1. The boiler is dry, no longer generating steam pressure because the water droplets have boiled off into steam. The column of water in the straws is no longer being pushed. But the momentum of the exiting water in the pipes keeps it going outward. Behind it --inside the boiler-- it expands the amount of volume available to the fixed amount of air inside. This creates a lower-than-atmospheric pressure inside the boiler. Colloquially, people call this a "vacuum", which isn't really right because there is still air in there, just less of it. "Rarified atmosphere" is a better term, I think. Whatever you call it, it's a huge change from phase 1, when there was high pressure in the boiler!

Normal (left) and Rarefied(right) Atmosphere

The bottom of the boiler bulges inward (concave), again making a sound (I called it "gnip" ('ping" spelled backward) in the illustration).

Phase 3:
Spring-back contraction.

We could say that the suction inside the boiler is now trying to pull the water column in the straws back into the boiler. More accurately, we should say say that normal atmospheric pressure is pushing the water back in. In any case, the water's momentum has been pushing against the air pressure. When the water's momentum is finally gone, the air pressure springs it back toward the engine. Some of the water squirts back into the aluminum boiler. Remember, that boiler was dry in phase 2. The candle has still been heating the metal, though, so the droplets of water explode into steam. There is high steam pressure in the boiler, again pushing out the water, and so on. The cycle repeats several times per second until the candle burns out.

Lingering question 1:

Why doesn't the boat go backward in reaction to the water column returning toward the engine?


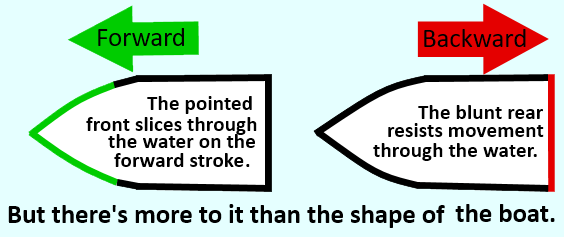
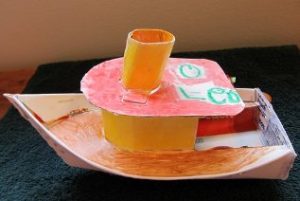
Sir Isaac Newton's Third Law of Motion is the familiar, "For every action there is an equal and opposite reaction." This is what propels jets and rockets--even in the deep vacuum of space. So, when the water jets backward out of the straws (action) the boat jumps forward (reaction). OK so far. But then the water rushes back into the straws, which would suggest the boat should actually kick backward in reaction. Why doesn't the putt putt boat just shake forward and backward in the water and not really go anywhere?

For years I assumed the whole answer lay in the shape of the boat. The pointed front cut forward through the water, while the blunt square back of the boat resisted going backward, sort of a hydraulic ratchet. But when I actually put it to the test--mounting engines on square boats, or even backward on pointed boats-- the engine still chugged forward. Clearly, some other principle is at work here.

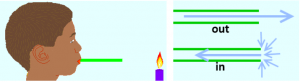
I am speculating that the answer lies in the different way the water exits and enters the ends of the straws. Consider this: If you blow through a straw, you can blow out a candle from more than a foot away. But if you suck in the air, you have to be within an inch or two of the flame to blow it out (I am not suggesting you breath fire to try this out). This leads me to think that in the first case, much of the air keeps going straight when blown out. But in the second case, air enters the straw from all angles --not just in front. If we then apply Newton's Third Law, most of the reactions cancel each other out in the second case.

However, Dr. Jeff Bindon explains it another way, and I am unable to find a flaw in his reasoning. He uses this analogy to illustrate why sucking water into the engine does not cancel out the expulsion phase:

Imagine a man standing at the front of the flat deck of a small boat. He starts to run across the deck towards the back and as he accelerates, he exerts a force on the deck and the boat is propelled forwards. He continues to accelerate and exert a force until he comes to the end of the deck and leaps into the water. The boat is now moving and as it does so, it passes another man in the water and he grabs hold of the ladder at the back of the boat. The boat jerks him into motion and the boat is slowed slightly. He climbs onto the deck and proceeds to accelerate and run towards the front of the boat. He exerts a force on the deck and the boat is retarded. But he does not want to leap off the front of the boat so he decelerates and exerts a propulsive force on the deck. By the time he has stopped, the propulsive force he has exerted is exactly equal to the retarding force he initially exerted. Or you can argue that he walks slowly to the front of the boat and exerts no force when he starts or stops. So, a series of men floating in the water, climbing on board, running and jumping back into the water can propel a boat !!

Lingering question 2:

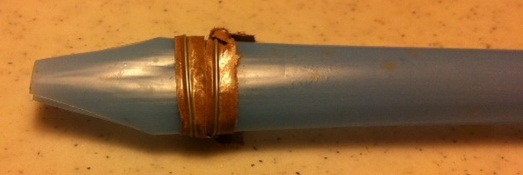
Why doesn't the glue sealing the engine burn?

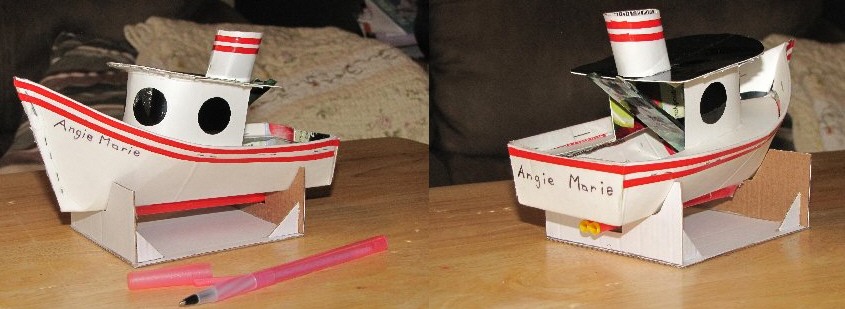
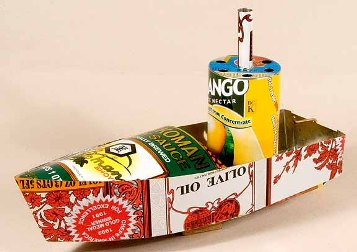
Although the putt putt engine is the most challenging project on this site, it would be even harder if you had to solder it together, as is the traditional way to make them. Furthermore, most solder does not stick to aluminum, so you would have to find special brass sheets instead.

It is not a good idea to run the engine dry, but when water is in, it stays below the temperature that would damage the epoxy and silicone. Consider that a water balloon can be held above a lit candle without bursting. The water keeps the rubber cool.

Patents for Putt Putt/Pop Pop Boats

Note: This article was originally published in March 2005

In addition to old patents, there is more recent technical information toward the bottom of this page.

Mr. Joel Rosenberg--whom we can all thank for finding and making these patents available as PDF documents--works with Boston's Museum of Science. He and others are developing a wide-ranging high school engineering program called Engineering the Future that includes students making putt putt boats.

The patents are in the public domain. I have added some commentary along with the links.

Thomas Piot's 1891 patent(PDF here) started it all. As he says, "My said invention is especially useful in the case of toy boats..." We can only guess about how he first came up with the idea. Did he observe something that led him serendipitously to the invention? The first two pages demonstrate a strong sense of science, so whatever triggered it, the development was still no easy accident. The third page shows pictures.

Those of us who have struggled to make putt putt engines--knowing it is possible--stand in awe of this man who made them without seeing somebody else's design! We stand on the shoulders of giants, but occasionally lightning strikes and someone invents something completely new. Let us pay our respects to Thomas Piot! Here is the best page I know of with biographical information about Désirée Thomas Piot.

Charles McHugh's 1915 patent(PDF) which was the first step to another patent of his 11 years later (see below). McHugh discovers that, "In some cases, if the boiler top is quite thin, a sound producer is provided for creating an interesting illusion.." He has discovered that by incorporating a diaphragm into the boiler he creates that wonderful sound that adds so much to the putt putt experience!

William Purcell's 1920 patent(PDF) appears to be the start of the other kind of putt putt boat: a boiler of coiled tubing. This kind of engine is very simple and durable. For years it was the only do-it-yourself putt putt engine. However, it does not make as much sound or go as fast as the diaphragm kind. Purcel realized it might be most practical to power toy boats with it, but the patent seems to leave open the possibility that it might be scaled up for a big boat. His sentiments are echoed in virtually all my classes, where someone will express an interest in a giant putt putt engine to power a full-size boat.

Charles McHugh's 1926 patent(PDF) further developed the engine to commercially viable design that could be produced in quantity. Notice how 9 years later the whole design is actually somewhat simpler. From the text and illustrations we can appreciate all the work that Charles McHugh and his partner Durward Williams devoted to making the engine what it is today. When I have some time, I would love to research how their company did.

Paul Jones' 1935 patent really emphasizes the mass-production using various stamp presses. The pressed-together parts seem to be more durable--less dependent on solder not melting. I have a Paul Jones boat in a balsa wood hull that still works well.

Interestingly, on page two Jones describes the top and bottom of the engine as "...having a different co-efficient of expansion and contraction..." Thermostats at that time were made of "bimetallic strips," which were strips of two metals stuck together. As the strips got hotter, the metals would expand at different rates, which caused the unit to bend (completing an electrical circuit). I think my all-aluminum boiler shows that it is hydraulics that make the engine work, not different rates of expansion of metals.

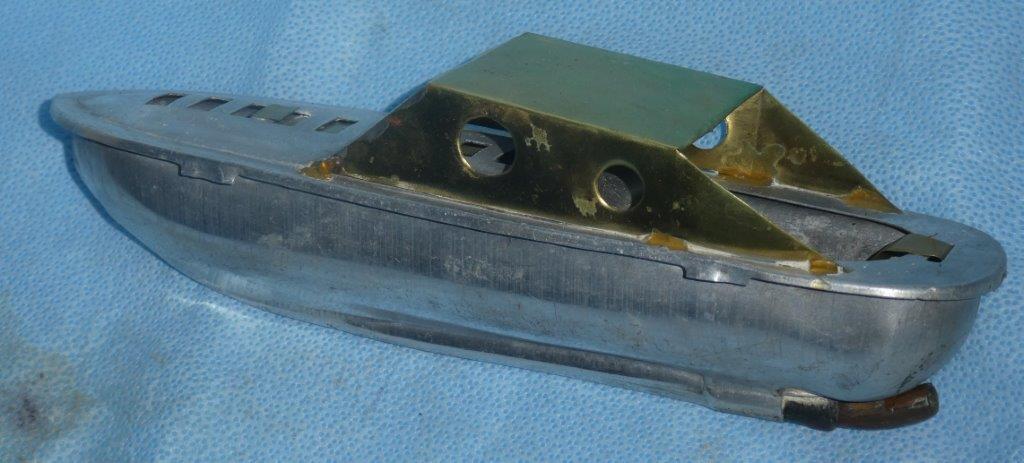
Another interesting thing is the timing of the patent application: 1934. The illustration on the right is from a science publication of 1933 featuring a toy boat manufactured and imported from Japan. You can see a PDF file of the whole page here. The text which accompanies the illustration has the same incorrect assumption about variable bimetallic expansion making it work. That and a very similar-looking engine make me wonder how much the Japanese design influenced the Paul Jones patent.


Recent Developments

Dr. Jeff Bindon has developed a very clever engine that allows you to see what's going on inside. You can read more about it, here. Be sure to see his excellent article about pop pop engine design.

Dr. Guus Flogel of the Netherlands has created instructions for the most extraordinary coil-type pop pop boats made from traditional Dutch wooden shoes.You can see instructions for them here.

If it is technical information you want, Mr. Jean-Yves of France has addressed the issue of efficiency in a must-read article here. You can also see more of Jean-Yves' work here.

Mr. Rosenberg also uncovered some very technical articles for engineers about putt putt boats, including such topics as scaling the engines larger. I cannot post these on the web because of copyright. If you contact me I can direct you toward them.

The French Pop Pop Connection

(Note: This article was originally published in May 2006)
In the 1991 I heard about an international association of pop-pop boat enthusiasts based in France. I wrote a letter expressing interest and described my efforts to create an engine design that was easy to make. A few weeks later I received 3 journals entirely devoted to pop pop boats and a note of encouragement from Professor Jean Le Bot. Even though I don't read or speak French, the journals were amazing. I treasure them to this day and it provided a lot of inspiration to me.

Professor Le Bot
Professor Le Bot with some of his marine model test equipment.
 

More than a decade had passed when I finally had a good design to share. Alas, Professor Le Bot was elderly by then and the association had become inactive. However, I am fortunate to know another French man who is carrying the torch. He is Jean-Yves, an early-retired marine engineer who is still very active experimenting with pop pops. He is developing apparatus that measures the thrust of various pop pop engine designs, and with that he can calculate total engine efficiency. His English is excellent. Here is a wonderful write-up with pictures of a visit Jean-Yves had with Professor Le Bot. Here is an interesting article he wrote about making a pop pop engine. And here is a really well done article about pop pop engine efficiency.

Jean-Yevs' Links and more

Although it is written in French, I encourage you to check out the this extraordinary web site eclecticspace.net. (Note: Now the site has an English language option)If you type "eclecticspace.net" into Google, it will offer to translate the page, and it will continue to translate the linked pages. There is a section about pop pop boats, and within that, a section by Jean-Yves. It is my understanding that there is a plan to reprint updated parts of the classic journals mentioned above in the eclecticspace pages--something you might encourage him to do.

Here is a link to a clever PowerPoint holiday card which notes a French saying about not making a ship from an iron...then he precedes to do just that.
Here is a link to a Word document with more activities and pictures.

My family had a wonderful visit from Jean-Yves and his wife in the summer of 2006. It was fun to meet after years of e-mailing!

Pop Pop Boat Gallery

What other people around the world are doing (and add yours if you send a picture).

New, A Solar Powered Pop Pop Boat: Georges Quénot!

My first reaction--because there's so much hoax material on Youtube--was that maybe there's a little candle under the boiler, blocked from view. But looking at other videos on his channel it's pretty clear that this French experimenter is the real deal: a dedicated experimenter.
I have to admit I have a tinge of, "I wish I'd thought of that!"

I was made aware of this and so many other interesting things by Mark, who runs the YouTube channel Resonanttheme. Mark makes the most extrordinary little thermo-kinetic machines--mostly "jumpers" and "rockers". So creative and made from inexpensive consumer products that have absolutly nothing to do with engines, and yet they work!

Paul D.

Pop pop engines with with a single pipe offer particular challenges--particularly getting the water in-- but Paul D. has gotten it to work. Paul reports that, "...the boiler was made from two soldered-together jar lids, in which I soldered a single 4mm copper tube.Since the jar lids are quite large, a candle doesn't provide enough heat. So I use alcohol gel to "sail" this pop-pop. I prime the boiler with a syringe.

Robert from Austraria

Almost all putt putt boats have 2 outlet pipes, but Rob of Brisbane Australia found a rare, single pipe design. I wondered if filling the boiler could be a problem, but Rob wrote,

"I fill the boiler by inserting a length of small diameter nylex tubing down inside the outlet tube, and then run water into the metal tube. The inner nylex then acts as an air release bleeder tube and the boiler fills up. The first expulsions of water and steam seem to push out whatever is excess, and the remainder commences to pulse in the usual Put-put manner. "

Rob replaced the missing cabin and repaired the leaky boiler. We would both like to know more about singe-pipe pop pops! Click on the images for larger view.

Gabriel and his daughter from California

Gabriel from California sent me this wonderful picture of his daughter and her science fair project about pop pop boats. Below, in the tub, you can see the simple foam boat. .

Louisa, Evie and Rachel from England

Louisa wrote from England and told me about making putt putt boats with her friends Evie and Rachel. The first engine did not putt, but they were determined to make a working boat. Putt putt boats are challenging and can be frustrating. But for those who are willing work through the problems—and build another if the first doesn’t work—success is sweet. Loisa wrote, "Just 15 minutes ago our boat successfully did 4 laps of my bath before we accidentally blew the candle out with our cheering!"

Young people who do not give up are the ones who make the world a better place. Hats off to these friends who had the grit to rebuild until it worked!

Gina Thompson’s 8th grade classes from California

Sometimes I get so wound up with technical details that I forget to have fun, but Gina Thompson’s 8th grade classes in California obviously had fun. Nearly 70 students designed the boats as well as making the engines. People sometimes have trouble sealing where the straws go through the bottom of the boat and into the water. But here her students show great ingenuity, obviating the need for a perfect seal by engineering catamaran pontoon boats. And with such creativity and class!

Melissa Draper from Utah

Melissa Draper in Utah belongs to a home-school co-op, “just a group of homeschool families who get together so their youth can have some good interaction with others and have a chance to learn something from someone besides mom.” She believes that hands-on learning is important, and acts on it with the group of kids whom she works with.

I usually discourage people from using tea candles—not enough heat—but their boat is obviously running just fine. Melissa even made the hull from some tall aluminum cans her husband emptied, epoxied together; although she allows that cartons are safer for kids. Turns out she is a fiber artist, too.

One of the most fun parts of my website hobby is hearing from people and families who make science projects!

Deanne Bishop and her Students from Nebraska

Deanne Bishop in Nebraska is another great teacher who challenges her high school students to create hands-on projects that harness science. Here her students made a double engine boat that works well. I don't know if it goes faster, but I suspect that it pulls more than a single engine boat would.

Mike Lampert's 9th grade students

Oregon teacher Mike Lampert's 9th grade students make putt putt boats as part of a way to introduce energy concepts in a hands-on way. This student noticed the soot from the candle (caused by incomplete burning when the flame is close) on the bottom of the steam engine and developed an aluminum sleeve. I like this: how some go to the extra work of providing hands-on learning experiences for their students; and students who look beyond what the assignmen requirest. I think this young person has a bright future.

There's more work, more setup, potentially more mess for teachers who expose thier students hands-on projects like this. I hope that students and administrators appreciate the teachers who rise to this challeng rather than just teach to standardized tests.

Geert-Jan and His Son from Netherlands


Geert-Jan in the Netherlands was looking for a cool project to do at his son's birthday party. Soon he was hooked, making amazing variations. "This is worse then smoking I can not stop (don't worry I don't smoke)." I think he was joking; anyhow, we agreed that it's a nice state of mind. Sometimes my thinking goes a bit rigid. I don't like "tea candles" (first picture) because they don't deliver enough heat, but Geert-Jan added another wick. Geert-Jan liked the sound of boats with up to 4 engines. You can see more boats, his rudder system, etc.(and the cool kids events he holds) here or click a picture. I think the boat with the Canadian flag is a shout out to Daryl Foster, whom we all admire.

Frederico Quintiero from Argentina

Speaking of being hooked, Frederico Quintiero of Argentina sent this picture of his experiments. I know just how it is, almost a fever that consumes! Frederico's picture reminds me of when I was in my innovation mode, engines appeared all over the house. The 5 minute epoxy adhesive used for the engines sets faster when it is warm. So I put the engines on top of the warm rice cooker, to my wife's dismay. Ah, good times!

Daniel Meltzer and His Son

Daniel Meltzer of New York City wrote, " My family and I were watching "Ponyo" two nights ago, and marvelling over their candle-powered boat. None of us had ever seen a contraption like this, but we could tell that it was based on something real, not Ponyo's magic. So I googled 'Ponyo's boat'and I found your website." Daniel built it with his 6 year old son and below is the bathtub test.

Diego Torres

Diego Torres in Mexico built this boat with his 8 years old daughter, below. He has uploaded some cool kite videos on his channel, too.

John Carr from UK

Hi, Just emailing to say thanks for the instructions, I made the engine and it worked first time (after I fixed a leak during the pressure test). Great job. Decided to go for a catamaran style as I had some foam board laying around, a bit of hot glue and an elastic band and the boat is up and running. Worked fine with a tea light as well, birthday candle probably had more power but the tealight is less hassle to keep in position.Thanks again,

John Carr
Newcastle UK

Zhiyang TEH

Here's a double engine boat by Zhiyang TEH

Huu Thang from Vietnam

Huu Thang is a 16 year old student inVietnam who started making putt putt boats for school competion. This boat is loud and powerful.

Jill G


Jill G., a home schooler, and son Leo got theirs working on the first try. They wanted to know more about how it works--simultaniously ejecting water while being replenished. I've added so many rambling odds and ends to these pages that navigation is difficult, but I do have a page that attempts to explain a bit about how the cycle works here.

 Amal Abdo, Faris and Basel from Saudi Arabia

Dear Mr. Sharrison,
First of all, thank you for this WONDERFUL website and the very clear presentations and instructions that you provide.
I am from Saudi Arabia and I have two boys: Faris 6 and Basel 3. My son Faris is the little scientist in our family. He loves science and really enjoys making projects himself.
We worked on the pop pop steam boat project for a school presentation that Faris had last school semester. We made two engines and two boats (we had to make one for the 3 year old Basel too!). We started by the foam boat and then made the 3D one. Our boats worked perfectly from the first try and that was VERY exciting to all of us. Most importantly, the kids enjoyed working on this project so much and we enjoyed making it with them too :).
Attached are some pictures and a video of the project.Thanks again!!

Best Regards,
Amal Abdo (Faris and Basel's Mother).

Jimmy Conner

Jimmy Conner has been experimenting with putt putt boats and converted one of his hulls to a functioning sail boat. He's also flying walkalong gliders--a bit hit at school--and modifying the talk box. Jimmy has has some interesting videos on his YouTube channel of train models that are powered by live steam and you can really ride them.

Hieu Tran Trung from Vietnam

Hieu Tran Trung from Vietnam innovated a simple milk box for the hull and a plastic lid for the candle holder.

Troy Black

Here is a well-built boat from Troy Black, who is an avid RC plane builder and sometimes tinkers with RC boats. " This was a nice diversion from the more complex models I usually build and operate and my wife even thought it was "so cute".  She never says that about the model airplanes I build."

And following is a cautionary tale from Troy about a drawback of boating on a large pond. "On the last run of the day, the boiler tubes lost their prime in the middle of the pond.  It was too far out to retrieve it quickly so I was unable to blow out the candle flame.  It continued to heat up, eventually burning the epoxy and setting the cabin on fire.  I think the Krylon paint added to the flammability and it became an inferno for about 5 minutes while slowly drifting to

Alex Haw


Here is a boat made by Alex Haws, themed after Forrest Gump's shrimp boat, with a candle holder variation.

James Hefner from Texas

James Hefner of Texas has been around "live steam" for awhile but liked the idea of making a steam engine with stuff around the home and no soldering. "My son made one for his science project at school. The candle shifted and slightly scorched the roof; but the end result came out fine. He got a 100 for his project, and his was one of three picked to go to a science fair in Dallas.  So, it was a big hit."

Alex from Texas


Here is another Alex, from Texas, who reported that the boat was so loud his mother could heard it from inside. He's been flying the gliders, and his next project is the hot air balloon.

Matt Naiva and his son William

Here's a picture and video sent by Matt Naiva and his son William. Their boat really moves fast!

Adam and his dad from England

Here is a picture that Adam and his dad, from England, made. Notice the tire that's been cut in half and filled with water. Great idea! And is that an air rocket launcher I see in the back?

 Alba and Rocío from Spain

Here is a note and picture of a boat made by some young people in Spain.

Hello. Nice to meet you.
We are two girls, Alba and Rocío, we live in Barcelona (Spain). We are 14 year old and we are studying the put-putt boats for a job in Secondary school.
We liked very much to see your Web. The first thing is to thank you your explication since to do the boat. We have made the boat and enough good works to us. We send a video and photos for you can see it and since it has left to us.

Erin Kermanikian and her son William

Erin Kermanikian and her son William worked on their boat in little bits after school and work, with William doing as much as he could safely. Now they are thinking about making the boat part out of wood.

Dan Everette and Dan Jr

Here is a letter and some pictures from Dan Everette and Dan Jr.


Dear Slater:

We did get the engine properly assembled on the first try and have had several good runs with the "putt putt". After a few good experiments in the bath tub we took it out to a local park and tried it in a pond. I have attached 2 photo's for you to enjoy.

Mark Horovitz

Here is a beautiful coil-type pop pop by Mark Horovitz. You can find Mark's instructions here.

Miguel in Madrid

Here is a tin version of the boat by Miguel in Madrid. He also made a rudder.

M.Lemaitre Michel from Belgium

Here is a YouTube video by M.Lemaitre Michel who is a teacher in Belgium, of a pop pop in a pond. Unfortunately, he reports that boat was lost. However, he said that he has others to replace it!

Illinois kindergarten teacher Gail and her husband

Here is a boat made by Illinois kindergarten teacher Gail and her accountant husband for a 4th of July party.

Derek and son Mikey Cook

Here is a picture as well as a video from dad Derek and son Mikey Cook. The video is mostly slides, but there is some kinetic video at the testing phase.

Tony in Victoria, Australia

Here's another tin hull from Tony in Victoria, Australia. His region is deep in drought--ponds are dried up, even pools can't be filled--so he faced some challenges testing it. Tony told me his 93 year old father in England made some sort of pop pop from lead electrical sheathing. I'm hoping to get some details from him.

Ashton and his dad Grant from England

Below is a boat made in 3 evenings by 11 year old Ashton and his dad Grant, in England. Note the modified hull design, the re-formed paper clip in the back to hold the boiler to the right tilt and the "tea candle" burner.


Clifford and his son

And below is a picture of Clifford and his son's boat with an interesting foam body. Clifford says he plans to experiment with flexible tubes rather than straws.

Alan Raubenheimer of Rose Boats

Here is a picture of a fine boat crafted and sent to me by Mr. Alan Raubenheimer of Rose Boats, PO Box 217, Napier 7270, South Africa.

John Green of Capetown, South Africa

And here is some fine craftsmanship from John Green of Capetown, South Africa. He relates that he nearly bought a Rose boat (above) and now wishes that he had.

How to Make a Putt Putt /Pop Pop Boat

Follow directions exactly when making your first engine!

And don't do anything not in the instructions.  Trust me that there are reasons for all the finicky details. --Slater, the sciencetoymaker

Read "Before You Start Building a Putt Putt Boat" First

If you haven't yet, first watch  how to follow the steps in the instructional videos. (Part 2 at 3:29). 

All instructions are in video form. 

Below are the video links and descriptions to making the kind of toy steam engine boat seen in the movie Ponyo. You can go straight to the instructional video play list, if you want.

Patterns and Material List

Introduction: Putt Putt Boat introduction in two parts

Part 1 Introduction to pop pop (aka putt putt) boats.

Part 1 shows my students testing their boats and gives an overview of the steps involved in making the engine out an aluminum beverage can. I relate where I first encountered pop pops (in South Asia in the 1980's). Then on to a little history: of steam power in general and putt putt boats specifically. Next I show some commercial boats I bought.

Part 2 continues the introduction.

I start off relating my efforts to create an easy enough for my students to make, inexpensive steam engine that used common materials that could be found anywhere. Then I make my plea that people follow the directions carefully for the first engine, then experiment.

Materials and Tools (video Part 3): Materials and Tools for a Putt Putt Boat

Part 3 goes through all the materials you will need.

Here is a complete list of materials and tools.               Materials and Tools

Note that if you would rather use an oil lamp instead of a candle, excellent oil lamp instructions are here.

Build the Boiler

Step 1  (Video Part 4): Cut off Can Top

Part 4 is Step 1 of the actual building instructions. Are you confused enough? Sorry! The steps are small. This Step 1 is just cutting off the top of an aluminum beverage can.

Step 2 (Video Part 5): Cut and Trim Can Middle

Cut and trim the middle part of the can so you have a sheet of aluminum to build the engine with.

Step 3 (Video Part 6): Fold Aluminum Sheet in Half

Fold the aluminum sheet in half, with a thin sliver of the inside of the can showing so it's easier to separate in a later step.

Step 4 (Video Part 7): Scale Check. tape Pattern on

Print out the pattern to actual size (no fitting to page or scaling) and check the scale of the pattern to be sure. Then you tape the pattern onto the aluminum sheet. Save the other boiler pattern and that other weird-looking pattern called the bend pattern.         Boiler and Bend Pattern

Step 5 (Video Part 8): Cut Solid Line, Write Name

Cutout the pattern and aluminum on the solid lines--carefully. Save one of the aluminum strips for a later step. Oops, I noticed that the pattern here doesn't have the writing--that's ok, same pattern.

Step 6 (Video Part 9): Fold Dashed Lines, Sharp Corner

Find a sharp corner, line up the dashed lines with the corner, and make clear fold lines on the dashed lines of the pattern. Your thumbs should be together, and press really hard so you see clear fold lines.

Step 7 (Video Part 10): Fold Edges All the Way, Flatten

Taking all the pattern/tape off and accurately fold the edge flaps the rest of the way over with a credit card or something like it. Then you need to pound it (not rub it) flat. Be careful not to kink it.

Step 8 (Video Part 11): Straw Parts Names, Open, Long end of Straws in

Use a thumbnail to open up the end of the "pocket" a bit, then pinch the end of the long part of a flexible straw and push it in. Then the long part of another straw. Push all the way in, but not so hard them split the other end.

Step 9 (Video Part 12): Small End Straw in, Tape Card

Put one more straw in to form a curved dome top, but this time it's the short end of of a straw. Pinch it and push it in--on the side with the flaps--only to the bendy part. Then put tape donuts on the flat side without the flaps and tape it to a piece of cardboard. Gently push on the edges to make the bottom flat.

Step 10 (Video Part 13): Mix, Apply, Push in Glue

Actually glue the aluminum so it keeps its new shape. You should watch the whole step before starting because you only have 5 minutes once you mix the two parts together (less if it's hot). You should have equal parts and mix thoroughly. Dab it on the silver parts even where the silver disappears, especially the ends. It's really important to push the epoxy in between the folds of aluminum with the strip, for strength and to prevent leaks. GOOD NEWS NOT IN THE VIDEO YET: Sticky epoxy is easy to get off with VINIGAR.

Intake/Exhaust pipe

Step 11 (Video Part 14): Measure, Cut Glue in Straws

Measure 1 1/2" or 39mm from the end of the bendy part of the straws into the small part of the straw. Cut there and apply mixed up, thin, even layer of epoxy to the small part of the straws, but not within 1/4" or 6mm of the bendy part. Put the straws in the end of the aluminum, but only to within 1/4" or 6mm of the bendy part. If a lot of epoxy gets on the bendy part, wipe it off, both above and below.

Step 12 (Video Part 15): Seal Where Straws Go in

Be careful when handling the engine and mixing up a tiny bit more epoxy and using it to seal off the 3 or 4 holes where the straws go into the engine.

Step 13 (Video Part 16): Pressure Test, Seal Leaks

Take a tip from automotive people and use pressurized air into the straws to find leaks (bubbles in the water). Patch with epoxy and don't pressure test again until it is hard. Use hot water if you need to speed up the epoxy

Step 14 (Video Part 17): Make Angle Tool

Make a cardboard angle tool to set the angle between the aluminum boiler and the straws. You saved the pattern that printed out with the boiler pattern way back in part 7, step 4, didn't you?!

Step 15 (Video Part 18): Tape Engine to Angle Tool

Pull the straws longer and tape the angle tool to the boiler and straws. Make sure the folded-over edges are facing outward, not inward against the angle tool.

Step 16 (Video Part 19) : Glue Bendy Straw Part

Use one of the cooler kind of hot glue guns to apply a thin layer of hot glue over the bendy part of the straws, so as stiffen them so they hold the correct angle.

Candles and Candle Holder

Step 17 (Video Part 20): Cut Candles, Make Holder

Cut down thin birthday candles into 4 pieces, then make a candle holder out of aluminum foil. It's important to push the aluminum down to the base of the candle, or the candle will go out before burning most of its wax.

Note that a sharp viewer has created some great instructions for making an oil lamp instead of the candle for heat.

Powered Engine Test

Step 18 (Video Part 21)

You finally get to power test the engine! You don't need a boat to power test the engine. You must prime the straws every time you use the engine. And the first time you use the engine you should slosh some water around inside the engine so the little droplets of water can flash to steam and get your engine going. To start out put the candle flame in the middle between the front and the back of the engine.

Trouble Shooting

Step 19 (Video Part 22) (Skip This Step If Your Engine Works)

Troubleshoot if your engine doesn't work. SKIP THIS SECTION IF YOUR ENGINE WORKS OK. Sometimes you only have to prime the straws with water and try it again and it works. Or maybe you need a more heat if you are using a tea candle (don't use a lighter or you'll ruin the engine). Sometimes there might be a leak even though you already tested it. Still, it's not hard to find it and seal the engine. Sometimes the cause of the trouble remains a mystery and you might just have to make another one (Yep, I know, I thoroughly hate having to do things over too).

Post Test Tips, Boat Decision

Step 20 (Video Part 23)

Some tips when you're finished using the engine, like wiping off the carbon from the candle. Also, using heat to remove what's left of the candle and affix a new one so it doesn't keep falling out. Now is the time to decide which kind of boat to make for your engine. Instructions for the simple foam boat are in Part 24. But the instructions for the 3D milk carton boat are in Part 27, farther below.

Make a Simple Flat Boat

Step 21 (Video Part 24)

Make a simple flat boat out of a foam grocery tray. It's only held on with rubber bands, so you can move the engine to another boat later if you want. Funny, but it seems you actually have to put some weight to give the engine something to push against or the engine doesn't work well.    Foam Pattern

Make the Boat Faster

Step 22 (Video Part 25)

Make the boat go faster by restricting the straws a little at the end, just like real jet engines and rockets. Finally you can tell the control freak (me) to go soak his head, and you can break loose with experiments.

Parting Words

Step 23 (Video Part 26)

Congratulations and some final words. I depend on feedback to make the instructions better. And frankly, when you get the engine working it's encouraging to me to hear that as well.There is a gallery of pictures of people's pop pop boats that you can add your boat to. Also, now that you have made a boat, be aware that there is a Yahoo group of people from all over the world who experiment and talk about pop pop boats. Some people are just interested in engine development, or scaling up engines, others in making a beautiful boat for the engine, others in the history. There are nice people moderating the group, there is an enormous archive of tips and pictures, there is no money involved, and it's easy to join (if an internet dummy like me can do it, anyone can). And, we are mostly older people, but I think I can speak for the group that we would be thrilled to see the work that younger people are pursuing (and you are still welcome if you are a geezer like the rest of us).

Extra: Hull, Deck, Cabin and Rudder

Make a 3D Hull

Part 27 is making a 3D hull from a milk or juice carton.

Most of the video is from a video I made for my students years ago. This hull is made from a 1/2 gallon or 2 liter milk or juice carton. That kind of cardboard is waterproof, east to cut, bend, glue and paint.  Make sure that when you print the pattern you do not have any box checked that "fits to page" or otherwise changes the scale. After it's cut, it's folded and fastened with staples and hot glue.               Hull Pattern

After it's widened you can install the engine. The straws go out a hole in the bottom, so you seal and glue in the engine with hot glue.

If YouTube is blocked at your school, try the SchoolTube equivalents below.

If you want to watch one long video instead of 3 separate parts, you can watch the whole video here.

Video Part 27A

If blocked, try this SchoolTube equivalent of Part 27A

Video Part 27B

If YouTube is blocked, here is SchoolTube equivalent

Video Part 27C

If YouTube is blocked, try this SchoolTube equivalent of Part 27C

Make a Rudder

I got a wonderful tip about making a rudder for the boat from young Australians Elana (12) and Alex (10) who made putt putt boats with their grandad Les. Click here to see the PDF of the drawing of their ingenious rudder system.              Rudder PDF

Make the Deck and Cabin

This too is made from a milk or juice carton. It fits on top of the hull but comes off if you need to get to the engine. The PDF patterns for the deck/cabin assembly are here.  (You don't have to make the smoke stack, but the instructions for that are also here if you want to.)               Deck and Cabin

A hot glue gun puts all the pieces together.

Here are the YouTube video instructions for making the deck and cabin for the 3 dimensional hull.

Here are the SchoolTube videos.
The Deck and Cabin Part 1
The Deck and Cabin Part 2
The Deck and Cabin Part 3

Now that you've made an engine, hull and deck, check out the work of a true craftsman, my friend Daryl from Canada

Before You Start Building a Putt Putt Boat

Before you start building, understand that this is not a slop-it-together project. You have to follow directions exactly, and, from the feedback I get, most people need to build a second one before it works. I like this e-mail from Jordan:

Mr Slater Harrison,

My name is Jordan and I'm from Greece. I'm 14 years old and I must say that I'm not very good at physics! But, I wanted to make something like a wooden construction so I searched on YouTube and I came up with your video about putt-putt boat! I thought that it was exactly what I wanted to do! Then, I saw all the videos of this boat. It looked so simple but when I started  I realized that it wasn't! My first try was a failure... well, I think it was a disaster because in the end my desk was full of epoxy!! My second try was a success! (I have one photo attached) When I saw it working I was very proud of my self!!

I must say that your site is fantastic and I'm planning to build a plane next time! (I hope that I won't break anything!) ( I will inform you!)

Yours sincerely,
Jordan

Jordan has just the right attitude: keep trying!

And for those who want to take up the challenge of building your own Putt Putt Boat, here are the instructions.

Putt Putt (Pop Pop) Boat Home

Putt Putt Boat Index

Introduction

The first time I saw a putt putt (aka pop pop, Ponyo) boat I couldn't believe my eyes! I must have gotten every science toy known to mankind when I was a kid: rockets, airplanes, slinkys, the bird that dunks its head in water, the junior chemistry set that I almost burned down the house with...I could name dozens. But it wasn't until I was an adult that I encountered a putt putt steam boat. It was chugging away in an outdoor market in Bangladesh-- in Southern Asia-- one of the poorest countries in the world. Made mostly from a recycled milk tin, it sounded like a tugboat and it really zipped fast--all powered by a little vegetable oil lamp. How could such a cool thing have existed without my knowing about it? ...Read More>>

Pop Pop Boat Gallery

You can see other people’s projects (and add yours if you send a picture) from around the world in the Pop Pop Gallery.

Before You Start

Photo by Jordan

Before you start building, understand that this is not a slop-it-together project.

Hull, Deck, Cabin and Rudder

You can make the body of the boat with a recycled, cut-up milk or juice carton.

Patents

Another kindred spirit looked up putt putt boat patents and scanned them into PDF files.

Giant Putt Putt Boat

Have you thought about making a giant pop pop boat? You’re not alone–and I mean that in a good way.


I'd like to know how this project goes for you. I'm happy to answer questions about it. Feedback from you is an important way for me to know what works and what needs clarification.

Robot Voice Ten Cent Talk Box


Important Update

I got a really interesting comment on the YouTube Talk Box instructional video from Tony Carl.

"I found that wrapping a garbage bag wire tie around the base of the reed makes it easier to adjust the reed opening. Just lightly squeeze the wire at the top and bottom close the opening a little or at the sides to open a little. A piece of tape wrapped around the wire to keep the ends of the wire from puncturing the balloon :)"

Tony based this innovation on the construction of crumhorn and bassoon reeds.
I found the twisty technique to be very helpful and I think it will help other people having trouble adjusting the reeds. Even sliding the wire a little forward or backward on the straw had an adjusting effect. If I squeeze it too hard shut, I can also push a pencil in to open it a little (in addition to squeezing the sides, as Tony recommends).


Part 1

Aside from the fun of speaking in a robot voice--and other cool harmonic sound effects--the 10 Cent Talk Box lets you step back and observe the amazing process of how our vocal tracts sculpt raw sound into speech. Musicians like Peter Frampton have been using talk boxes for decades to sing with an unworldly voices. When I heard a talk box the first time I thought that singer's voice was being run through a synthesizer and electronically modified. But it's a surprisingly simple accoustic trick. Set a column of air vibrating with the sound of an instrument. Channel said vibrations into the musician's mouth with a tube instead of using the musician's vocal folds. You can even form vowels outside your mouth with an artificial vocal tract (a plastic soda bottle). If YouTube is blocked at your school, try this SchoolTube equivalent.


Part 2

As with so many things, it's the details that make or break projects. Getting the "reeds" of the straw to vibrate can be maddening at first.

Part 2 shows some tips that I've found helpful. But there's no substitute for just trying different things and cultivating a feel for what works. Here is the SchoolTube equivalent.


Whether you do this project as an individual, family, school/scout/church group--whatever--please make a video of building/using your talk box. I will put links in the Talk Box Gallery. Here is my contact Information.

No one person has all the good ideas. Everyone brings a fresh perspective, and the straw Talk Box project is new--just waiting for people to discover cool new directions to go with it. Make a YouTube video response (not difficult). I can also put innovation links in the Talk Box Gallery.

Human-Powered Dragonfly Helicopters Home

If YouTube is blocked at your school, try this MPG file (18MB)

Dragonfly Helicopters Are a Great Beginning Flight Project!

There is something empowering about making the propeller from a trashed 2-liter drink bottle; and wind up with a propeller that's superior to commercial propellers. Your flying machine will go higher than the tallest trees with no batteries (assuming you wind it). Unlike model airplanes, which can be plagued by stability problems from a slightly warped or crooked wing, helicopters always fly true. Nobody is excluded. Windup helicopters are so inexpensive that whole classes of students can make them for much less than a dollar for each project.

Q&A

Below are some questions and answers. When there are numbers, they refer to where in the video (minutes and seconds into the video) to see what the text is describing.
If you have other questions about Dragonfly Helicopters, contact me or leave a message in the comment section at the bottom of this page, and I’ll answer them.

Q. Where are the instructions for building the helicopter?
A. Click here. This is called the Eco-Empirical (Eco-E for short) design because it's made largely of recycled stuff and it's really good for experimenting with. That distinguishes it from a simpler design...

Q. Is there a simpler, faster, easier design for younger kids?
A. Yes, it's called the Easy Dragonfly Helicopter.

Q. Do we buy the Dragonfly Helicopter or make it?
A. Yes…er, both. You can make either design from a kit or buy them completely ready-to-fly (well, you still have to wind them).

Q. What if I don't want to make them from a kit?
A. At the end of the Eco-Empirical instructions there are some tips for making a propeller from stuff around the house. So, you use a steel paper clip instead of the aluminum wire that would be in the kit. It would not be variable-pitch (change the propeller angle) the way the kit is. So far, still ok. But, the kits also supply rubber that is specifically made for model airplanes and there is absolutely no comparison between that and regular office or school rubber bands. I'm not saying model rubber is a little better; I'm saying--based on lots of trials--that it's an order of magnitude better. Why spend time making a very high-quality flying machine and then power it with a low-quality rubber motor? Fortunately, you can buy small amounts of rubber.

Q. How high to the helicopters go?
A. If you wind them up enough, Human Powered Dragonfly Helicopters will go way higher than tall trees. The heavier kind made with commercial propellers do not go as high, but will still go as high as a big house or hit the ceiling of a gym, auditorium or flight hanger.

Of course, how high the copters go depend on how much you wind them up(1:13). It takes beginners some time to understand that they can wind up at least 160 turns in warm weather. But rubber loses some of its stretch when it's cold, so do not wind up as much in cold weather.

When you are ready to go beyond basic flying, there are other strategies for going even higher. You can make the rubber bands longer. I don't do that with beginners because there is more winding to do before it flies at all. But when you wind it a lot, you get more power. Experts make the rubber loop long so it's very loose. They also wind it up with a special winding device which saves time. And they stretch it as they start winding, slowly un-stretching as they wind. Serious pilots add lubrication (not oil-based) to the rubber and use geared winders so you can wind it up more. Green soap and glycerin was the traditional way; now silicone based lubricants are used also.

Q. Can you really send gliders up with the helicopters?
A. Yes, you can make a very simple paper glider that you wedge under the rubber band. As the rubber band unwinds, it pushes out the gliders. You can see how to make the gliders here and I am making a web page dedicated to making releases more consistent as people like you experiment and find eve better ways to do it.

Q. Why did you make the helicopter look like a dragonfly?
A. I didn’t—at least not intentionally. I set about to make the most efficient, highest-flying helicopter. The wings serve two purposes: to always make it go up, and to keep the body (fuselage) from spinning too much so the propeller can spin more. I discovered that long, thin wings attached near the top worked best…and—hey—it looks so much like a dragonfly!

Q. Do the rubber bands break?(1:13)
A. It is quite rare for Tan Super Sport rubber to break. In fact, most people never wind them anywhere close to their capacity. However, we send extra rubber bands with our Dragonflies just in case. You can also buy enough rubber for 6 helicopters inexpensively because we can send it in an envelope.

Q. Can you make the Dragonfly autogyro down?
A.  Yes, by twisting the wings—left up, right down as the wing ends face you—then the whole Dragonfly will turn like a helicopter once it has reached its peak and starts down(2:32). It’s pretty amazing, when launching with no wind, that even when the copter goes really high, it will land very close to where you launched. However, if there is even the gentlest breeze, it will land far away.

Q. Can you change the flight characteristics of the Dragonfly?
A. Yes. Usually the Dragonfly heads straight up. But I’ve found that as I tape the wings closer to the propeller and give the wings less dihedral (dihedral is the curve of the wings), then the flight of the Dragonfly becomes more erratic. And that can be cool because it reminds me of the way real dragonflies zigzag so abruptly!(2:55)

Q. How strong are Human Powered Dragonfly Helicopters?
A. The helicopters can bash into a ceiling with no harm. If someone can hold a paper airplane without smashing it up, then they should be able to handle a Dragonfly. The weakest part of Dragonflies is the wing. It is made of lightweight foam. If you pull it out of a bush or tree, the foam might break. But no worries, just tape it and it’s good as new.(3:06)

Q. Can you change the pitch of the propeller?
A. The pitch is set to be ideal. However, if you want to experiment, you can change it by pinching the glue joints (where the shaft glues to the prop spar, an where the prop spar glues to the blade) so they don’t break. So when you twist, it only twists the propeller spar, which is the stick part of a cotton swab stick(3:11). If you bend it enough, it will not spring all the way back to its original angle.  Obviously, if you do this too much or if you don’t stabilize the glue joints enough, something will break. But it is interesting to see how a more aggressive pitch makes the copter go higher—to a point. Then it stalls and is useless. DO NOT TRY THIS TWISTING IN COLD WEATHER!! I just discovered this the hard way. Only do this when it's warm.


Build an Overhead Water Rocket Launcher

This is the version with the trigger mechanism. There is a simpler version here.

Sorry, no text instructions yet, only video instructions for now.

The updated directions are in instructional video form. You can see the whole video here . Alternately, you can watch one step at a time below.

Part 1: Introduction and Overview

This video lets you know what you're getting into if you want to make the overhead water rocket launcher featured on Ask This Old House during their special kids program. It uses inexpensive, readily available materials. It peeks at how the launcher works: the bump that seals the water and air pressure in the bottle, the zip-tie assembly that holds it on, and the spring that helps prevent accidental launches. And part 1 asserts that shooting a water rocket is analogous to driving a car--potentially dangerous, but safe if done with care.

Part 2: Materials and Tools.

For printer friendly supply list, click here. You can get the things you need at a building center, plus one thing at an auto parts store. The overhead water rocket launcher uses less than $10 US of actual material.

Substitutes for the 2" of 1 1/2" pipe

Observant correspondent Andrew Baillie of Atlanta discovered that you can substitute a 1 1/4" slip joint for the 2" of 1 1/2" pipe. Also you can make one from scratch. Read More>>

Part 3: Pipe and Valve

Install the Valve, Cut and Glue Pipe. You hook a bicycle pump to the launcher to pressurize the bottle. You drill a hole and install a common car tire valve. Then you can glue the plastic pipe together, which stinks (do it outside) but is not hard to do. You glue the pipe first so it will be strong by the time you are done with the rest of the launcher.

Part 4: Seal on a Bump.

I worked in Bangladesh in South Asia for an organization that promoted inexpensive water wells and hand pumps. It was there that I learned how to heat and form PVC plastic pipe. With only a candle you can create a little bump on on the small pipe that will seal in air and water while you pressurize the rocket. It's easier to make than a seal with O rings and more durable, too.

Part 5: Make the Trigger Mechanism.

An Australian water rocket enthusiast named Ian Clark came up with a simple, effective trigger mechanism that uses ordinary plastic ties (zip-ties).

Part 6: Make a Safety Spring.

A British Astronomer who--naturally--also tinkers with water rockets (sending up mini video cameras) devised a simple spring that helps prevent accidental launches. Fittingly, it's made from a 2 liter bottle

Part 7: Launch Tips

Here are launching tips like how much water and how much pressure to put in, and tipping water out of the launcher after each use. And how to modify a bottle to launch water balloons. In addition to the video version, below you can find more tips and answers, including some you won't find on the video.

Printer friendly version of the launch tips.

If the air pump locks up it's because too much water got into the launching tube and the check valve on your pump is not working. Then water leaked into the pump. The check valve is a one-way valve that is supposed to let air go out of the pump, but not go into the pump. It's on all air pumps, near where the hose goes into the pump, but it is usually not accessible for repair. You'll have to unhook the pump from the launcher and pump out the water. To prevent it from happening--short of getting a new pump--is to pump fast so there is little back flow and...

Tip out the water in the launcher after each use

If there is a leak as you pressurize the bottle you can readjust the zip ties for a better fit. If it's a hot day and you don't mind getting sprayed a little, you don't have to fix a small leak.

To adjust the launcher, loosen the hose clamp so you can slide the taped-together zip ties. You might want to mark on the pipe so you know how much you are moving them. Move them just 1/16" or so at a time, toward the bottom of the launcher to tighten the fit. If you move them too much you won't be able to get the bottle hooked on.

Very rarely, if the bottle has landed on hard pavement, the neck of the spout can crack, causing a leak.

How much water depends on what you want. You don't have to put any water in the bottle, which might be good on a cold day when you don't want to get wet. It makes a satisfying sonic boom when launched without water. Note, however that the trigger mechanism has to be well adjusted (see above) because air volume leaks out much faster than water.

If you want to get wet, you can fill the bottle up to half full with water. However, if you fill it much more than that it can be dangerous. Too much water displaces the compressed air, which is your stored energy source once the bottle is in the air. And the bottle is heavier, too, so a bottle with too much water might fall on someone before having ejected all its water.

When launching water balloons (see below) I find that a bottle 1/3 full of water works well.

How much pressure do you need in the bottle? Depending on how hard you have the bottle jammed onto the bump, you will likely need 30 or 40 psi of pressure just to get the bottle off of the launcher. And you need that much pressure to eject all the water before the bottle lands. Young kids will need some help getting the pressure high enough.

So how much pressure is too much? I talked to a bottle manufacturer who said they can guarantee the bottle will not burst up to 100 psi, but that is a new bottle, unscratched and not crushed, not left in the sun for weeks, etc. Although you can see bottles bursting at 168 psi, I stick to 70 psi maximum. If you are going to go higher, use a different kind of launcher where you are not so close to the bottle, and wear earplugs!

If your pump does not have a pressure gauge, you can unhook the air-pump use a cheap tire gauge from an auto parts store to check the pressure. With a typical bicycle tire pump, it gets pretty hard to pump after 70 psi.

If the bottle gets stuck on the launcher it could be that you need more pressure in the bottle (see how much pressure, above). Once, a bottle got stuck because the water inside was sandy. The sand lodged in between the bottle and the pipe, so even with a lot of pressure it would not launch. I was able to push off the bottle with my hand, still pointing up, of course. You can also disarm the rocket of its energy by unhooking the pump and pushing the inside core of the tire valve, which will let the air out.

What about fins on the water rocket? When we taped the Ask This Old House segment about water rockets, I was the overhead launcher construction expert. But the show’s producer, Chris Wolf, was the water rocket expert. He made some cool rockets with nose cones and fins, and they soared really high, much higher than the plain old bottles that I launch. Bottles tend to tumble around in the air, creating a huge amount of drag, so they don’t go as high. Fins keep the low profile of the nose pointing up, so the rocket goes higher.

But we found that the upside of adding fins to rockets is the downside as well. Unlike a tumbling bottle, they speed down hard and fast enough to possibly lacerate a scalp or break a windshield.

There're ideas on the internet for parachutes and other recovery devices to slow the descent of the rocket, but they're much harder to get to work than anyone thinks heading into it. So if you launch finned rockets, do it in a wide open space with no kids or cars nearby.

Launching water balloons Water balloons launched from water rockets go as high as finned rockets. Although the dense balloon would sting if it landed on you, it's unlikely that you would need stitches. I have heard of people launching tennis balls, too. The simple modification for the bottle to launch balloons is shown near the end of the video instructions. Of course you still have to launch water balloons in wide open spaces sans young kids. And it goes without saying that launching hard objects like stones could cause severe injury--or even kill someone. See Safety FAQs>>