The Robot Hand

Make a hand with fingers that work like real fingers.

Who knows where working modle hands might end up? Tony Byron is one of the most gifted teachers I know. The projects on his YouTube channel are eclectic and creative–including his GIANT HAND(below), among other cool parts of a set. At 1:50 it completely engulfs a kid!

Pull the tendons (strings) and they flex the fingers--just like on a real hand.

You can make this robot hand point, grab, and make the peace sign. It's so real in its finger movements that it's almost creepy. Indeed, I get requests to borrow it around halloween. But this project had a pretty serious origin.

I could not lift a finger. I couldn't wiggle my toes. In three days I had gone from perfect health to being paralyzed below my neck. I had been stricken with Guillain-Barre Syndrome, a neurological condition.

I missed my hands the most. I know there's an expression about being so familiar with something that I "know it like the back of my hand." But I discovered that for all I depended of them, I didn't understand my hands at all. It wasn't until I lost the use of them that I began to contemplate and appreciate them.

How can it be that we can grab onto a bar and suspend all of our weight with the same fingers that can type on a keyboard or speak with sign language?

Strings! Those big, strong muscles for our fingers are actually out of the way in our forearms.*  They transmit power to the slender bones in our fingers with strings. What ingenious design!

The robot hand we will make doesn't just look kind of real, it works real, the way our real hands work.

I recovered most of my movement over a period of about three years. And as you can see from this site, I love to use my hands to make things more than ever. This science project, though very simplified, is a way to understanding how real hands work and appreciating them without going through some ordeal. It's my tribute to the great mystery of our existence.

* The strings in our body which connect muscle to bones are called "tendons."


I'd like to know how this project goes for you. I'm happy to answer questions about it. Feedback from you is an important way for me to know what works and what needs clarification.

Putt Putt (Pop Pop) Boat Home

Putt Putt Boat Index

Introduction

The first time I saw a putt putt (aka pop pop, Ponyo) boat I couldn't believe my eyes! I must have gotten every science toy known to mankind when I was a kid: rockets, airplanes, slinkys, the bird that dunks its head in water, the junior chemistry set that I almost burned down the house with...I could name dozens. But it wasn't until I was an adult that I encountered a putt putt steam boat. It was chugging away in an outdoor market in Bangladesh-- in Southern Asia-- one of the poorest countries in the world. Made mostly from a recycled milk tin, it sounded like a tugboat and it really zipped fast--all powered by a little vegetable oil lamp. How could such a cool thing have existed without my knowing about it? ...Read More>>

Pop Pop Boat Gallery

You can see other people’s projects (and add yours if you send a picture) from around the world in the Pop Pop Gallery.

Before You Start

Photo by Jordan

Before you start building, understand that this is not a slop-it-together project.

Hull, Deck, Cabin and Rudder

You can make the body of the boat with a recycled, cut-up milk or juice carton.

Patents

Another kindred spirit looked up putt putt boat patents and scanned them into PDF files.

Giant Putt Putt Boat

Have you thought about making a giant pop pop boat? You’re not alone–and I mean that in a good way.


I'd like to know how this project goes for you. I'm happy to answer questions about it. Feedback from you is an important way for me to know what works and what needs clarification.

The Scribbling Top

The classic folk toy gets easier.

Here is a paradox: Tops are ancient. Clay tops have been found in archeological digs dating back over 5000 years. The Iliad, by the ancient Greek Homer, contains a reference to tops. So does The Republic, by fellow Greek, Plato. More "recently", Shakespeare referred to tops many times in his works.

Yet, tops are so cutting edge. The key to the balancing Segway scooter is the gyroscope. A gyroscope is a top with a frame and a motor to keep it going. Gyroscopes make aviation guidance systems like auto-pilot work. Finally, the physics of tops remain a mystery even to most people who understand most other basic physics concepts. Precession--the scientific term for the force that keeps the top up-- is one the most counterintuitive concepts in science.

The Propeller Stick

A classic folk /science toy gets easy to make

I don't care if my ancestors were playing with this folk toy a century ago. It is as magical today. And it will be just as fascinating to future generations even if we harness nuclear fusion for power and interplanetary travel becomes routine. That's what "classic" means: timeless, immortal.

If you haven't crossed paths with a magic propeller stick (also known as a whimmy-doodle in Appalachia), you're in for a treat. You hold the stick in one hand and rub bumps on it with another. Mysteriously, the propeller spins fast... really fast. Some people can make it reverse direction at will.

There is some cool science going on here. In the "more about" page I will make the case that this propeller is closely related to such seemingly disparate subjects as hula-hoops and modern industrial fasteners. This project lends itself to endless experimentation. Change the propeller shape? Sure! Make multiple propeller heads like a mythological Hydra? Go ahead and try it. I have a lot of fun when I make this project with groups of kids, seeing the creative variations they come up with.

Traditionally, people have whittled notches into a wooden stick with a pocket knife to create the bumps-- not a very safe elementary project. I offer this easy-to-make version that uses a coat hanger or other wire with a couple of wavy bends instead of the whittled notches.


Feedback


Bob William in the U.K. volunteers at a kid's club, bringing lots of hands-on science activities and projects. Bob came up with a clever bending jig to make the propeller stick available for 30 kids. Bob used 2.5mm copper cut to 25cm (10 inches). Copper could be expensive, but he had it leftover from an old job.

An 8 year old helper stripped off some of the insulation and the kids--at least 7 years old--used the bending jig themselves. If someone was unsure or having difficulties, 10 year old helpers assisted them.

Bob has made air and water rockets as well as rubber band-powered planes with various groups. I had to laugh when he wrote, "I have another meeting on Wednesday for mixed ages from toddlers up so I'll present the popular "moose call" activity. Thanks for that, although some parents may express other sentiments when the kids get home."

Michael Deal, a retired Physics teacher and model airplane enthusiast, also in the U.K., has been coaching me about amazing projects like camphor boats, rattlebacks (he made one out of a spoon) and magnet toys--often things that spin mysteriously. I hope share them on this website when when I get caught up. And this is the most creative propeller stick that I've ever seen! He makes them as Christmas presents, calling them "Sopwith Crocodiles". The Snoopy figures are so intricate that I thought they must be bought, but a close look at the farthest reveals that it's a prototype. When I asked about it, Michael said one trick is to add the oven-hardening mouldable plastic in stages--heating multiple times in the oven is not a problem. He used internal wire, especially for Woodstock (which represents the "Spirit of Ecstasy" mascot on Rolls Royce cars. Snoopy is giving the thumbs up to the ground crew (you) to start the engine.

Robot Voice Ten Cent Talk Box


Important Update

I got a really interesting comment on the YouTube Talk Box instructional video from Tony Carl.

"I found that wrapping a garbage bag wire tie around the base of the reed makes it easier to adjust the reed opening. Just lightly squeeze the wire at the top and bottom close the opening a little or at the sides to open a little. A piece of tape wrapped around the wire to keep the ends of the wire from puncturing the balloon :)"

Tony based this innovation on the construction of crumhorn and bassoon reeds.
I found the twisty technique to be very helpful and I think it will help other people having trouble adjusting the reeds. Even sliding the wire a little forward or backward on the straw had an adjusting effect. If I squeeze it too hard shut, I can also push a pencil in to open it a little (in addition to squeezing the sides, as Tony recommends).


Part 1

Aside from the fun of speaking in a robot voice--and other cool harmonic sound effects--the 10 Cent Talk Box lets you step back and observe the amazing process of how our vocal tracts sculpt raw sound into speech. Musicians like Peter Frampton have been using talk boxes for decades to sing with an unworldly voices. When I heard a talk box the first time I thought that singer's voice was being run through a synthesizer and electronically modified. But it's a surprisingly simple accoustic trick. Set a column of air vibrating with the sound of an instrument. Channel said vibrations into the musician's mouth with a tube instead of using the musician's vocal folds. You can even form vowels outside your mouth with an artificial vocal tract (a plastic soda bottle). If YouTube is blocked at your school, try this SchoolTube equivalent.


Part 2

As with so many things, it's the details that make or break projects. Getting the "reeds" of the straw to vibrate can be maddening at first.

Part 2 shows some tips that I've found helpful. But there's no substitute for just trying different things and cultivating a feel for what works. Here is the SchoolTube equivalent.


Whether you do this project as an individual, family, school/scout/church group--whatever--please make a video of building/using your talk box. I will put links in the Talk Box Gallery. Here is my contact Information.

No one person has all the good ideas. Everyone brings a fresh perspective, and the straw Talk Box project is new--just waiting for people to discover cool new directions to go with it. Make a YouTube video response (not difficult). I can also put innovation links in the Talk Box Gallery.

Vortex

The Design That's Not a Flop

There are lots of web pages that show you how to connect two soda bottles together to make a vortex. Mind you, it's a great idea. I've been mesmerized for hours watching the wavy sides of the vortex and seeing bits of ribbon accelerate into the the center of the whirlpool. But the designs I've seen all flop around and leak. Duct tape might be "handyman's secret weapon," but wrapping endless amounts around two bottle necks is not going to fix those two problems. A couple of pennies worth of plastic pipe and food-wrap will do the trick-- here's how.

Human-Powered Dragonfly Helicopters Home

If YouTube is blocked at your school, try this MPG file (18MB)

Dragonfly Helicopters Are a Great Beginning Flight Project!

There is something empowering about making the propeller from a trashed 2-liter drink bottle; and wind up with a propeller that's superior to commercial propellers. Your flying machine will go higher than the tallest trees with no batteries (assuming you wind it). Unlike model airplanes, which can be plagued by stability problems from a slightly warped or crooked wing, helicopters always fly true. Nobody is excluded. Windup helicopters are so inexpensive that whole classes of students can make them for much less than a dollar for each project.

Q&A

Below are some questions and answers. When there are numbers, they refer to where in the video (minutes and seconds into the video) to see what the text is describing.
If you have other questions about Dragonfly Helicopters, contact me or leave a message in the comment section at the bottom of this page, and I’ll answer them.

Q. Where are the instructions for building the helicopter?
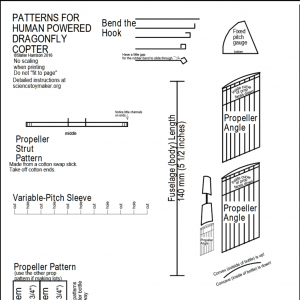
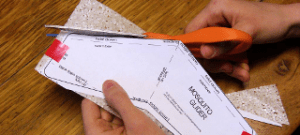
A. Click here. This is called the Eco-Empirical (Eco-E for short) design because it's made largely of recycled stuff and it's really good for experimenting with. That distinguishes it from a simpler design...

Q. Is there a simpler, faster, easier design for younger kids?
A. Yes, it's called the Easy Dragonfly Helicopter.

Q. Do we buy the Dragonfly Helicopter or make it?
A. Yes…er, both. You can make either design from a kit or buy them completely ready-to-fly (well, you still have to wind them).

Q. What if I don't want to make them from a kit?
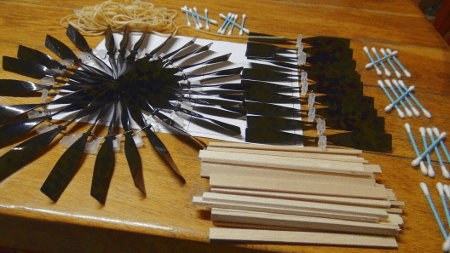
A. At the end of the Eco-Empirical instructions there are some tips for making a propeller from stuff around the house. So, you use a steel paper clip instead of the aluminum wire that would be in the kit. It would not be variable-pitch (change the propeller angle) the way the kit is. So far, still ok. But, the kits also supply rubber that is specifically made for model airplanes and there is absolutely no comparison between that and regular office or school rubber bands. I'm not saying model rubber is a little better; I'm saying--based on lots of trials--that it's an order of magnitude better. Why spend time making a very high-quality flying machine and then power it with a low-quality rubber motor? Fortunately, you can buy small amounts of rubber.

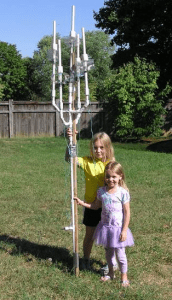
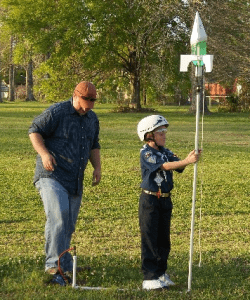
Q. How high to the helicopters go?
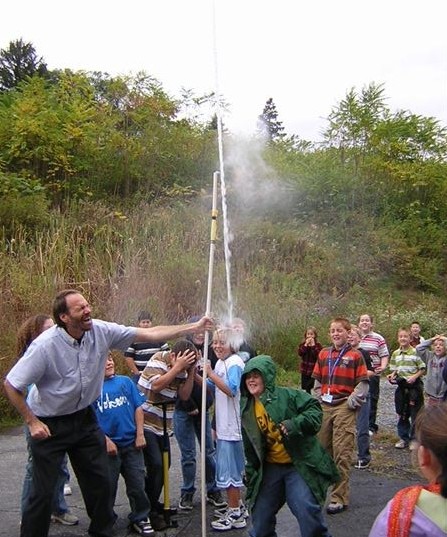
A. If you wind them up enough, Human Powered Dragonfly Helicopters will go way higher than tall trees. The heavier kind made with commercial propellers do not go as high, but will still go as high as a big house or hit the ceiling of a gym, auditorium or flight hanger.

Of course, how high the copters go depend on how much you wind them up(1:13). It takes beginners some time to understand that they can wind up at least 160 turns in warm weather. But rubber loses some of its stretch when it's cold, so do not wind up as much in cold weather.

When you are ready to go beyond basic flying, there are other strategies for going even higher. You can make the rubber bands longer. I don't do that with beginners because there is more winding to do before it flies at all. But when you wind it a lot, you get more power. Experts make the rubber loop long so it's very loose. They also wind it up with a special winding device which saves time. And they stretch it as they start winding, slowly un-stretching as they wind. Serious pilots add lubrication (not oil-based) to the rubber and use geared winders so you can wind it up more. Green soap and glycerin was the traditional way; now silicone based lubricants are used also.

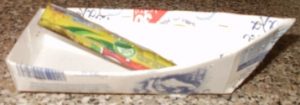
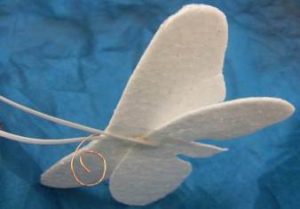
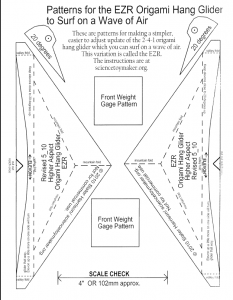
Q. Can you really send gliders up with the helicopters?
A. Yes, you can make a very simple paper glider that you wedge under the rubber band. As the rubber band unwinds, it pushes out the gliders. You can see how to make the gliders here and I am making a web page dedicated to making releases more consistent as people like you experiment and find eve better ways to do it.

Q. Why did you make the helicopter look like a dragonfly?
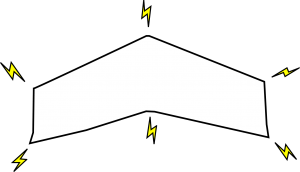
A. I didn’t—at least not intentionally. I set about to make the most efficient, highest-flying helicopter. The wings serve two purposes: to always make it go up, and to keep the body (fuselage) from spinning too much so the propeller can spin more. I discovered that long, thin wings attached near the top worked best…and—hey—it looks so much like a dragonfly!

Q. Do the rubber bands break?(1:13)
A. It is quite rare for Tan Super Sport rubber to break. In fact, most people never wind them anywhere close to their capacity. However, we send extra rubber bands with our Dragonflies just in case. You can also buy enough rubber for 6 helicopters inexpensively because we can send it in an envelope.

Q. Can you make the Dragonfly autogyro down?
A.  Yes, by twisting the wings—left up, right down as the wing ends face you—then the whole Dragonfly will turn like a helicopter once it has reached its peak and starts down(2:32). It’s pretty amazing, when launching with no wind, that even when the copter goes really high, it will land very close to where you launched. However, if there is even the gentlest breeze, it will land far away.

Q. Can you change the flight characteristics of the Dragonfly?
A. Yes. Usually the Dragonfly heads straight up. But I’ve found that as I tape the wings closer to the propeller and give the wings less dihedral (dihedral is the curve of the wings), then the flight of the Dragonfly becomes more erratic. And that can be cool because it reminds me of the way real dragonflies zigzag so abruptly!(2:55)

Q. How strong are Human Powered Dragonfly Helicopters?
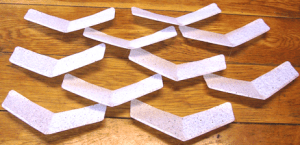
A. The helicopters can bash into a ceiling with no harm. If someone can hold a paper airplane without smashing it up, then they should be able to handle a Dragonfly. The weakest part of Dragonflies is the wing. It is made of lightweight foam. If you pull it out of a bush or tree, the foam might break. But no worries, just tape it and it’s good as new.(3:06)

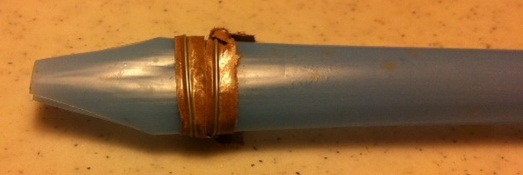
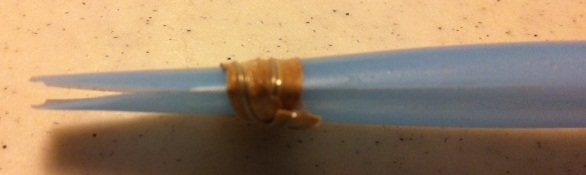
Q. Can you change the pitch of the propeller?
A. The pitch is set to be ideal. However, if you want to experiment, you can change it by pinching the glue joints (where the shaft glues to the prop spar, an where the prop spar glues to the blade) so they don’t break. So when you twist, it only twists the propeller spar, which is the stick part of a cotton swab stick(3:11). If you bend it enough, it will not spring all the way back to its original angle.  Obviously, if you do this too much or if you don’t stabilize the glue joints enough, something will break. But it is interesting to see how a more aggressive pitch makes the copter go higher—to a point. Then it stalls and is useless. DO NOT TRY THIS TWISTING IN COLD WEATHER!! I just discovered this the hard way. Only do this when it's warm.


Overhead Water Rocket Launcher Home

Introduction

2-liter soda bottles turned water rockets are as shrieking good a time as a water park and a lot easier to build. They streak into the air faster than the eye can track while dousing everyone in the launch area with water. Occasionally, my middle school students host and teach classes of elementary school kids from across the street to make a take-home science project, and we always finish off with a couple of launches. Years later, when I teach those now-middle school kids, they never remember me, but invariably remember the water rockets! I have been searching for the "perfect" water rocket for two decades. I finally have a design that I'm happy with: it's easy to make with locally available materials, dirt cheap, and it launches safely overhead. Of course, 2-liter bottles are free, and the launcher is virtually indestructible--no "O" rings or anything to wear out. A bicycle air pump provides the air pressure. I am confident that a normally handy person can make this project in an hour or two. I have created step by step instructions for making a water rocket launcher. It's free--I do ask that you give me feedback  about things like clarity of the directions and I ask that people outside North America inform me about the availability of the pipe sizes in their respective countries using metric measurement. It is a great joy when experimenters share design innovations and improvements that I can in turn share with everyone through this site. Feel free to link to sciencetoymaker.org or any page of it so others can access the material directly (there are many other science projects)

Simple Water Rocket


Here is an alternate, simpler water rocket launcher design that's easier to build and gives kids a tactile understanding of "pressure".

Great Water Rocket Links

See the links to the best water rocket web sites I've found--including slow-motion launches, aerial photography and multi-stage rockets

I'd like to know how this project goes for you. I'm happy to answer questions about it. Feedback from you is an important way for me to know what works and what needs clarification.

Make a Hot Air Balloon ( aka Sky Lantern)

For years I'd heard that you could make a hot air balloon from a garbage bag. When I finally tried it, I found that - as with so much of life - the "devil's in the details." Here's what I learned, in the form of the embedded instructional videos below, with the help of some of my students.

REALLY USEFUL UPDATES

By far the biggest problem with this project is finding bags that are thin enough. Most garbage bags sold through retail are much too thick and heavy. However, some people have sent in some solutions.

From California Science Teacher Susan Rideout: "I have a tip - I used the garbage bags you recommended, and was not able to get it to launch until I cut the straws lengthwise in half (except at the join where they overlapped to connect). This removed just enough weight that with 5 candles I launched quite well. Just passing it along for future experimenters!"

I would add to Susan's suggestion that you can use 3mm or 1/8" square balsa sticks--or even thinner if you are really careful--instead of straws. Balsa might be harder to find, but it weighs significantly less than straws.

Steve Mazzanti, a Technology Instructor in Athens, Texas has used bags from the dry cleaners, which I mentioned in the videos. But the bags have a pesky hole at the top where the hanger goes through. I've been taping the the top, but Steve welds the plastic together with a clothes iron, first putting paper under and over so it doesn't stick. That sounds like an easier and better way. He even welds bags together end to end!

Richard Brown, a math/science teacher at Watertown High School in Connecticut, informed me of a widely distributed bag that worked for him. Look for Ruffies 8 gallon Color Scents (they smell like vanilla) at home improvement stores or Amazon (at least in North America--people from other continents please let us know where you've found thin bags). If you Google it you can see what retail outlets sell them near you. At 8.9 microns (or 0.35 mil) the bags are half again as thick as the thin bags I use, but Rich got them to fly (you might have to use a fifth candle).

Finally, I knew there must be a better way to attach the candles than the way described in the video. Somebody (I can't find the e-mail) suggested hot glue, which works well for me. And when I put them all together, in a line, it's much easier to light the candles. John Mason made the balloons in the UK with his Scouts and discovered that tiny pieces of double-sided tape work best for him to hold candles. And he will fold up the sides of the foil so that it does not drip wax.

Part 1 : Introduction

This video covers history of hot air balloons in Asia and France, modern day ballooning, and some basic terms.

Part 2 : How It Flies

This video presents some amazing facts that allow hot air balloons to fly, woven into cool videos of people-carrying balloons preparing for take off.

Part 3 : Fuel and Safety

This video shows why we think volitile fuels are a bad idea (we use candles) and I make the case that hot air balloons, education and kids (with adult supervision) all go together.

Part 4 :  What You Need to Build a Hot Air Balloon

You need aluminum foil, plastic drinking straws, birthday candles. And the only tricky part is finding a trash can liner that's thin enough, but we'll show you where to look and how very thin plastic is measured.

Part 5 : Build and Fly

This video gives the construction details for keeping the botom of the balloon open and holding the candles and we make the case for flying indoors. You do not have to weigh anything, but we do on the video just to stay conscious of keeping it light.

Part 6 : Using Smaller Bags

Using smaller bags is more of a challenge than using larger ones. We'll show you why and present some tips for making them work. Plus a (green screen) ride in a hot air balloon for the student volunteer presenters.

I put a lot of work into making these instructional videos. It's encouraging to me to know that people are putting the information to work and I improve the instructions when people point out when something is not clear ( I answer specific technical questions as best I can, too). Furthermore, hundreds of people have sent me innovations that have made all the projects on ScienceToyMaker better. So, consider sending me feedback or leave a comment at the bottom of this page about how the hot air balloon project went for you.

Here is some cool feed back.

Welcome to Air Surfing!

(AKA Walkalong Gliding)

"Any sufficiently advanced technology is indistinguishable from magic." --Arthur C. Clarke

If YouTube is blocked at your school, try this 16MB MPEG file

How to Start Flying Any Design of Glider

Introduction to Walkalong Glider

The first time I encountered gliders levitated and controlled by an invisible wave of deflected air, it felt like magic! Surely this was going to take the world by storm, the way Mentos and Soda swept the world as a science activity a few years ago. But while researching the history of walkalong gliders, I was surprised to learn that the concept of surfing the gliders is decades old. Knowledge about them was cloistered within a few aerospace engineering and hang glider communities—definitely not in schools.

As an educator, I set about to make walkalong gliders accessible to regular people as a fun science activity by developing thin (1/2 mm) foam gliders that are an order of magnitude lighter than paper. Only a few times denser than air itself, they fly so slowly that beginners have time to think and react. If I walked beside you and we both held onto the board, then you could learn to fly in minutes because that way you gain a feel for flying. Soon you would be swooping around your house flying as easily as you ride a bicycle.

And the thin foam gliders are so efficient that advanced pilots (with practice) can levitate them with only their hands deflecting the air! The foam sheets are inexpensive to buy or slice your own--no one is excluded for lack of money. I find that kids around the age of 10 start having enough coordination to fly them.

So NOW the activity is going to catch fire, right? No. Any knucklehead can drop Mentos in soda, but walkalong gliders demand more. You don’t need to be flight savvy to start, but you have to pay attention to details. For one thing, the thin, light foam is also very delicate. The gliders won’t break from crashing into walls, but careless/nervous hands will wreck them in seconds. Even adults lack an analog for handling something that carefully--unless they’ve cuddled with a pet butterfly. Furthermore, the gliders need dead-still air, which usually means not outside except at dawn and dusk. Even aggressive HVAC systems and cause too much air turbulence inside. And although I can easily show people how to fly, being the first in your region with nobody to show you is more difficult.

Some people will be daunted by these eccentricities of walkalong gliders. But inspired pioneers--who care a little more about details and work a little harder to learn new things--are spreading walkalong flight in the world! Here are some tips for teaching groups to fly.

 Learn to Fly Walkalong Gliders

Flying an already-made glider is the best way to begin and all packages come with a couple of RTF (ready to fly) gliders. This video shows the best way I know of how to learn.

Teaching a group to fly? Here are some tips.

 Get Gliders and Foam Sheets

Using gliders made from thin, low-density EPS (expanded polystyrene) is the best way to get started. Foam is extremely lightweight and slow-flying, so you have time to think and react. Thin sheets of EPS foam are much lighter and more rigid than paper, and inexpensive, too. Get gliders and foam here.