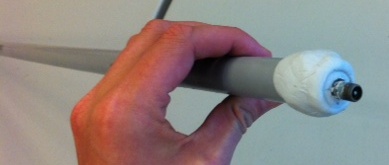
Substitutes for the 2″ of 1 1/2″ Pipe

1 1/4"Slip Joint

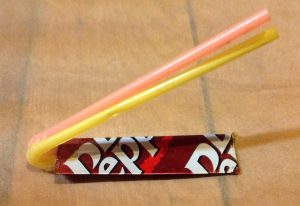
So you don't want to buy a long piece of 1 1/2" pipe when you only need 2 inches of it. Before you make a substitute from scratch (instructions below), observant correspondent Andrew Baillie of Atlanta discovered that you could simply substitute a 1 1/4" "slip joint" (pictured below). It has the correct inside diameter and is already 2" long. Why didn't I think of that?!

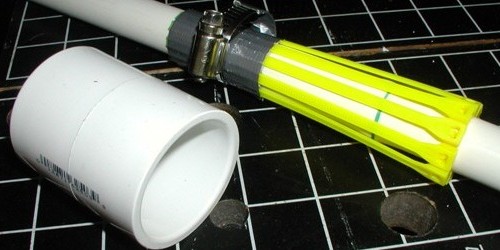
Neither the inside or the outside diameter ever actually is the inch designation of pipe. The inside diameter of the 1 1/4" slip joint--the measurement that matters-- is about 1 5/8". And if you are working with metric pipe, the inside diameter of the slip joint should be about 42 mm.

Make a Substitute from Scratch

If you cannot get either 2 inches of the 1 1/2" schedule 40 pipe or the slip joint, there is a workaround. The same tough plastic that allows 2-liter bottles to withstand high pressure can also be cut up and formed into a pipe.

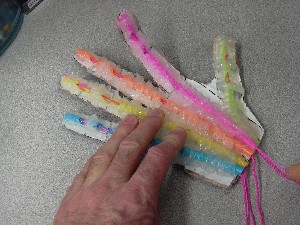
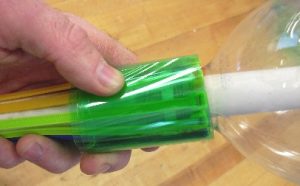
Cut into a 2-liter bottle above the label, as in the picture above.

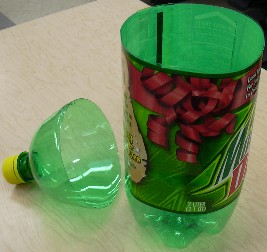
Cut around the bottle, right on the edge of the label. You will not use the top, but it does make a good funnel.

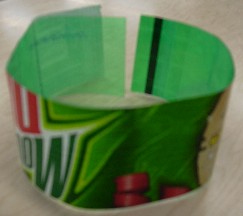
Measure and mark 50mm (2") from the top of the bottle, several places around the bottle. Cut down to a mark, then turn 90 degrees so as to cut out a strip 50mm wide.

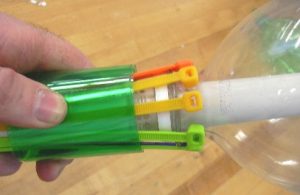
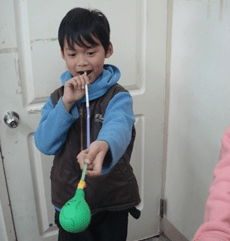
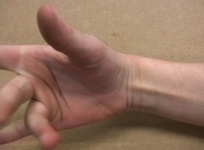
Peel off the label. The next part is easy to show someone, but difficult to explain. The bottle must be pushed onto the bulge, and ties adjusted so they fit over the handle of the bottle--as shown in the picture below. Have piece of duct tape already cut because your hands will be full when you need it.Wrap the strip of plastic that you just cut around the ties. Do not wrap it where the heads of the ties are. Wrap it fairly tightly. Don't let go or it will unravel.

Still holding onto the wrap of plastic, slide it up and over the heads of the ties (you can see them through the green plastic in the picture below). The wrap of plastic unravel a little bit to get big enough to slide over, but do not let it get very loose. The friction as it slides over is what holds the trigger in place until the rope pulls it.

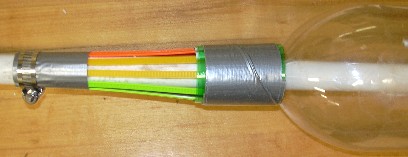
Without letting the plastic unravel, put the piece of duct tape on it so now the duct tape keeps it from unraveling. Then wrap at least 4 more layers of duct tape around. There will be lots of stress on this part when the bottle is full of pressure. When the slide trigger/pipe is slid over the heads of the ties as pictured below, you should not be able to take the bottle off.

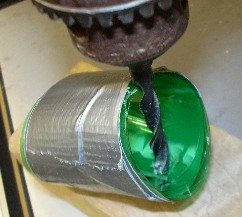
A rope must be firmly attached to the trigger you have just made so it can be pulled from a distance. Either drill a hole for the rope, or tape the rope on with duct tape. If you drill, it is almost impossible to drill from the top because the plastic squishes. Instead, angle the bit and drill into the bottom as shown in the picture below. When the hole is drilled, thread the rope through and tie it somehow.

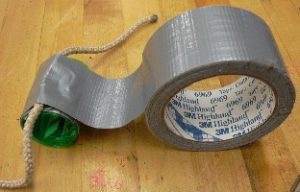
Alternately, you can tape the rope on. It is best to weave the rope through several layers of tape so it does not come off. Tape on rope with about 150mm (6") sticking out as in the picture above.

About Putt Putt Boat Engines

There are two kinds of putt putt boat engine: the diaphragm kind I concentrate on in this site, and the looped copper tubing kind.

How Putt Putt Engine Work (diaphragm type)

Though relatively simple construction, putt putt engines ingeniously harness several principles of physics to push the boat and make raucous boat noises.

Copper Coil Engine

The advantage of the copper tubing engine is the relative ease of construction, and you cannot wreck it with too much heat. The disadvantage of the coil design is that it is often slower and makes little or no noise.

Experiments with Coil Engines

Experiments by my good friend from the Netherlands, Dr.Guus Flogel


I'd like to know how this project goes for you. I'm happy to answer questions about it. Feedback from you is an important way for me to know what works and what needs clarification.

Make a Shrill Whistle From an Acorn Cap

From the time I was a kid, I envied people who could stick a thumb and finger in their mouth and generate an attention-getting whistle. Despite patient people trying to show me how to do it and assuring me it was "easy" -- the kiss of death -- I still don't get it. I just get hyperventilated.

I take some consolation from a bit of wood lore I learned in high school: whistling on an acorn cap. Let me warn you from the start that acorn whistles are ear-splitters. I never show people how to do it indoors. Once they get it, I shoo them far away.


I'd like to know how this project goes for you. I'm happy to answer questions about it. Feedback from you is an important way for me to know what works and what needs clarification.

The Cartesian Diver

A new twist for the great classic science project.

Cartesian divers were first noted by a student of Galileo Galilee! Some people back in those days thought its mysterious dives and ascents in the water smacked of dark magic, as witnessed by the name it was sometimes called: Devil's Diver. The advent of clear plastic bottles made Cartesian divers popular in school science classes, as well they should be. What a cool way to learn about density, buoyancy, compression of gases, etc.

Unfortunately, some diver designs are either too expensive for large groups, or they hide what's going on inside the diver. For example, pen caps and modeling clay are cheap enough for everyone to make, but you can't see the air compressing and the water rushing in. Using clear eye droppers costs at least a dollar each. Not bad if you're just making one at home, but quite a bit of money if you are making them with a large group. I offer a design to fill the void, plus some variations.

In the instructional videos above, (on YouTube: Part 1 , Part 2 ) I've included scenes of groups of kids actually making Cartesian divers as well as an educational diversion: a visit to a scuba diving shop with some under water video footage.

Here you can read more about how Cartesian divers work.

Many thanks to the West Branch School, YMCA after school program and Sunken Treasure diving shop.

Build a Simple Water Rocket Launcher

This is the text (word) file that explains the video, Water Rocket Launcher : Simple and Easy.

Note : There is an Update on drill size to use for the valve.


The instructional video is divided into 12 video clips, and those clips are embedded below. You can watch a clip and read the description that follows.

01 The numbers correspond to the numbers at the top of the video.

02 Many of the best sciencetoymaker projects evolve from complicated at first, to simpler. So what happens when we apply simple to the do-it-yourself water rocket launcher? I think this simpler design is safer, more fun and easier to build, costing almost nothing, and it’s quite portable.

Water Rocket Overview

03 With this deign we just hold the bottle on as someone pressurizes it with a bicycle pump, and let go—no complicated trigger mechanism. I think this is safer because you cannot get to the really high pressures. It starts to leak before that. Older kids can hold it on to higher pressures, but they should be able to use it safely. I know that older/stronger/smarter does not correlate sometimes, so don’t let knuckleheads use this water rocket launcher.

The long pipe keeps the water rocket bottle above young kid’s heads so it doesn’t hit them on the way up. I came up with this idea after witnessing young kids run toward an old, low-launching bottles during countdown. Some people have “improved” my previous design by making the launcher self-supporting and launching close to the ground. But knowing how young children are impulsive, I can’t imagine why anyone would launch from low to the ground.

I do, however, understand why people love to be near the launch on a hot day: it’s a splash of cooling joy! I think it’s more fun when you are actively holding the bottle on than it is passively watching from a distance.

The Music

04 I’m fortunate to have a world-class Celtic group—Burning Bridget Cleary--in my home state of Pennsylvania and they were kind enough to allow me to use a high energy song I really like. You’ll have to go to their website for an explanation of the group’s name. I know it’s a little incongruous to have such beautiful music accompanying the messy process of building a science project. You can see a video with this music (Stor Mo Chori). You can support great artists by buying their quality music.

Water Rockets as Learning Tools

05 Tactile, hands-on learners can feel the pressure build as air gets compressed into the bottle . They can also feel the air get warmer as the pressure increase (Boyle’s Law of Gases: when volume goes down and pressure goes up, the gas heats up). If you let the hot air cool, then when you release the pressure the air will be colder than the surrounding air. That’s the principle that makes refrigerators work. And if you pull the bottle off suddenly it looks like smoke, but it’s really water vapor: fog caused by the lower pressure and cooling.

Obviously water rockets use all of Newton’s 3 Laws of Motion.

I’m too lazy to do much with finned rockets, but it’s very easy to launch water balloons with water rockets. Water balloons are dense enough that you can use the amount of time it’s in the air to figure out the gravitational acceleration and know how high it went, what its velocity was when it hit the ground, etc.

Build a Simple Water Rocket Launcher: Pipe Basics First

Update Note: The purpose of the video was to see how simple we could go. Although it is possible to make the air inlet from a pen body or needle attachment glued in with hot glue (as is seen in the video), time has shown those options to be not as durable as a tire valve inserted into an end cap--the original way of doing it. You can see how to do this here . However, I now suggest that you use a slightly larger drill bit: 9/16" (instead of 1/2") because it will be easier to pull the valve into place. 9/16" is not so common in twist drill sets, but the flat kind of drill bit called "spade bits" or "speed bits" are inexpensive even when bigger than 1/2" and they work well.

06 The heart of the water rocket launcher is a very inexpensive piece of plastic (called PVC for polyvinylchloride—not CPVC which is more expensive and sized differently) water pipe. It costs around 2 dollars in U.S., and that’s enough pipe to make 2 launchers. I use a 5 foot long (about 1 1/2 meters) piece for each launcher. The store can cut it for you.
The diameter of the pipe in North America is called ½ inch (half inch), but it’s not really half inch if you measure it (the inside diameter is actually about 5/8” and the outside diameter is about 13/16”—weird)!. But at the hardware /building supply store you should ask/look for HALF INCH PVC PIPE. “Schedule 40” refers to the thickness of the pipe wall and schedule 40 by far the most commonly found. Although you might be able to find thinner wall pipe, I like having the additional strength that schedule 40 provides as people hold the bottle on.
Where the metric system is dominant, look for plastic pipe with an outside diameter of about 21mm. Or just take a two-litre bottle to the store with you and look for a pipe that barely fits into the bottle. Keith, a physics teacher in England told me that the commonly available 22mm pipe at DIY chains like B & Q is too tight a fit on the bottle. He sanded (abraded) down the outside until the 2-litre bottle neck would slide smoothly over.

A First Look at the Build

07 This might seem like a lot, but once you’ve built one and know what to do, additional ones will only take you 15 minutes to build. When you have the pipe, there are 3 important places.

  • 08 Near the top of the pipe where the bottle seals against the pipe. It’s quite easy to melt the pipe with a candle and form a little bump that seals on the pinch.
  • 09 Near the bottom of the pipe there is an entry for air from the bicycle pump, to go into the pipe and into the bottle. Abhinav Subramanian in Texas discovered that the outside of an old ball point pen, which fits the chuck of the bicycle pump, works well. It’s held in with hot glue or epoxy. A drill is convenient for making the hole, but not necessary; there’s a workaround. You can also use an inflator needle (normally used to inflate soccer balls, volleyballs, etc.). However, I have found that inflator needles are more prone to leaking.
  • 10 The bottom end of the pipe must be sealed off so no pressure escapes, not difficult. We melt it and close it off. Some glue makes the seal.
    UPDATE: You might be able to combine 09 and 10 (air inlet and close off bottom) into one step. See "Step B" below.

Step A: Form the Bottle Seal, Near the Top

Many water rockets use O rings to stop any leaks between the bottle and the pipe. I prefer this simpler method that grew out of my experience in the South Asian country of Bangladesh. I lived and worked there for a year and a half and watched people drill water wells. They thought nothing of heating plastic pipe and shaping it however they wanted it. Then, from this documentary about building a wooden water tub (one of my favorite films)  I learned how a taper can pinch in a way so as to make a seal.

11 At the top of the pipe, mark where the pipe goes into the bottle but does not touch the bottom inside the bottle. The part of the pipe inside the bottle keeps it going straight as it launches.

12 Heat up a narrow section of the pipe with a candle-- always turning for even heating all around. Keep the pipe at least 2 inches or 5 cm above the flame. 13 If the flame sways then shield it. Never let the pipe burn. Burning PVC gives off particularly toxic smoke. Be patient; it can take a couple of minutes. 14 When you can bend it like this, heat another 15 several seconds or so until it bends easily. 16Then push the top of the pipe down. That will cause the soft part to bulge out a little. If you push pretty hard it will stay bulged out.

I prefer a subtle bulge. It’s easier to keep the bottle from leaking. 17There might be one circumstance where it would be best to make a big bulge like this: If only young children will be pumping the bicycle pump, then they won’t be able to attain much pressure. Without much pressure the bottle might be wedged on tight enough that it won’t come off when released. A big bulge—which you can make by pushing the pipe down harder and holding on until it cools, might let go of bottles a little easier.

When you’ve made the bulge, let it cool, and then test with a bottle. The bottle should stop when it hits the bulge.

Step B: Add an Inlet for Compressed Air (Bicycle Pump), Near the Bottom

Update: An even simpler method that combines air input with closing off the bottom?

Here's an interesting tip from James Upham in Canada, sent after the video was finished. "I think I’ve come up with an even simpler way to build the launcher. Rather than spending time closing off the lower portion of the PVC tube, and cutting into the side of the tube to insert the air valve, we just wrapped some epoxy putty around the valve and stuck it into the bottom of the tube. The putty sets up in about 5 minutes, and it takes no time at all to stuff it in around the valve so it forms a good strong seal."
A good simplification, and I'll add a couple of thoughts. First, the epoxy putty plug will bond stronger if you scuff inside and outside of the smooth PVC pipe with sandpaper. I have visions of the plug popping out and turning the whole launcher into a water rocket! Second, in the rare event that your air pump has a leaky check valve (one-way valve to keep compressed air from going back into the pump), then water--from when you put the bottle on, that settles at the bottom) could leak into the pump. I've only seen this happen a few times, but you'll know it's happening if it suddenly gets really difficult to pump. Usually you can deal with it by pumping faster.

18 The simplest way to make an air inlet is to first find an old pen that fits snugly into a bicycle chuck (if the chuck is threaded like a screw, then you’ll have to use the needle inflator, below. 19 Remove the ends. 20 If it is soft, you can often cut it with a good pair of scissors.

The air inlet should be at least 15 centimeters or 6 inches from the end (bottom) of the pipe. This raised inlet lets some water collect in the bottom before submersing the air inlet. That could be a problem if the check valve (one-way valve) in your bicycle pump doesn’t work well; water could back up into the pump. If you have a drill, make a hole just big enough to get the pen through, with a snug fit.

21 If you don’t have a drill, hammer a nail in, pull it out, and then heat the area close to the nail hole. Hold the pipe at least 5 cm or 2” above the flame and keep the pipe moving a little. Do not burn the plastic pipe. 22 When it is softened, push the point of scissors in and enlarge the hole. 23 Before the plastic cools, push the pen in. Let it cool and harden.

For gluing, I find that hot glue is easy and is ready to use quickly, but it seems hot glue guns are hard to find in some places in the world. So you can substitute epoxy, which is stronger than hot glue but which can also be hard to find. So, I think any waterproof glue could work. Super glue type of adhesive might not be thick enough to fill up gaps, but you can experiment.

Making the Glue Connection Stronger

I am still experimenting with how to glue the pen tube in. 24 At first I just put some glue on the outside. 25 It worked for a while, but then broke loose. 26 I had forgotten to scratch and scuff the plastic before gluing. Glue cannot hold onto smooth plastic very well, but scratches make for a much stronger connection. You can use sandpaper or rough concrete or stone to make the scratches.

Other strategies can also make stronger glue joint. 27 I got a lot of glue inside the pipe first, pointing up and around so the glue settles on the pipe around the hole. 28 Don’t do what you see here, but if you cut away the other side of the pipe, this is what you’d see. 29 With the pump chuck on the pen, I push it in and (important!) push some air through while the glue is still soft. This keeps the glue from obstructing the tube, which would defeat the whole purpose for putting it in. Putting glue inside like this always works for me, keeping the pen from breaking loose and no leaks. If you think about it you’ll see that the air pressure inside the pipe pushes the glue even tighter against the pipe, which is good—it tends to close leaks. However, if the air reaches the glue outside, the air pressure pushes it between the glue and pipe, which opens up leaks rather than closing them.

30 Other things you can try: making a collar or harness of glue to keep the pen affixed. 31 I have also experimented with pushing glue into the pen after the outside glue is hard. If the other end of the pen tube is near the far side (inside) the pipe, it glues it there, increasing strength and eliminating wiggling. 32 Once again it’s important to blow air through before the glue hardens to so there are no obstructions.

Using an Inflator Needle for the Air Instead

33 I seem to get small leaks when using sports balls inflator needles instead of pen tubes. I think it is because the needle is so thin that the glue doesn’t hold it well. If you are careful, however, it works ok. I suggest using really strong glue, like epoxy. 34 I do not think it’s a good idea for it to be sticking out very much—especially with soft glue like hot glue—because it wiggles around a lot. Does anybody have good techniques for getting inflator needles to work as well as pens?

Step C: Close Off the Bottom

If you’ve done the other steps, this is pretty easy. 35 Heat the end of the pipe until it is soft enough to be crushed with a pair of pliers. 36 Squeeze glue around the inside of the pipe. This is because even though you will crush the end of the pipe shut, air can still leak out. But the glue on the inside stops the leaks.

37 At first when you crush the end it opens up again. But as the pipe cools it stays shut.

Optional: Launch Water Balloons

This is very easy. 38 Cut off the bottom of a soda bottle. 2 liter bottles work better than smaller, I think because of Newton’s Second Law of Motion with more mass being hurled in the opposite direction. 39 Tape it to the bottom of an uncut bottle with duct tape. 40 Tape the cut edge so it’s not so sharp. 41 Put water balloons in the top of this special rocket. Again, as per Newton’s Second Law of Motion, smaller water balloons will accelerate faster and go higher than bigger.

Launching

You can launch bottle without any water. It makes a satisfying sonic shockwave when it goes off. The bottles still go pretty high, if not as high, and that might be the way to go if it is cold and you don’t want to get wet.

If you do fill the bottles with water, if more than 1/3 full then you are reaching the point of diminishing returns. Certainly the bottles should not be more than ½ full because you need some space for the compressed air. Although you only fill the bottle with water, not the piple, of course some water will go into the pipe when you put the bottle on. That's usually ok. If, however, the check valve (one way valve that let's air out of the pump but does not allow air to be pushed back in) is leaky, there could be a problem. If water collects past the level of the air inlet, and if the water gets pushed into the pump, it gets difficult to pump. The solution is simple. Every few launches, just tip the pipe to drain the water out.

Have Fun, Be Safe

Even though it’s hard to hold onto a bottle long enough to build too much pressure, like a baseball, if it hit someone directly it could hurt or even kill someone. If you think about it, unlike a thrown or hit baseball which is just the energy of muscle contractions once, with each stroke of the air pump you are adding more and more energy. An adult needs to supervise kids.

42 I’ve only seen what happen in this clip this one time. My son let the rocket go up but was still holding onto it. So it broke loose from his grip in a deflected spin that could have bad results. It was his first launch and I think the lesson is to show people how to get their hands clear when launching!

43 I already mentioned that if a young kid is pumping, he might not generate enough pressure to get a wedged-on bottle to c come off. Pushing the bottle off with a hand is ok as long as it does not have too much water (the low pressure might not get all the water out by the time it comes down, making it heavier if it lands on a little kid’s head.

In this clip the bottle did not go off and, since nobody was holding it anymore, if fell over, and that dislodged it. As long as it’s sliding on the ground and has low pressure, I’m not too worried about it. It would be worse if someone caught it before it hit the ground, and that launched it, hitting someone pointblank.

44 If you have a cluster of kids it will never fall over. Holding onto the bottle though the launch is harmless if you really have a grip. But if it gets loose while it still has pressure it would be dangerous.

I am a bit wary of putting fins on water rockets. Yes, they go very high instead of tumbling, but they also slam back to earth fast enough to do some damage. Recovery devices like parachutes for water rockets are notoriously unreliable. However, my friend Thomas Buchwald, a teacher in Germany, told me about “backslider rockets” and he made some with his students. These finned water rockets go straight up, but seem to tilt to the side and almost glide on the way down. You can see Thomas’ students launching here  and an explanation of backsliders here.  and here

If you want to add a pull-string trigger launch you can see the original trigger-launch design starting here. Links to all parts here.

Popular Projects Home


Air Surfing (AKA Walkalong Gliding) with very thin foam. Levitate even with only your hands. Looks like magic, but what’s the science?

Best DIY Boomerang in the Wide World?


Wind-up Dragonfly Helicopters fly higher than the tallest trees. There is a simple version and a high-performance version.


Make a Hot Air Balloon (aka Sky Lantern) from a plastic bag.


The Ponyo Type Putt Putt Boat has a real candle powered steam engine made from a soda can and straws.


The Overhead Water Rocket Launcher uses pressurized air and water to launch 2-liter bottle rockets.


Call it a Vortex, whirlpool, tornado, hurricane, dust devil, water spout... whatever you call it, it happens a lot in nature.


Robot Hands work like our real hands... with strings attached.


Aside from the shear fun of it, making the Robot Voice 10 Cent Talk Box reveals how we turn raw sound from our vocal folds into speech.

It's not high-tech, but whistling on an Acorn Cap involves some cool science.

I'd like to know how these projects go for you. I'm happy to answer questions about them. Feedback from you is an important way for me to know what works and what needs clarification.

The Robot Hand

Make a hand with fingers that work like real fingers.

Who knows where working modle hands might end up? Tony Byron is one of the most gifted teachers I know. The projects on his YouTube channel are eclectic and creative–including his GIANT HAND(below), among other cool parts of a set. At 1:50 it completely engulfs a kid!

Pull the tendons (strings) and they flex the fingers--just like on a real hand.

You can make this robot hand point, grab, and make the peace sign. It's so real in its finger movements that it's almost creepy. Indeed, I get requests to borrow it around halloween. But this project had a pretty serious origin.

I could not lift a finger. I couldn't wiggle my toes. In three days I had gone from perfect health to being paralyzed below my neck. I had been stricken with Guillain-Barre Syndrome, a neurological condition.

I missed my hands the most. I know there's an expression about being so familiar with something that I "know it like the back of my hand." But I discovered that for all I depended of them, I didn't understand my hands at all. It wasn't until I lost the use of them that I began to contemplate and appreciate them.

How can it be that we can grab onto a bar and suspend all of our weight with the same fingers that can type on a keyboard or speak with sign language?

Strings! Those big, strong muscles for our fingers are actually out of the way in our forearms.*  They transmit power to the slender bones in our fingers with strings. What ingenious design!

The robot hand we will make doesn't just look kind of real, it works real, the way our real hands work.

I recovered most of my movement over a period of about three years. And as you can see from this site, I love to use my hands to make things more than ever. This science project, though very simplified, is a way to understanding how real hands work and appreciating them without going through some ordeal. It's my tribute to the great mystery of our existence.

* The strings in our body which connect muscle to bones are called "tendons."


I'd like to know how this project goes for you. I'm happy to answer questions about it. Feedback from you is an important way for me to know what works and what needs clarification.

Copper Coil Boat Engines

Although I do not have a lot of experience with the copper coil kind of engine, I can point you to some very good instructions by others.

Yvon Masyn

This gentleman from Belgium, Yvon Masyn, has done a wonderful job of creating a simple design that young kids can participate with.

Marc Horovitz

We can thank Marc Horovitz for these high-quality, illustrated instructions for making a complete coil-type boat with recycled tin sheet.

Dr. Guus Flogel

My friend from the Netherlands Dr. Guus Flogel has written the ultimate guide for building a boat with a coil engine out of a wooden Dutch shoe! He has also done the experimental work  to determine what size works best and how many coils should be made for best results.

Bob Jay

One of the biggest hassles has been finding the right size of tubing. Bob Jay seems to have solved the problem for people who have a PepBoys (automotive store) nearby. As he wrote me,

"Here's the skinny on the copper tubing . At two local Pep Boys there is a large section of an isle dedicated to various auto parts called " HELP ". They are on red cardboard with the part in plastic blister heat shrink. The red pack has the word " HELP!" in white letters. The tubing that I used is 1/8" x 8'. The HELP number is 55134 and the SKU # 37495 55134 2. I hope this helps ya out."

Thanks Bob. Another thing I think is worth pointing out is that copper can be annealed (softened). This is important because bending hard tube results in kinks (which block the tube) rather than smooth bends. Strangely, copper is softened in exactly the way that steel is hardened--by heating to red hot and quickly quenching in water. As copper is worked (bent, for instance) it once more starts to harden. It might have to be annealed again. The procedure is explained in both Marc and Guus' articles.

Putt Put/Pop Pop Boat Links

Here are some interesting related pop pop links.

Perhaps the best, most encompassing web site is the Pop Pop Pages by Vance Bass.

Here is a nanotechnology device smaller than an ant that uses propulsion system similar to a pop pop engine, but it uses audio waves instead of a flame as the power source.  Here is an amazing video clip of the Acoustic Scallop in motion.

Here is a fascinating site all about steamboats big and small.

Daryl of Canada is building some magnificent, powerful boats, and I call this his Dr. Suess boat.

Here is a link to a Google translated page a gentleman from Argentina doing interesting research into pop pop engines

Here is the Ponyo movie trailer.