What You Need:
- Mirror
First, figure out about how much you'll need. How many kids will make the project? With no waste, each square foot of mirror will provide enough material for 20 projects. Allow for some waste. The plastic mirror must be cut into 1 1/2" wide strips. The company that sells you the mirror is likely to be able to do that for you.
In the yellow pages of your phone book, look under "mirror" or "glass." Try to find the company that replaces most of the window glass in your area. They will also sell mirror, and probably acrylic (plastic) mirror.
You might want to mention that you need the mirror for an educational science project for kids before mentioning that it must be cut up into 1 1/2" wide strips. - Cardboard
Each project will need about an 8 1/2" by 11" piece of poster board or cereal box cardboard. - Other
Hacksaw, scissors, ruler (or other straight edge, or a sharp corner to fold cardboard with) and tape. - Sawing jig
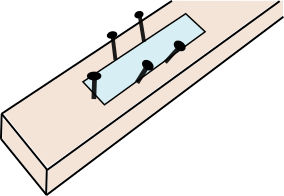
Although the sawing jig is optional, it is especially useful if you are working with a group.It only takes 5 minutes to make and you just need one for a group. You need 5 nails about 1" to 2" long and a piece of wood at least a foot long. A 2 by 4, furring strip or virtually any other flat piece of wood will work. Any place where building construction is going on will likely give you a piece of scrap 2 by 4. - Patterns
Step 1: Make the sawing jig (make it ahead of time if you are working with a group).
The 1 11/2" strips of mirror need to be cut to 2" long pieces. You might think you would be doing kids a favor by cutting the rectangles from the strip ahead of time, but I believe that when the kids help cut, it adds a great deal to the project. You will be holding the other end of the saw and helping to guide it (see step 2). Unlike some kinds of saws, hack saws are pretty safe. The jig makes the cutting fast and easy. It also keeps hands away from the saw.
- Print out the nail pattern for the jig. Some browsers and PDF viewers change the scale and the size of the printed pattern. Choose the print options that say something like "Actual Size" or "Scale: 100%." Also, the printout has a scale check. It says 2" line to line or 5 cm line to line. Make sure it's accurate.
- Line up the indicated edge with the end of your board and tape it down.
- Pound in the 5 nails where indicated.
- Bend the nails outward slightly so it is easy to get the mirror in and out.
- Cover the nail heads with some tape so they don't hurt anyone. The illustration shows a strip of mirror in the jig.
Step 2: Cut the mirror
I help a few kids at a time while most of the kids are working on steps 3 and 4.
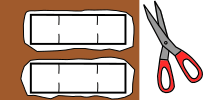
- Slide a mirror strip in the jig until it hits the end nail.
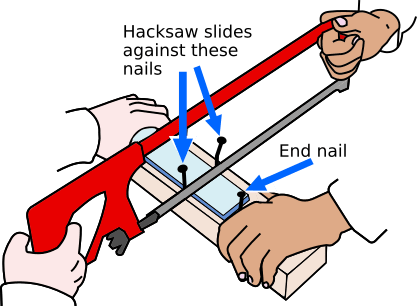
- Both you and the kid will hold the hack saw with one hand and the jig with the other hand, as shown. Let the kid hold the hack saw handle while you hold the frame on the other end.
- Slide the hack saw blade against the pair or nails closest to the end nail, which will cut the mirror to about 2" long.
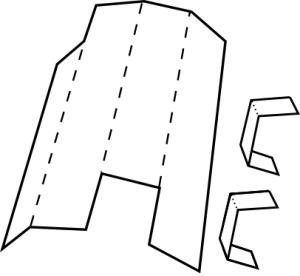
Step 3: Cut out the periscope body and the triangle mounts.
- Go here and print out the body pattern. Some browsers and PDF viewers change the scale and the size of the printed pattern. Choose the print options that say something like "Actual Size" or "Scale: 100%." Also, the printout has a scale check. It says 2" line to line or 5 cm line to line. Make sure it's accurate.
- Rough cut (bubble cut) around the solid lines.
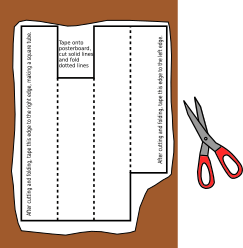
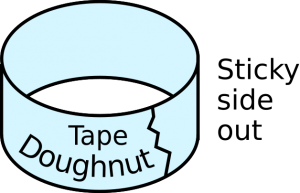
- Stick 4 tape "doughnuts" to the corners of the non-print side.
- Tape it onto the cardboard and cut out on the solid lines. Keep the pattern taped on until you have folded on the dashed lines (step 4).
- Go here and print out the pattern for the triangle mounts. Some browsers and PDF viewers change the scale and the size of the printed pattern. Choose the print options that say something like "Actual Size" or "Scale: 100%." Also, the printout has a scale check. It says 2" line to line or 5 cm line to line. Make sure it's accurate. When formed into the said triangles, they will hold the mirrors in the periscope at just the right angle.
- Once again, rough cut them out and stick them onto cardboard using tape doughnuts.
- Cut out on the solid lines. Don't tear off the pattern until it is folded (next step).
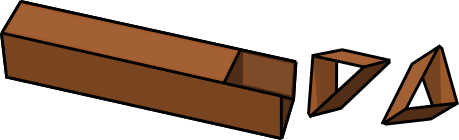
Step 4: Fold and tape
- Fold the periscope body on the dashed lines. Do it with a straight edge or even on the sharp edge of a desk. Kids have a hard time applying enough pressure to make the fold while at same time trying to be accurate and stay on the dashed line. For that reason, I encourage the kids to help each other out in pairs for this operation. Four hands are better than two.
- When folded, the body will start look like a rectangular tube. When you're satisfied of the folding job, tear off the pattern and tape the edges together.
- Similarly, fold the triangle mounts on their dashed lines and they will actually start to look like triangles. Tape one end to the other end.
Step 5 Tape the mirrors to the mounts, and the mounts to the periscope.
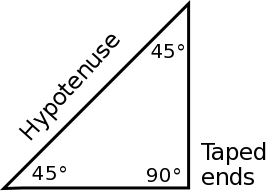

The mirrors have to be taped to the hypotenuse of the triangle. This is the longer side opposite the taped ends. The triangles are right triangles (have a 90 degree angle), isosceles (have 2 sides of equal length) and they have two 45 degree angles.

On one of the other sides of triangles, stick on a tape doughnut. Push that side of the triangle into the periscope so it sticks on the inside wall. Look carefully to see how it goes in. Put a piece of tape on the bottom to further secure it in place. Of course, this has to be done with the other triangle on the other end as well.
You might have to do some adjusting to get the mirrors to line up, but it's pretty intuitive.
I'd like to know how this project goes for you. I'm happy to answer questions about it. Feedback from you is an important way for me to know what works and what needs clarification.