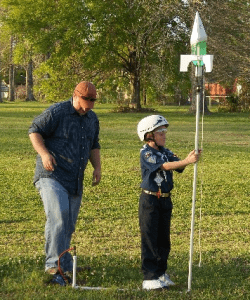
Substitutes for the 2″ of 1 1/2″ Pipe

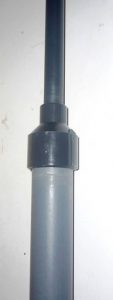
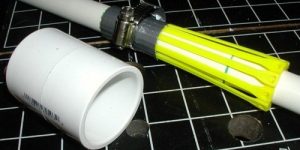
1 1/4"Slip Joint

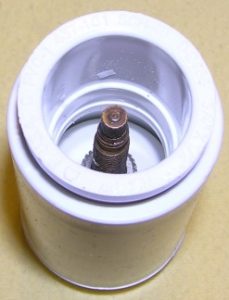
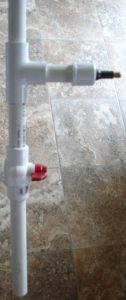
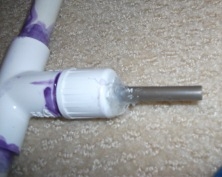
So you don't want to buy a long piece of 1 1/2" pipe when you only need 2 inches of it. Before you make a substitute from scratch (instructions below), observant correspondent Andrew Baillie of Atlanta discovered that you could simply substitute a 1 1/4" "slip joint" (pictured below). It has the correct inside diameter and is already 2" long. Why didn't I think of that?!
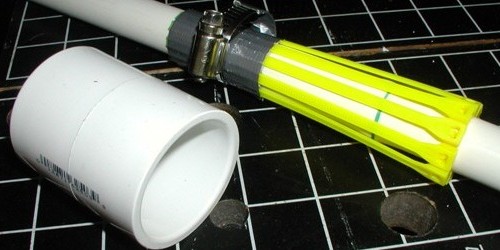
Neither the inside or the outside diameter ever actually is the inch designation of pipe. The inside diameter of the 1 1/4" slip joint--the measurement that matters-- is about 1 5/8". And if you are working with metric pipe, the inside diameter of the slip joint should be about 42 mm.

Make a Substitute from Scratch

If you cannot get either 2 inches of the 1 1/2" schedule 40 pipe or the slip joint, there is a workaround. The same tough plastic that allows 2-liter bottles to withstand high pressure can also be cut up and formed into a pipe.
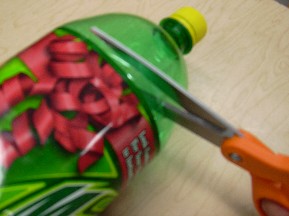
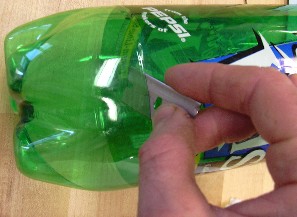
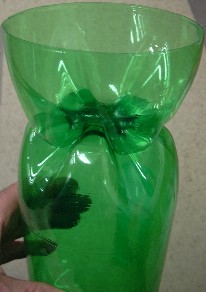
Cut into a 2-liter bottle above the label, as in the picture above.
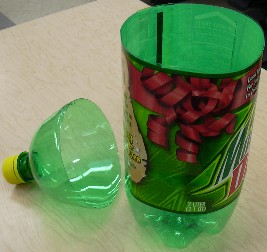
Cut around the bottle, right on the edge of the label. You will not use the top, but it does make a good funnel.
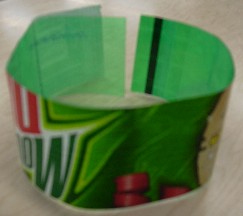
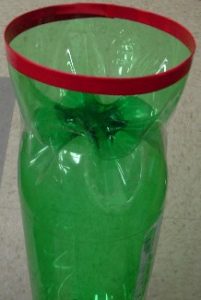
Measure and mark 50mm (2") from the top of the bottle, several places around the bottle. Cut down to a mark, then turn 90 degrees so as to cut out a strip 50mm wide.
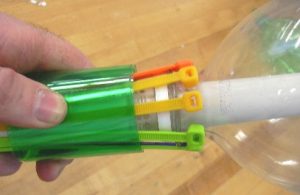
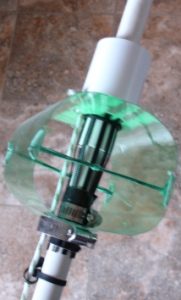
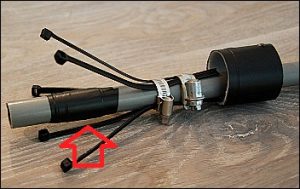
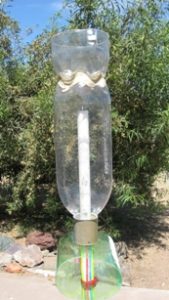
Peel off the label. The next part is easy to show someone, but difficult to explain. The bottle must be pushed onto the bulge, and ties adjusted so they fit over the handle of the bottle--as shown in the picture below. Have piece of duct tape already cut because your hands will be full when you need it.Wrap the strip of plastic that you just cut around the ties. Do not wrap it where the heads of the ties are. Wrap it fairly tightly. Don't let go or it will unravel.
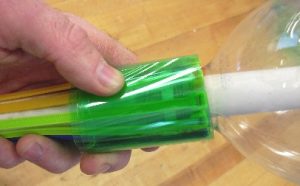
Still holding onto the wrap of plastic, slide it up and over the heads of the ties (you can see them through the green plastic in the picture below). The wrap of plastic unravel a little bit to get big enough to slide over, but do not let it get very loose. The friction as it slides over is what holds the trigger in place until the rope pulls it.
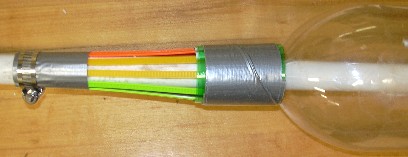
Without letting the plastic unravel, put the piece of duct tape on it so now the duct tape keeps it from unraveling. Then wrap at least 4 more layers of duct tape around. There will be lots of stress on this part when the bottle is full of pressure. When the slide trigger/pipe is slid over the heads of the ties as pictured below, you should not be able to take the bottle off.
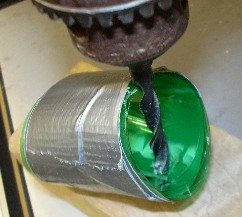
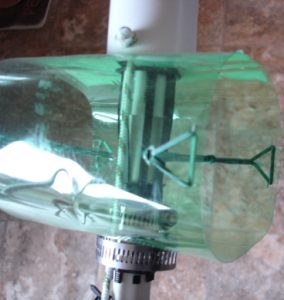
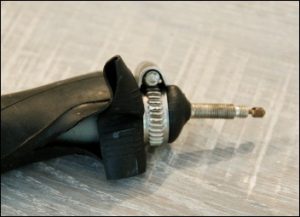
A rope must be firmly attached to the trigger you have just made so it can be pulled from a distance. Either drill a hole for the rope, or tape the rope on with duct tape. If you drill, it is almost impossible to drill from the top because the plastic squishes. Instead, angle the bit and drill into the bottom as shown in the picture below. When the hole is drilled, thread the rope through and tie it somehow.
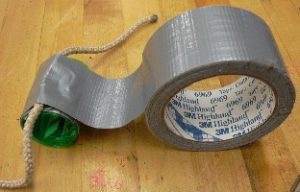
Alternately, you can tape the rope on. It is best to weave the rope through several layers of tape so it does not come off. Tape on rope with about 150mm (6") sticking out as in the picture above.

Great Water Rocket Links

Water rocketry is no solitary pursuit. Launching them always draws a crowd, and a quick search on the internet reveals zillions of home-spun sites from every continent. Here are some great links that I came across, and specifically why I liked them. Please feel free to recommend other sites to me.

Back in 2008 the PBS home improvement program Ask This Old House teamed up with sciencetoymaker.org to make an overhead water rocket on their annual kids program.

I also used my 8 minutes of fame to document how the talent, camera person, director, grip, production coordinator and producer work together as a team to create an Ask This Old House segment.

Build a Simple Water Rocket Launcher

This is the text (word) file that explains the video, Water Rocket Launcher : Simple and Easy.

Note : There is an Update on drill size to use for the valve.


The instructional video is divided into 12 video clips, and those clips are embedded below. You can watch a clip and read the description that follows.

01 The numbers correspond to the numbers at the top of the video.

02 Many of the best sciencetoymaker projects evolve from complicated at first, to simpler. So what happens when we apply simple to the do-it-yourself water rocket launcher? I think this simpler design is safer, more fun and easier to build, costing almost nothing, and it’s quite portable.

Water Rocket Overview

03 With this deign we just hold the bottle on as someone pressurizes it with a bicycle pump, and let go—no complicated trigger mechanism. I think this is safer because you cannot get to the really high pressures. It starts to leak before that. Older kids can hold it on to higher pressures, but they should be able to use it safely. I know that older/stronger/smarter does not correlate sometimes, so don’t let knuckleheads use this water rocket launcher.

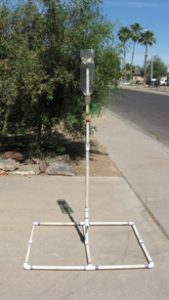
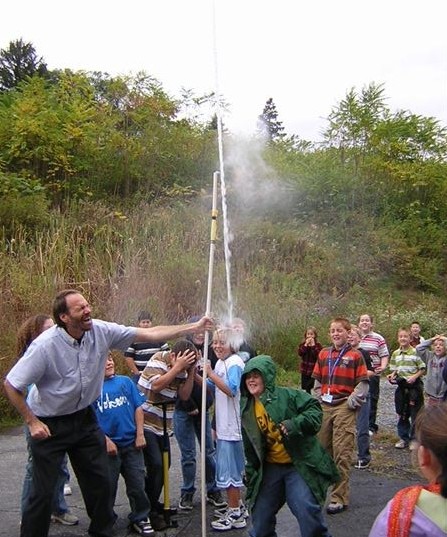
The long pipe keeps the water rocket bottle above young kid’s heads so it doesn’t hit them on the way up. I came up with this idea after witnessing young kids run toward an old, low-launching bottles during countdown. Some people have “improved” my previous design by making the launcher self-supporting and launching close to the ground. But knowing how young children are impulsive, I can’t imagine why anyone would launch from low to the ground.

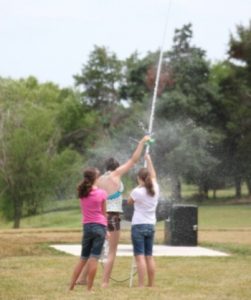
I do, however, understand why people love to be near the launch on a hot day: it’s a splash of cooling joy! I think it’s more fun when you are actively holding the bottle on than it is passively watching from a distance.

The Music

04 I’m fortunate to have a world-class Celtic group—Burning Bridget Cleary--in my home state of Pennsylvania and they were kind enough to allow me to use a high energy song I really like. You’ll have to go to their website for an explanation of the group’s name. I know it’s a little incongruous to have such beautiful music accompanying the messy process of building a science project. You can see a video with this music (Stor Mo Chori). You can support great artists by buying their quality music.

Water Rockets as Learning Tools

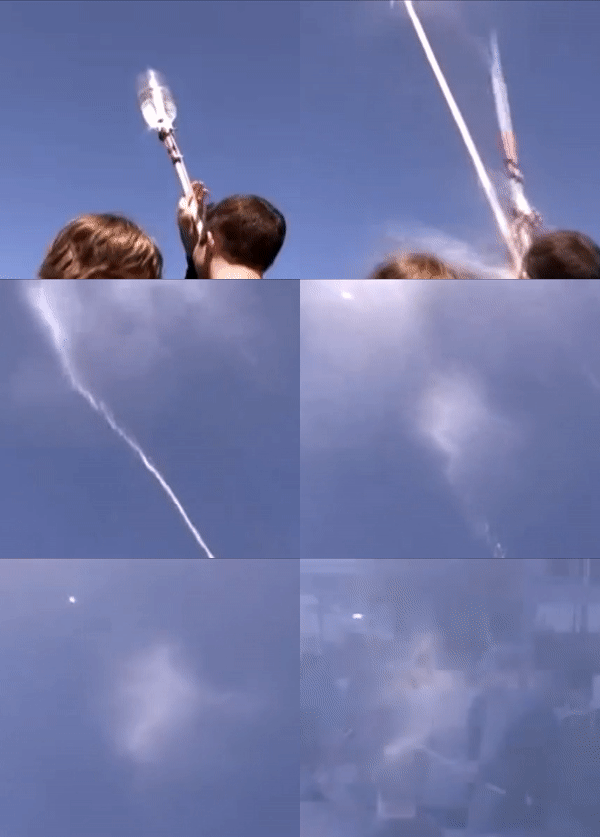
05 Tactile, hands-on learners can feel the pressure build as air gets compressed into the bottle . They can also feel the air get warmer as the pressure increase (Boyle’s Law of Gases: when volume goes down and pressure goes up, the gas heats up). If you let the hot air cool, then when you release the pressure the air will be colder than the surrounding air. That’s the principle that makes refrigerators work. And if you pull the bottle off suddenly it looks like smoke, but it’s really water vapor: fog caused by the lower pressure and cooling.

Obviously water rockets use all of Newton’s 3 Laws of Motion.

I’m too lazy to do much with finned rockets, but it’s very easy to launch water balloons with water rockets. Water balloons are dense enough that you can use the amount of time it’s in the air to figure out the gravitational acceleration and know how high it went, what its velocity was when it hit the ground, etc.

Build a Simple Water Rocket Launcher: Pipe Basics First

Update Note: The purpose of the video was to see how simple we could go. Although it is possible to make the air inlet from a pen body or needle attachment glued in with hot glue (as is seen in the video), time has shown those options to be not as durable as a tire valve inserted into an end cap--the original way of doing it. You can see how to do this here . However, I now suggest that you use a slightly larger drill bit: 9/16" (instead of 1/2") because it will be easier to pull the valve into place. 9/16" is not so common in twist drill sets, but the flat kind of drill bit called "spade bits" or "speed bits" are inexpensive even when bigger than 1/2" and they work well.

06 The heart of the water rocket launcher is a very inexpensive piece of plastic (called PVC for polyvinylchloride—not CPVC which is more expensive and sized differently) water pipe. It costs around 2 dollars in U.S., and that’s enough pipe to make 2 launchers. I use a 5 foot long (about 1 1/2 meters) piece for each launcher. The store can cut it for you.
The diameter of the pipe in North America is called ½ inch (half inch), but it’s not really half inch if you measure it (the inside diameter is actually about 5/8” and the outside diameter is about 13/16”—weird)!. But at the hardware /building supply store you should ask/look for HALF INCH PVC PIPE. “Schedule 40” refers to the thickness of the pipe wall and schedule 40 by far the most commonly found. Although you might be able to find thinner wall pipe, I like having the additional strength that schedule 40 provides as people hold the bottle on.
Where the metric system is dominant, look for plastic pipe with an outside diameter of about 21mm. Or just take a two-litre bottle to the store with you and look for a pipe that barely fits into the bottle. Keith, a physics teacher in England told me that the commonly available 22mm pipe at DIY chains like B & Q is too tight a fit on the bottle. He sanded (abraded) down the outside until the 2-litre bottle neck would slide smoothly over.

A First Look at the Build

07 This might seem like a lot, but once you’ve built one and know what to do, additional ones will only take you 15 minutes to build. When you have the pipe, there are 3 important places.

  • 08 Near the top of the pipe where the bottle seals against the pipe. It’s quite easy to melt the pipe with a candle and form a little bump that seals on the pinch.
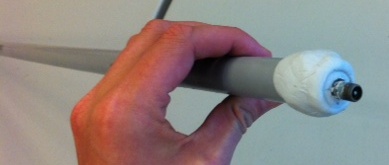
  • 09 Near the bottom of the pipe there is an entry for air from the bicycle pump, to go into the pipe and into the bottle. Abhinav Subramanian in Texas discovered that the outside of an old ball point pen, which fits the chuck of the bicycle pump, works well. It’s held in with hot glue or epoxy. A drill is convenient for making the hole, but not necessary; there’s a workaround. You can also use an inflator needle (normally used to inflate soccer balls, volleyballs, etc.). However, I have found that inflator needles are more prone to leaking.
  • 10 The bottom end of the pipe must be sealed off so no pressure escapes, not difficult. We melt it and close it off. Some glue makes the seal.
    UPDATE: You might be able to combine 09 and 10 (air inlet and close off bottom) into one step. See "Step B" below.

Step A: Form the Bottle Seal, Near the Top

Many water rockets use O rings to stop any leaks between the bottle and the pipe. I prefer this simpler method that grew out of my experience in the South Asian country of Bangladesh. I lived and worked there for a year and a half and watched people drill water wells. They thought nothing of heating plastic pipe and shaping it however they wanted it. Then, from this documentary about building a wooden water tub (one of my favorite films)  I learned how a taper can pinch in a way so as to make a seal.

11 At the top of the pipe, mark where the pipe goes into the bottle but does not touch the bottom inside the bottle. The part of the pipe inside the bottle keeps it going straight as it launches.

12 Heat up a narrow section of the pipe with a candle-- always turning for even heating all around. Keep the pipe at least 2 inches or 5 cm above the flame. 13 If the flame sways then shield it. Never let the pipe burn. Burning PVC gives off particularly toxic smoke. Be patient; it can take a couple of minutes. 14 When you can bend it like this, heat another 15 several seconds or so until it bends easily. 16Then push the top of the pipe down. That will cause the soft part to bulge out a little. If you push pretty hard it will stay bulged out.

I prefer a subtle bulge. It’s easier to keep the bottle from leaking. 17There might be one circumstance where it would be best to make a big bulge like this: If only young children will be pumping the bicycle pump, then they won’t be able to attain much pressure. Without much pressure the bottle might be wedged on tight enough that it won’t come off when released. A big bulge—which you can make by pushing the pipe down harder and holding on until it cools, might let go of bottles a little easier.

When you’ve made the bulge, let it cool, and then test with a bottle. The bottle should stop when it hits the bulge.

Step B: Add an Inlet for Compressed Air (Bicycle Pump), Near the Bottom

Update: An even simpler method that combines air input with closing off the bottom?

Here's an interesting tip from James Upham in Canada, sent after the video was finished. "I think I’ve come up with an even simpler way to build the launcher. Rather than spending time closing off the lower portion of the PVC tube, and cutting into the side of the tube to insert the air valve, we just wrapped some epoxy putty around the valve and stuck it into the bottom of the tube. The putty sets up in about 5 minutes, and it takes no time at all to stuff it in around the valve so it forms a good strong seal."
A good simplification, and I'll add a couple of thoughts. First, the epoxy putty plug will bond stronger if you scuff inside and outside of the smooth PVC pipe with sandpaper. I have visions of the plug popping out and turning the whole launcher into a water rocket! Second, in the rare event that your air pump has a leaky check valve (one-way valve to keep compressed air from going back into the pump), then water--from when you put the bottle on, that settles at the bottom) could leak into the pump. I've only seen this happen a few times, but you'll know it's happening if it suddenly gets really difficult to pump. Usually you can deal with it by pumping faster.

18 The simplest way to make an air inlet is to first find an old pen that fits snugly into a bicycle chuck (if the chuck is threaded like a screw, then you’ll have to use the needle inflator, below. 19 Remove the ends. 20 If it is soft, you can often cut it with a good pair of scissors.

The air inlet should be at least 15 centimeters or 6 inches from the end (bottom) of the pipe. This raised inlet lets some water collect in the bottom before submersing the air inlet. That could be a problem if the check valve (one-way valve) in your bicycle pump doesn’t work well; water could back up into the pump. If you have a drill, make a hole just big enough to get the pen through, with a snug fit.

21 If you don’t have a drill, hammer a nail in, pull it out, and then heat the area close to the nail hole. Hold the pipe at least 5 cm or 2” above the flame and keep the pipe moving a little. Do not burn the plastic pipe. 22 When it is softened, push the point of scissors in and enlarge the hole. 23 Before the plastic cools, push the pen in. Let it cool and harden.

For gluing, I find that hot glue is easy and is ready to use quickly, but it seems hot glue guns are hard to find in some places in the world. So you can substitute epoxy, which is stronger than hot glue but which can also be hard to find. So, I think any waterproof glue could work. Super glue type of adhesive might not be thick enough to fill up gaps, but you can experiment.

Making the Glue Connection Stronger

I am still experimenting with how to glue the pen tube in. 24 At first I just put some glue on the outside. 25 It worked for a while, but then broke loose. 26 I had forgotten to scratch and scuff the plastic before gluing. Glue cannot hold onto smooth plastic very well, but scratches make for a much stronger connection. You can use sandpaper or rough concrete or stone to make the scratches.

Other strategies can also make stronger glue joint. 27 I got a lot of glue inside the pipe first, pointing up and around so the glue settles on the pipe around the hole. 28 Don’t do what you see here, but if you cut away the other side of the pipe, this is what you’d see. 29 With the pump chuck on the pen, I push it in and (important!) push some air through while the glue is still soft. This keeps the glue from obstructing the tube, which would defeat the whole purpose for putting it in. Putting glue inside like this always works for me, keeping the pen from breaking loose and no leaks. If you think about it you’ll see that the air pressure inside the pipe pushes the glue even tighter against the pipe, which is good—it tends to close leaks. However, if the air reaches the glue outside, the air pressure pushes it between the glue and pipe, which opens up leaks rather than closing them.

30 Other things you can try: making a collar or harness of glue to keep the pen affixed. 31 I have also experimented with pushing glue into the pen after the outside glue is hard. If the other end of the pen tube is near the far side (inside) the pipe, it glues it there, increasing strength and eliminating wiggling. 32 Once again it’s important to blow air through before the glue hardens to so there are no obstructions.

Using an Inflator Needle for the Air Instead

33 I seem to get small leaks when using sports balls inflator needles instead of pen tubes. I think it is because the needle is so thin that the glue doesn’t hold it well. If you are careful, however, it works ok. I suggest using really strong glue, like epoxy. 34 I do not think it’s a good idea for it to be sticking out very much—especially with soft glue like hot glue—because it wiggles around a lot. Does anybody have good techniques for getting inflator needles to work as well as pens?

Step C: Close Off the Bottom

If you’ve done the other steps, this is pretty easy. 35 Heat the end of the pipe until it is soft enough to be crushed with a pair of pliers. 36 Squeeze glue around the inside of the pipe. This is because even though you will crush the end of the pipe shut, air can still leak out. But the glue on the inside stops the leaks.

37 At first when you crush the end it opens up again. But as the pipe cools it stays shut.

Optional: Launch Water Balloons

This is very easy. 38 Cut off the bottom of a soda bottle. 2 liter bottles work better than smaller, I think because of Newton’s Second Law of Motion with more mass being hurled in the opposite direction. 39 Tape it to the bottom of an uncut bottle with duct tape. 40 Tape the cut edge so it’s not so sharp. 41 Put water balloons in the top of this special rocket. Again, as per Newton’s Second Law of Motion, smaller water balloons will accelerate faster and go higher than bigger.

Launching

You can launch bottle without any water. It makes a satisfying sonic shockwave when it goes off. The bottles still go pretty high, if not as high, and that might be the way to go if it is cold and you don’t want to get wet.

If you do fill the bottles with water, if more than 1/3 full then you are reaching the point of diminishing returns. Certainly the bottles should not be more than ½ full because you need some space for the compressed air. Although you only fill the bottle with water, not the piple, of course some water will go into the pipe when you put the bottle on. That's usually ok. If, however, the check valve (one way valve that let's air out of the pump but does not allow air to be pushed back in) is leaky, there could be a problem. If water collects past the level of the air inlet, and if the water gets pushed into the pump, it gets difficult to pump. The solution is simple. Every few launches, just tip the pipe to drain the water out.

Have Fun, Be Safe

Even though it’s hard to hold onto a bottle long enough to build too much pressure, like a baseball, if it hit someone directly it could hurt or even kill someone. If you think about it, unlike a thrown or hit baseball which is just the energy of muscle contractions once, with each stroke of the air pump you are adding more and more energy. An adult needs to supervise kids.

42 I’ve only seen what happen in this clip this one time. My son let the rocket go up but was still holding onto it. So it broke loose from his grip in a deflected spin that could have bad results. It was his first launch and I think the lesson is to show people how to get their hands clear when launching!

43 I already mentioned that if a young kid is pumping, he might not generate enough pressure to get a wedged-on bottle to c come off. Pushing the bottle off with a hand is ok as long as it does not have too much water (the low pressure might not get all the water out by the time it comes down, making it heavier if it lands on a little kid’s head.

In this clip the bottle did not go off and, since nobody was holding it anymore, if fell over, and that dislodged it. As long as it’s sliding on the ground and has low pressure, I’m not too worried about it. It would be worse if someone caught it before it hit the ground, and that launched it, hitting someone pointblank.

44 If you have a cluster of kids it will never fall over. Holding onto the bottle though the launch is harmless if you really have a grip. But if it gets loose while it still has pressure it would be dangerous.

I am a bit wary of putting fins on water rockets. Yes, they go very high instead of tumbling, but they also slam back to earth fast enough to do some damage. Recovery devices like parachutes for water rockets are notoriously unreliable. However, my friend Thomas Buchwald, a teacher in Germany, told me about “backslider rockets” and he made some with his students. These finned water rockets go straight up, but seem to tilt to the side and almost glide on the way down. You can see Thomas’ students launching here  and an explanation of backsliders here.  and here

If you want to add a pull-string trigger launch you can see the original trigger-launch design starting here. Links to all parts here.

Overhead Water Rocket Launcher Gallery


Jonathan Beutlich and his students

Here's a fun video from Jonathan Beutlich, jr high science teacher, of his students making rockets.


Mark Schilke

Here is a multi-pronged approach to water rocket launchers by Mark Schilke. This whole page is launcher variations that people have sent in.


Mike Werling and his daughter

WHAT A BIRTHDAY PARTY! Mike Werling's daughter asked for a science-themed 13th birthday party. These are party favors, Tracy Bahr's free standing variation. They also used the overhead design to cool off.
To see the other great science activities at the party check out Mike's cool blog.


Salvador Robert

These pictures were sent to me by Mr. Salvador Robert of Spain. He added the idea of a wider, more rigid pipe, except for the end.


Shannon and her Bear Scouts

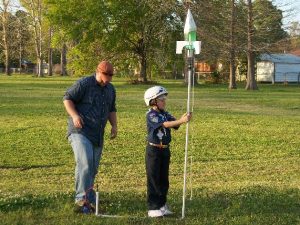
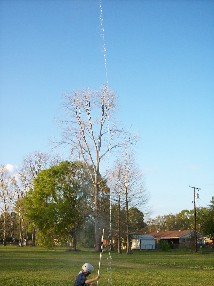
Here are some pictures from Shannon--den leader of 3rd grade "Bear Scouts" from the southern state of Louisiana. The scouts, she wrote, "...built a luncher and designed their own rockets. We met to discuss the Scientific Method and compile our Purpose and Hypothesis. We built our rockets from re-cycled materials ONLY and then we launched after discussing the safety measures that you described on your website. We tracked weight of the rockets, amount of water annd air pressure for each boy and noted our observations. Then we calculated the distance using a program we found on the internet. The boys really had a blast."
"It was one of our favorite projects to date!"


Hurling Water Balloons into Space (or at least really really high)


"Be careful and proceed at your own risk"--Slater, the ScienceToyMaker


In the early days of 2-liter bottle water rockets I brought in my first launcher to show to my ninth grade technology classes. To make a long story short, before I could stop him a student--thinking I had looked away for a moment--put an apple on top of a bottle and quickly launched it. My first reaction was anger (the apple would have injured someone if it had landed on them). But I was also astonished at how high the apple went--almost out of sight.

Video tapes of soda bottle water rocket launches show that the water is pushed out within 4 or 5 meters of the ground. From then on the bottle has very little density: not much weight for the amount of volume it takes up. Because of the relatively low density, air resistance slows down the empty bottle very quickly. To see an extreme example of this try hurling or pounding an inflated balloon as hard as you can. No matter how fast it starts out, its momentum is completely gone within a meter.

By contrast, an apple (or a water balloon) weighs more than an empty bottle for a given amount of volume. So, while there is still air resistance, momentum carries it much higher. That's why bullets for guns use lead--much denser even than water--despite the toxicity of lead.

For the highest launches, match the size of the water balloon to the thrust of the rocket. In my experience, water balloons about the size of a small apple go the highest. Bigger water balloons are easier to see and make a satisfying splash when they land.

I offer water balloons as the least dangerous thing to send up. Launching a stone with a water rocket could easily kill someone if it landed on them, and whoever did it should be prosecuted to the fullest extent of the law just as surely a person who fatally shoots someone with a gun. That is not to say that launching water balloons instead is "safe." Even a water balloon really hurts if you try to catch it. Launching water balloons requires a big, empty field or lake to aim the launch into. Young children should be under roof or absent such events.

I got some feedback about the dangers of launching water balloons from Shawn Suttonm of Nebraska, which I reprint verbatim:

I am making water rockets with my boys and came across your page, it is the best I have found and now understand the cable tie trigger...thank you for the good pictures.  I have a comment about the water balloons.  A couple of years ago while launching water balloons with a water balloon launcher we accidentally had one of the small balloons, about the size of a baseball, hit a Dodge Durango hood right where it bends down to meet the grill.  The launch angle was fairly high as we only wanted about 100 feet of distance and when the balloon hit it actually dented the hood at this bend point.  The dent was the same size as the balloon.  I do not know how high the balloon went or the height yours go.  This was in the summer and the hood was probably warm but the force of the falling balloon was incredible.  I thought I would share this expensive lesson with you.

Bottom line: be careful and proceed at your own risk.

How to Make a Water Balloon Launching Bottle

Make a special launching bottle by first cutting off the bottom of a bottle. I start the cut with a razor blade, then finish with scissors.

Fit it to another bottle (whole). The lobes interlock nicely.

Tape the top edge to make it less sharp. I used red electrical tape. I used 2" (50mm) wide clear packaging tape to hold the bottles together. It does not show up in the picture below. Everything must be dry when you apply the tape--then it's ok to get wet later.

I find that water balloons go the highest if I fill the 2-liter bottle only 1/3 of the way up with water.

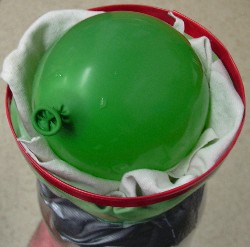
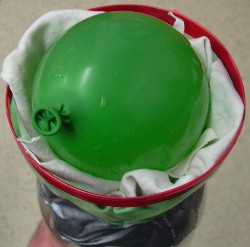
Here is a water balloon packed and ready for launch. I put a rag or something below the balloon because I'm afraid the lobes will break the balloon at launch, though I have never experimented to see if it is really necessary.

Great Launcher Variations and Innovations


Pablo Betancur

Pablo Betancur is an extraordinary teacher in Colombia who takes the time and effort to create hands-on learning experiences for his students. They took the simple launcher principle and designed double and even (at the end) quadruple launchers (everyone has to let go at the same time)!


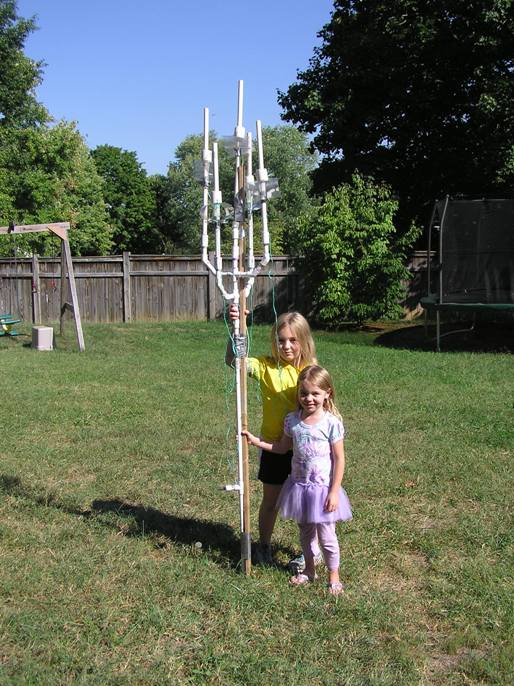
Multiple Launcher by Mark, Victoria and Lelia Schilke

It reminds me of Hydra from Greek mythology--if you cut one off, do two appear in it's place! Brilliant! Note that Small Parts Inc sells a check valve that has worked well for me (to keep water from back washing into a pump with a check valve that didn't work).

Here is Mark's September 2010 e-mail verbatim:

Dear Mr. Harrison:

My daughters Victoria and Lelia (now ages 8 and 5, respectively) very much enjoyed making the water rocket last year.  They have used it again and again -- in our backyard, at the park, at a Mensa gathering, at our church picnic, et cetera.  Thank you for detailing its construction on your web site!!!

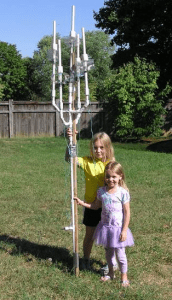
This month, we added a new feature: multiple launch capability.  By cutting the main vertical tube and adding two four-way junctions, our launcher now has five branches and somewhat resembles a candelabrum.  Rather than depending on perfectly simultaneous trigger fingers, which is virtually impossible to achieve, we added to each branch an in-line check valve that we invented.  Each of the two-liter bottles can thusly hold its pressure until its trigger cord is pulled.  Without the check valves, the first launch(es) would cause the pressure to be purged from the remaining bottles.
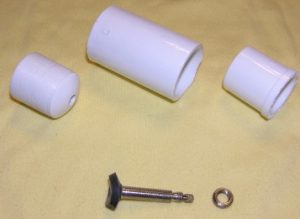
To make the check valves, we spun a 1/2" PVC end cap in a drill press and narrowed its diameter by holding first a rasp and then a piece of coarse sandpaper against the cap's side -- until it was small enough to fit inside a 3/4" PVC coupling.  (This step would have been easier on a lathe, but ours is out of commission.)  Then we drilled a 5/16" hole in the domed end of the cap so that a Presta valve stem from an old bicycle tube would fit through.  A bead of caulk around the base of the valve stem helps seal it to the cap.  The skinny Presta valve was left open, and a 3/4"-to-1/2" adapter on the other end allows the big coupling to fit the smaller pipe.


The attached photos show how the check valve pieces fit together and how the finished launcher looks.  Note the 1" x 2" stiffener board lashed to the central column.  With five bottles loaded and ready for launch, the monstrosity is VERY top heavy.  We were too wet from the test launches to take any pictures of it in action, but I'm sure you can imagine the pressurized deluge blasting us from above.  By the way, it takes A LOT of pumping for a five-way launch to be ready for lift-off -- but Pascal's Law assures that all bottles get their fair share.  For single launches, we added a feature that is not readily apparent from the photo: we can unscrew the center from the four-way branch assembly and use it by itself on the base.

Thank you again for all the great ideas for science projects on your web site!!!

Sincerely,     Mark


Tracy Bahr

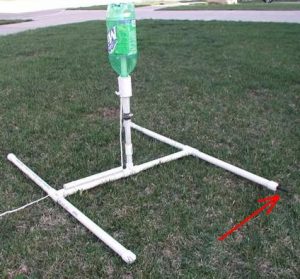
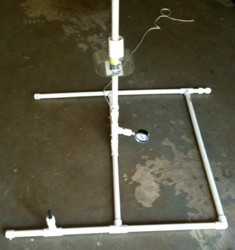
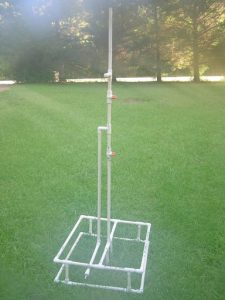
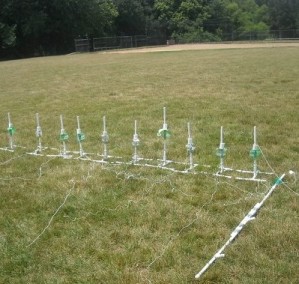
Here is a clever variation of a launcher which is self-supporting on a sturdy frame, sent by Tracy Bahr of Wisconsin, made for his cub scout pack. It's a little hard to see, but the red arrow points to the valve that the air pumphooks to.


Andrew and Colin Baillie

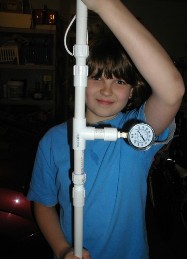
Andrew Baillie and his son Colin discovered that a common 1 1/4 inch slip joint could substitute for the 1 1/2 inch pipe, saving people from having to buy a whole pipe when they only need 2 inches of it. They also made a frame, and added pressure gages right into their launchers!


Galen Payne and his son

Galen Payne and his son in Vancouver, WA came up with some interesting innovations. They strengthened the spring with a couple of rubber bands. And, they added an inexpensive PVC slip ball valve to the bottom of the rocket. Here's how he came up with it:

"You might find this funny - The reason we came up with the idea, is because my 8 yo son was curious one day (in the garage of our suburban home) and pumped up the rocket with the compressor. There we were with a loaded rocket in my garage, in a neighborhood of 6000 sq' lots with nowhere safe to launch it. Thank goodness it did not fire, could you imagine that thing going off in the garage? Anyway, we where able to deflate it with the tire valve, but I decided a ball valve would be easier and faster.   Galen"

That gave me the idea to shoot paper air rockets like this from the launcher. We had to lengthen the handle to provide the leverage to snap open the valve quickly and add a removable length of pipe at the bottom. But you won't believe how high the rockets launch with all that stored up air pressure. Now I'm trying to design some paper rockets that don't get crunched up when they hit the ground. Then I'll get up some instructions.


Sealing Variations

People have developed some variations. In particular, if you cannot melt a bump to seal the rocket (maybe you can only find metal pipe that is the correct diameter) they show how to make it with tape. Also a clever way to use a bicycle inner tube for the valve that I had not thought of.


Abhinav

Abhinav in Texas used the hollow case of a pen instead of a bicycle valve and hot glue to hold it in/seal. The footvalve in the pump is what keeps the air from going back out, not the tire valve. If the air pump chuck slips off you might be able so sand around the outside to get a better grip.


Christopher Bassett

Christopher Bassett shows that PVC pipe is very adaptable to innovations you want to try (125 psi is higher than I would want to be close to).

"In the pictures attached, I have my design on a double base.  The bottom square puts the weight into the ground and the second square gets the launch tube off the ground.  The two center poles touching the ground are mainly for stabilization.  The center hole between those two is for water drainage.  Near the bottom, to assist the center of gravity, is the compressed air inlet which then elbows up to a T of the launch tube.  This is for prevention of water in the air line.  The bottom valve is to blow water out the bottom and the top valve is to charge the bottle then shut off so that when the launch is commenced, the compressed air isn't just being released.  As well it assists with the reloading. The highest T is for a future pressure gauge so I know for sure when the bottle is fully charged so that I can shut off the air from the tank.  The design is set to have the pipe between the two valves at tank pressure.  This happens to be 125 psi for me.  Lastly, If I were to do it over again I would take Mr. Salvador Robert's advice and thicken the pipes for I have quite a stabilization issue sometimes, especially when I fill the bottle over half full.  Thanks again for inspiring me to make a water rocket launcher as well as providing a great base design."


Gary and Dorothy Morse

Gary Morse has found a way to mix water rocket balloon launching with fireworks!


"I wanted to thank you for your inspiration concerning water rocket launchers. This is my 12th one and I finished it an hour ago. I have sent one like it to Germany in kit form and several out of Arizona where I live to other states. I usually launch water balloons, and a lemon sized balloon will travel easily 1/4 mile but I try to send them up at about a 3 degree angle which means they go about 250 - 300 feet away. I found polyurethane glue available at  Home Depot in large caulking tubes is perfectly suited for gluing the two bottles together and have shot the same bottle several hundred times. Buying used pvc pipe and fittings on Craigslist has enabled me to build one for around ten dollars. If fireworks are legal in your state they can be taped to the water balloon and lit immediately before launch. The firecracker attached pops in the air making a very interesting rain cloud aprox. 2' dia.    Gary and Dorothy Morse "


Daniel Berry

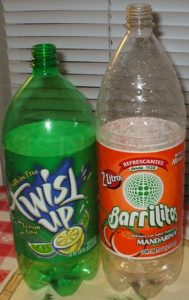
Correspondent Daniel Berry says that a kind of Mexican soda bottle works better than the kind sold in the U.S. I know some serious rocketeers intentionally heat and re-form bottles to be longer, and here it's already done for you.


Water Rocket Safety FAQ

If you do not read anything else on this page, remember this: when a bottle is loaded onto the launcher, treat it the way you would treat a loaded gun. Never let it point at anyone.

Safety FAQ

Q. Can the bottle burst? What would happen if it did?

A.  Although any container holding compressed air can explode, under "normal" circumstances it is highly unlikely. Carbonated beverage bottles are a marvel of modern technology. In two decades and thousands of launches, a bottle has never blown up on me. "Normal" means not going over 90 psi (6.3kg/cm)--which is difficult to do anyhow with an ordinary bicycle pump--and not using bottles that have obviously sat out in the sun for months, getting brittle. I spoke to an engineer who designs bottle-making equipment and he said that 90psi is a safe pressure. High pressure bicycle tires routinely take that much air pressure. I have never seen a middle-school age kid reach a higher pressure than 70psi, and 30 psi is plenty of pressure to still get a great launch.
I do have friends who hook bottles up to electrically powered air compressors and take the pressure way over 100psi. They tell me bottles don't start bursting until they hit at least 150psi. Some of my friends are insane.

As for what happens to the bottles, my crazy friends tell me the bottles do not throw shrapnel but they make a bang so loud it would undoubtedly cause ear damage if you were next to it without hearing protection. I wear ear plugs whenever I go above 70psi just in case.

In conclusion, I would not want my head near a water rocket that exploded. However, I believe the risk of severe injury from someone getting hit by a launched rocket far exceeds the threat from an exploding rocket, which is why I developed this overhead design.

Q. Could the bottle falling back down hurt someone or break a car windshield?

A.  A normal, un-modified 2-liter bottle falling back to earth is unlikely to cause injury or damage for the same reason it does not go very high: because it is not dense. It has a lot of surface area for it's small mass and it tumbles through the air, so its terminal velocity is low. Having said that, people are not going to be happy to see a bottle hitting their car.

In thousands of launches with large groups of young kids, a few bottles have landed on someone's head. No one ever cried, but if I launch enough bottles with enough kids, the tumbling bottle will eventually hit a kid with the opening, which is harder than the rest of the bottle, and it might hurt. I will be sorry if that happens, but I am willing to take that risk because I look at it in perspective. When we load kids in a car and drive them somewhere--sometimes for frivolous reasons-- we know there is a small but real risk that the child will be injured in a traffic accident. We balance risk against benefit all the time without thinking about it. I consider being hit by a falling bottle to be low incidence and low consequence compared to other risks normal kids face. I am much more concerned about a kid being hit as the rocket is launched, which is why I developed this overhead design.

However, there is a related issue that you should watch out for, particularly is you are letting kids pump the bicycle pump. Let's say a young kid can only get 10psi of pressure into the bottle. That is not enough pressure to push the water out quickly, and not enough pressure to get the bottle high enough to have time to eject the water. In this case the bottle, still heavy with water, could hurt a kid coming down. That is why I stopped working the type of water rocket that releases suddenly because pressure builds up enough to push out a rubber stopper or something.

Back to your rocket, make sure you help young kids pump the rocket to at least 30 psi or so before releasing and do not fill it up more than half way with water.

Q. What about when you launch water balloons?

A.  I developed launching water balloons in response to some...um...creative adolescents who were putting apples on top of rockets just before launching. An apple falling from hundreds of feet was clearly dangerous. Water balloons do not break windshields, but they go so high and are so dense that they sting if you try to catch them. Young kids should have a roof over their heads or not be present where water balloons are being launched. I tilt the launcher toward an empty field or lake. In town, I don't launch water balloons at all.

Water Rocket Safety by Air Command

Build an Overhead Water Rocket Launcher

This is the version with the trigger mechanism. There is a simpler version here.

Sorry, no text instructions yet, only video instructions for now.

The updated directions are in instructional video form. You can see the whole video here . Alternately, you can watch one step at a time below.

Part 1: Introduction and Overview

This video lets you know what you're getting into if you want to make the overhead water rocket launcher featured on Ask This Old House during their special kids program. It uses inexpensive, readily available materials. It peeks at how the launcher works: the bump that seals the water and air pressure in the bottle, the zip-tie assembly that holds it on, and the spring that helps prevent accidental launches. And part 1 asserts that shooting a water rocket is analogous to driving a car--potentially dangerous, but safe if done with care.

Part 2: Materials and Tools.

For printer friendly supply list, click here. You can get the things you need at a building center, plus one thing at an auto parts store. The overhead water rocket launcher uses less than $10 US of actual material.

Substitutes for the 2" of 1 1/2" pipe

Observant correspondent Andrew Baillie of Atlanta discovered that you can substitute a 1 1/4" slip joint for the 2" of 1 1/2" pipe. Also you can make one from scratch. Read More>>

Part 3: Pipe and Valve

Install the Valve, Cut and Glue Pipe. You hook a bicycle pump to the launcher to pressurize the bottle. You drill a hole and install a common car tire valve. Then you can glue the plastic pipe together, which stinks (do it outside) but is not hard to do. You glue the pipe first so it will be strong by the time you are done with the rest of the launcher.

Part 4: Seal on a Bump.

I worked in Bangladesh in South Asia for an organization that promoted inexpensive water wells and hand pumps. It was there that I learned how to heat and form PVC plastic pipe. With only a candle you can create a little bump on on the small pipe that will seal in air and water while you pressurize the rocket. It's easier to make than a seal with O rings and more durable, too.

Part 5: Make the Trigger Mechanism.

An Australian water rocket enthusiast named Ian Clark came up with a simple, effective trigger mechanism that uses ordinary plastic ties (zip-ties).

Part 6: Make a Safety Spring.

A British Astronomer who--naturally--also tinkers with water rockets (sending up mini video cameras) devised a simple spring that helps prevent accidental launches. Fittingly, it's made from a 2 liter bottle

Part 7: Launch Tips

Here are launching tips like how much water and how much pressure to put in, and tipping water out of the launcher after each use. And how to modify a bottle to launch water balloons. In addition to the video version, below you can find more tips and answers, including some you won't find on the video.

Printer friendly version of the launch tips.

If the air pump locks up it's because too much water got into the launching tube and the check valve on your pump is not working. Then water leaked into the pump. The check valve is a one-way valve that is supposed to let air go out of the pump, but not go into the pump. It's on all air pumps, near where the hose goes into the pump, but it is usually not accessible for repair. You'll have to unhook the pump from the launcher and pump out the water. To prevent it from happening--short of getting a new pump--is to pump fast so there is little back flow and...

Tip out the water in the launcher after each use

If there is a leak as you pressurize the bottle you can readjust the zip ties for a better fit. If it's a hot day and you don't mind getting sprayed a little, you don't have to fix a small leak.

To adjust the launcher, loosen the hose clamp so you can slide the taped-together zip ties. You might want to mark on the pipe so you know how much you are moving them. Move them just 1/16" or so at a time, toward the bottom of the launcher to tighten the fit. If you move them too much you won't be able to get the bottle hooked on.

Very rarely, if the bottle has landed on hard pavement, the neck of the spout can crack, causing a leak.

How much water depends on what you want. You don't have to put any water in the bottle, which might be good on a cold day when you don't want to get wet. It makes a satisfying sonic boom when launched without water. Note, however that the trigger mechanism has to be well adjusted (see above) because air volume leaks out much faster than water.

If you want to get wet, you can fill the bottle up to half full with water. However, if you fill it much more than that it can be dangerous. Too much water displaces the compressed air, which is your stored energy source once the bottle is in the air. And the bottle is heavier, too, so a bottle with too much water might fall on someone before having ejected all its water.

When launching water balloons (see below) I find that a bottle 1/3 full of water works well.

How much pressure do you need in the bottle? Depending on how hard you have the bottle jammed onto the bump, you will likely need 30 or 40 psi of pressure just to get the bottle off of the launcher. And you need that much pressure to eject all the water before the bottle lands. Young kids will need some help getting the pressure high enough.

So how much pressure is too much? I talked to a bottle manufacturer who said they can guarantee the bottle will not burst up to 100 psi, but that is a new bottle, unscratched and not crushed, not left in the sun for weeks, etc. Although you can see bottles bursting at 168 psi, I stick to 70 psi maximum. If you are going to go higher, use a different kind of launcher where you are not so close to the bottle, and wear earplugs!

If your pump does not have a pressure gauge, you can unhook the air-pump use a cheap tire gauge from an auto parts store to check the pressure. With a typical bicycle tire pump, it gets pretty hard to pump after 70 psi.

If the bottle gets stuck on the launcher it could be that you need more pressure in the bottle (see how much pressure, above). Once, a bottle got stuck because the water inside was sandy. The sand lodged in between the bottle and the pipe, so even with a lot of pressure it would not launch. I was able to push off the bottle with my hand, still pointing up, of course. You can also disarm the rocket of its energy by unhooking the pump and pushing the inside core of the tire valve, which will let the air out.

What about fins on the water rocket? When we taped the Ask This Old House segment about water rockets, I was the overhead launcher construction expert. But the show’s producer, Chris Wolf, was the water rocket expert. He made some cool rockets with nose cones and fins, and they soared really high, much higher than the plain old bottles that I launch. Bottles tend to tumble around in the air, creating a huge amount of drag, so they don’t go as high. Fins keep the low profile of the nose pointing up, so the rocket goes higher.

But we found that the upside of adding fins to rockets is the downside as well. Unlike a tumbling bottle, they speed down hard and fast enough to possibly lacerate a scalp or break a windshield.

There're ideas on the internet for parachutes and other recovery devices to slow the descent of the rocket, but they're much harder to get to work than anyone thinks heading into it. So if you launch finned rockets, do it in a wide open space with no kids or cars nearby.

Launching water balloons Water balloons launched from water rockets go as high as finned rockets. Although the dense balloon would sting if it landed on you, it's unlikely that you would need stitches. I have heard of people launching tennis balls, too. The simple modification for the bottle to launch balloons is shown near the end of the video instructions. Of course you still have to launch water balloons in wide open spaces sans young kids. And it goes without saying that launching hard objects like stones could cause severe injury--or even kill someone. See Safety FAQs>>

Overhead Water Rocket Launcher Home

Introduction

2-liter soda bottles turned water rockets are as shrieking good a time as a water park and a lot easier to build. They streak into the air faster than the eye can track while dousing everyone in the launch area with water. Occasionally, my middle school students host and teach classes of elementary school kids from across the street to make a take-home science project, and we always finish off with a couple of launches. Years later, when I teach those now-middle school kids, they never remember me, but invariably remember the water rockets! I have been searching for the "perfect" water rocket for two decades. I finally have a design that I'm happy with: it's easy to make with locally available materials, dirt cheap, and it launches safely overhead. Of course, 2-liter bottles are free, and the launcher is virtually indestructible--no "O" rings or anything to wear out. A bicycle air pump provides the air pressure. I am confident that a normally handy person can make this project in an hour or two. I have created step by step instructions for making a water rocket launcher. It's free--I do ask that you give me feedback  about things like clarity of the directions and I ask that people outside North America inform me about the availability of the pipe sizes in their respective countries using metric measurement. It is a great joy when experimenters share design innovations and improvements that I can in turn share with everyone through this site. Feel free to link to sciencetoymaker.org or any page of it so others can access the material directly (there are many other science projects)

Simple Water Rocket


Here is an alternate, simpler water rocket launcher design that's easier to build and gives kids a tactile understanding of "pressure".

Great Water Rocket Links

See the links to the best water rocket web sites I've found--including slow-motion launches, aerial photography and multi-stage rockets

I'd like to know how this project goes for you. I'm happy to answer questions about it. Feedback from you is an important way for me to know what works and what needs clarification.