Step 1 Get Ready
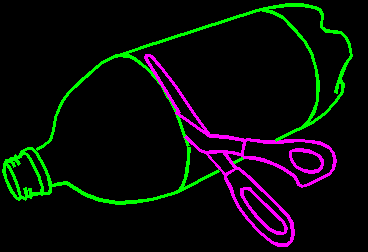 Cut off the spout end of the bottle as shown. The razor can be helpful for starting the cut. Putting on a lid tightly helps keep the bottle from collapsing as you start the slice. If using a knife, be careful that it doesn't glance off as you start the cut.
 If you haven't already put on a bottle cap, twist one on now. Have the pipe and water ready to go. Read through step 2 and step 3 so you know what to do once the bottle cap is melted.
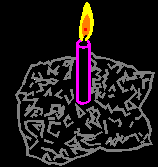 Light the candle. The air around the candle must be still or it will be difficult to direct the heat where you need it the most.
Step 2 Melt the Lid
If you examine the bottle cap you will see there is a second, thinner circle of plastic pushed into the inside of the bottle cap. This "inner seal" will also be melted and formed. It usually takes about 2 minutes for the heat to travel from the other side of the cap enough to melt this inner seal, too.
Hold onto the bottle so that the cap is suspend an inch or two over the top of the candle flame. If the cap smokes, move it up and away from the candle more. You are going to smell melting plastic, but there should not be smoke.
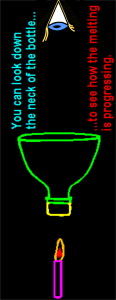 Viewing from the top, look for changes in appearance in the bottle cap. First you will concentrate on directing to the middle of the cap, not lopsided to one side. Then you'll be looking for the signs that it's melted enough to form, but not so hot it melts a hole in the cap.
After a minute or so of heating, the inner seal appears to be a little puffed up (convex) as viewed from above. I think the puffing might be caused by the air trapped between the cap and the seal heating up and expanding.
Perhaps 15 or 30 seconds later part of the inner seal will take on a slightly shiny, wet appearance which indicates melting. Soon it will begin to droop down a little instead of puffing up. If the melting and drooping is NOT in the middle, try to direct more heat to the un-melted part.
Once you see the some drooping lift up and look at the cap from the BOTTOM. The pattern of melting on the bottom, too, will show you where to direct more heat.
When there is significant drooping that indicates the plastic is soft enough --but before there is a hole melted in the cap-- quickly move to the next step while the plastic is still hot. I know it sounds kind of vague about when to do that, but I don't there is any substitute for practicing on a few caps. Melting them is fun anyhow.
Step 3 Form the cap to a new shape.
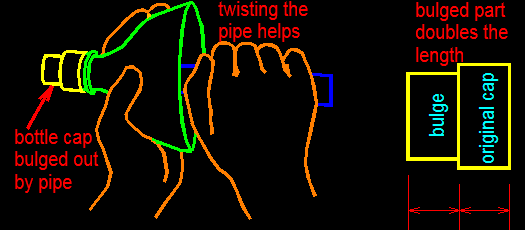 Push the pipe into and through the neck of the bottle. Twisting the pipe slightly as it goes in helps control the motion. It will push against the soft spot on the cap and bulge it out to be about twice as long as the original bottle cap. The neck will keep the pipe perfectly centered. Interestingly, the bulge will hug the pipe and take its shape.
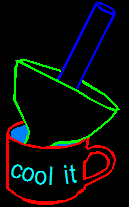 Quickly cool the bottle cap by dunking it in water. The plastic that forms the side of the bulge might seem a bit thin, but that's ok.
Step 4 Cut and attach the quick-change part.
 Pull the pipe back out. Twisting might help again. Un-screw the lid off the bottle. Cut the end off the bulge. I think the easiest way to start the cut is by cutting off the corner formed by the end and the side, so you're actually cutting through 2 layers at once.
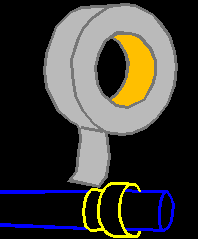
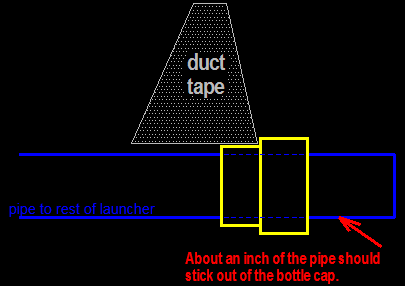
Twist and slide the plastic piece onto to the end of the launcher. Have about an inch stick out the other end. Tape the bulged out part to the pipe with duct or other strong tape.
Screw on a bottle and you're in business.