Note: If you want a very quick, easy project, you can stop after the first two steps. The balloon won't spin, but it will float.
What You Need
- Round balloon
Look at a discount store like Walmart in the section where they sell birthday party supplies. If there is more than one size of round balloon, get the bigger size. - Hair dryer with long nose
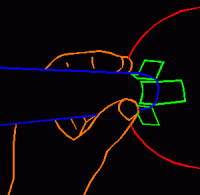
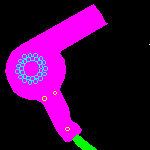 The hairdryer has to be the kind with the long front nozzle--as shown in the picture--so the air stream is well directed. Unfortunately, this style is hard to find these days. Perhaps a store that specializes in barber supply products would have them. A vacuum cleaner hooked up the wrong way so it blows out air instead of sucking it in might work. I have not tried a leaf blower yet, but that might work.
 - Tape, string, pennies, ruler
You can use dental floss, thread, or whatever for string - Optional
Scissors, marker, paper
STEP 1: Inflate the balloon, attach string and weight.
- Inflate and tie off a round balloon.
- With about a foot of string, tie one end of the string to the balloon.
- Tape one or two pennies to the other end of the balloon. With one penny, the balloon hovers farther from the hair dryer. With two pennies it is more stable. You can fly it right now, although it won't spin yet.

STEP 2: Fly the balloon
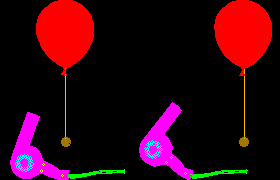
Set the hairdryer for minimum heat. Experiment with the air-flow setting. High flow flies the balloon farther away. Low flow might allow more stable flight.
Start flying the balloon above the hair dryer. Then you can slowly tilt more and more so the balloon will hover farther away.
STEP 3: Start laying out the tape-turbine locations.
The small, angled tape protrusions will spin the balloon. This step and the next are optional, but helpful, especially the first time for getting the tape evenly on the balloon. That makes it more stable. It also provides a learning opportunity for kids as the balloon is divided into hemispheres, quarters, then eighths.
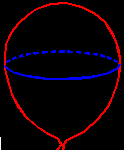
With the balloon oriented as shown, use a magic marker to draw an "equator." I have never been able to draw a decent looking line. It has not hurt the performance, but if you want it to look good, try this: Wrap a long strip of paper or a sheet of newspaper around it and trace on the edge.
STEP 4: Finish laying out tape-turbine locations.
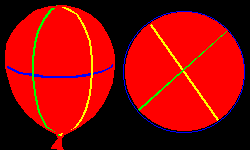
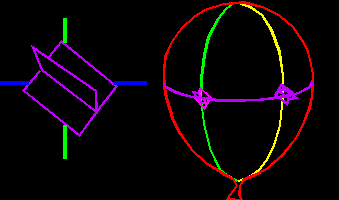
Now draw two meridians perpendicular to the equator and to each other. The illustration shows a side view, the right side shows how it looks from the top.
STEP 5: Make the tape-turbine pieces.
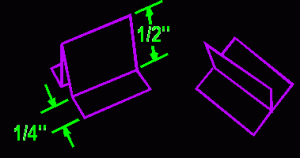
Cut off a one and one-half inch piece of tape and fold it as shown. The middle will stick together, but fold one quarter inch of each end out so they do not stick to each other.
I always mangle half of the tape, and even the best are not quite right. The balloon still spins great. If you really hate working with tape, try cutting and folding plain paper strips, then stick them to the balloon with a glue stick or tape.
Step 6: Stick tape-turbine blades onto balloon.
Stick on one piece of formed tape (or paper) at each of the equator / meridian intersections, angled about forty-five degrees from vertical. They all have to slant the same way. The right illustration shows a close-up view.The balloon might spin now with just the four turbine blades. Try it, remembering that you still need the string and one penny attached.
STEP 7: Stick on more turbine blades if needed
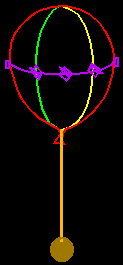
Stick four more tape blades on the balloon in between the tape already there, as shown.The balloon should spin quickly and fly with more stability than when it was not spinning.
To see an even more stable design, as well as activities to do with the spinning balloon, go to the following steps.
STEP 8: If the balloon seems too wobbly, replace the string and weight with a paper tube (optional).
Use an ordinary 8 1/2" by 11" sheet, and roll it up so it is long (11"). Roll it tightly enough that the wall of the tube has two layers, which will make it about 1 1/4" in diameter. Tape the tube so it holds its shape.
STEP 9: Tape paper roll to bottom of balloon.
Tape the paper tube onto the bottom of the balloon
Tape it on the underside so it is exactly centered on the outlet of the balloon, with four pieces of tape.
Now try flying it (no need for the penny now) If you got it centered it should be more stable.
Put a cup on the edge of a table and try to land in the cup. It's not easy, is it? It makes me appreciate how difficult and dangerous it must be to land a helicopter in turbulent wind.

I'd like to know how this project goes for you. I'm happy to answer questions about it. Feedback from you is an important way for me to know what works and what needs clarification.
