Make an Airplane from a Dragonfly Helicopter

So you’ve made a dragonfly helicopter and now you want to make it into an airplane. I get it. If you can make a good flying airplane from straws, paper clips and an old bottle, is there anything you can’t do? But let’s be clear: getting stable flight from the helicopter is pretty easy. Getting stable flight from an airplane is more challenging. More things can go wrong.

But struggling is a really good way to learn stuff. And the strategies here are good for other flying model plane projects - Slater, the SciencetoyMaker

Full Transcript

Hi it’s Slater

So you’ve made a dragonfly helicopter and now you want to make it into an airplane. I get it. If you can make a good flying airplane from straws, paper clips and an old bottle, is there anything you can’t do? But let’s be clear: getting stable flight from the helicopter is pretty easy. Getting stable flight from an airplane is more challenging. More things can go wrong.

But struggling is a really good way to learn stuff.
And the strategies here are good for other flying model plane projects

I’m assuming you’ve made a working dragonfly helicopter. That’s where we start from.

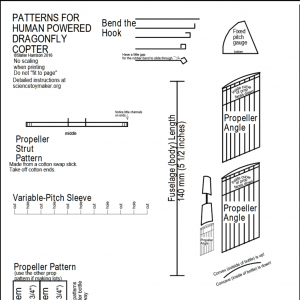
Print out the pattern, no scaling unless it’s 100%, no fit to page. 

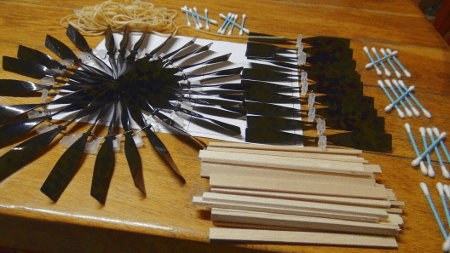
Let’s match the wing to the propeller—we’ll make it big-- or the plane will roll over from propeller torque. We need 6 rectangles from 3 foam plates. [[It’s heavier than balsa and tissue paper, but stronger too. While cut pattern]] Get the pattern centered and tape. If we fold in the middle to know where to cut, we can reuse the pattern.

Bending in camber, or curve for all 4 wing sections makes an efficient, airfoil shape. I bend about the front 25% of a long side of a rectangle. It’s hard. The best way I found was to make little bends with a ruler, then bending with fingers and rolling with a pen. But use whatever method works to make it look like this.

To make the flat middle section, hold 2 short ends together and tape top and bottom so it stays flat. But for the two wing sections at the end, we’re going to make them slant up, called dihedral. [[Cut out the angle pattern and apply it to the bottom of the wing.]] That prevents roll and stabilizes the plane. So for these end sections, only tape the top. Notice how the wing hinges. The angle pattern tells how much to bend and filling in with a little hot glue makes it stronger. Only then do I put tape on the bottom.

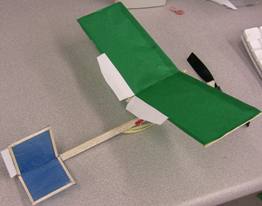
It’s tempting to just hold the wings in between straws, and I’ve tried it. But the old trick of hanging the fuselage well below the wings is yet another way to gain flight stability—worth the extra hassle in my opinion. Punch 4 holes and put the thin ends of toothpicks in. It’s best if the flat side is parallel to the center line. Then hold them in with a thin layer of glue, top and bottom. If it’s not quite right, you can reheat the hot glue and reposition.

The last two foam rectangles make the tail section. Cut the vertical part to a square. Find the middle of the other piece. Glue and tape to the middle.

Strengthen the bendy part of a straw with some tape. Flatten that end and tape to the tail section. Let’s cut a little off the tail starting in the middle. Two cuts allow you to telescope into the fuselage. Push pretty firmly so it stays in. [[aligned to wing?]]

Usually we obsessively reduce weight in planes. But there are two places where weight helps flight stability—in the very front and as low as possible. So landing gear, made from small paper clips--does double duty. When you test fly the plane and this is happening—severe stalling—adding front weight is one way to correct it. I’m using 4 paper clips for this landing gear; and I’ll probably add two more if it keeps stalling. Glue it on securely.

Something is wrong here—can you see it? [[wing is on backward]] The wing goes on with tape, so we can adjust it. And I did have to move the wing more toward the back of the plane after the first test flight. But first, here I taped the wing on about the middle of the fuselage. I could use a third hand. The front toothpick does not go below the fuselage bottom. But the back does go a little lower than the front because—you guessed it—better flying. This gives the front of the wing a very slight upward angle, called angle of attack.

The tail should straight and lined up with the wing, at least at first. It looks a little crooked here. Try to get it straight. Let’s snip off the vertical tail like a real plane.

I think we’re ready to fly. Make sure you wind it up enough.

The first time I flew this plane, is stalled. Sometimes people confuse stalling with diving—which comes after a stall; but if it stalls first, it’s a stall. Sometimes, if there’s enough altitude, it will recover and stall again.

I added some front weight to the front to counter the stall, but it still stalled.

That does it: I’m moving the wing all the way back. Beside adding weight to the front, moving the wing more toward the back is another good way to stop stalling. And this time it works—no stalling!

If the plane started diving or not gaining enough altitude, I would have moved the wing more forward and/or taken off some weight.

Oops, now it’s in a tree. It’s always something.

I’ve heard that a model plane should have about the same amount of weight in front as there is behind if you lift here. It’s a point about a third of the way from the front of the wing, where most lift occurs. I pick it up by paper clips, and sure enough it balances horizontally. Can you see how either moving the wing forward or backward, or adding or removing weight would change this balance point?

Real airplanes have lots of control surfaces, but that’s beyond the scope of this video. I’m just tickled that it flies this well. I’d love to hear how it went for you. What worked and what didn’t? If you had trouble, what fixed it?

Rubber Band Powered Airplanes that Fly Great

All my 6th grade students-- over 250 of them every year when I was teaching - made this project from scratch. Thin strips of balsa wood were challenging to work with, but when the kids put their finished creations to flight there are no words to describe the joy


Introduction

Seeing one of these planes soar gracefully overhead re-defines your perception of the three-dimentional space above. It even re-defines us: we are creatures living at the bottom of an ocean of air. All my 6th grade students-- over 250 of them every year when I was teaching-- made this project from scratch. Thin strips of balsa wood were challenging to work with, but when the kids put their finished creations to flight there are no words to describe the joy.

Although this design worked well for us, I owe it to you to say: check out this other site, by Jan Nosul in the Netherlands, for a design that's make from scratch out of common materials. If you do not have access to balsa wood and propellers, these are the best instructions for getting started, I think. I asked Jan to tell me more about himself and how he came to model airplanes. His reply was so interesting that I copied and pasted it here.

You also might want to check out a flapping flying ornithopters by Nathan Chronister. They are truly unworldly to watch. He even has some free plans.

Washout Project

I am experimented with a crude kind of "washout"--having less wing tilt at the wing-tips than at the root--by gluing paper that is curved down near the middle of the wing. Washout can help prevent a problem called "tip stall" which causes the plane to spiral dive.

The latest development to this project is making propellers from ordinary paper clips and the plastic from 2-liter bottles.


More About Jan Nosul

I asked Jan to tell me more about himself and how he got involved with indoor models. His reply was so interesting and funny that I am just copying and pasting from the e-mail:

Hey Slater

I am very happy to see, that this project can have a chance to help out kids around to start with this beautifull hobby.
With your support this seems to be way more possible. I guess would be good to update the tutorial a bit with more explanations
here and there about details, I will try to make it done asap. Also I will try to include trimming tutorial and basic aerodynamics behind it in an easiest way possible. A lot more can be done to explain the topic, actually every part of such an airplane can have a separate tutorial, so let us see what the feedback will be 🙂

Some info about myself. My name is Jan Nosul, I am polish, but I live permanently in the Netherlands. I am 35 years old, always kinda technical, I work in IT. Came to NL 6 years ago on holiday, and actually I stayed longer 😉

I guess the virus of such a flying aircrafts was in my veins all my life, since I think I got it with my father's blood 🙂
As a kid he was busy with other kids building big wooden outdoor gliders, and some of them he later on built with me and it was a lot of fun. A lot of flying toys were at that time available and popular in Poland, also people did not have a lot of money, so this was way more common to build toys by kids themselves.

Some time later I was reading about rubber band airplanes in few books and magazines, also very easy versions I tried to build as a kid, but without too much success in flying. Today I know, they were way too heavy. But they flew for short time and this was magic.

Last holidays we were camping with my girlfriend in a nice place and I made paper glider for fun. That was way more fun that we expected, both we played with it for quite some time:) I think that the flying spirit in me was triggered back to life at that time:) After coming back home I realized that this could be a nice new hobby for me, cause my long lasting hobby programming, actually is not a hobby anymore, since I do it professionaly for years, I needed new one!:)

So I started playing, I knew it would be rubber band powered. I came across ornithopters. And it was way more difficult to get some flying time, than I expected. I made a lot of this models, before got decent climbing flight. And I read on Nathan Chronisters page, that you actually can not build a good flying ornithopter from common materials, or its very difficult. I took it as a challenge;)

I made bamboo versions in the end, which flew ok. Its white version in this video:

I plan to merge this two channels into one btw.

The problem in the Netherlands is that its super difficult to fly outdoor in my opinion. Everywhere you have trees and water plus a lot of wind, so I lost a lot of models. That was not fun, so I had to go indoor as a natural process. Also I like to make sure, that the model I build flies, because of its properly made, powered and trimmed, and not because its too much wind 😀 So indoor and if indoor, than propellers - not ornithopters. And I carried a challenge of common materials built to this task as well.
I thought propeller based airplanes will be way more easy than ornithopters and that was not truth 🙂 A lot of work has been applied to that, and I started adopting professional indoor practices like rolling tissue tubes, making pigtail bearings, bending wet wood and drying it, etc. So you learn a lot doing that, and that can be super beneficial for those all kids I guess. As Mike Parlang, US champion in the indoor flying says: There are many opportunities to advance your knowledge of what it takes to make one fly good (or many opportunities to find out what doesn't). Usually its the second one 😀 Lets hope those kids will be stubborn enough 🙂

Jan

I'd like to know how this project goes for you. I'm happy to answer questions about it. Feedback from you is an important way for me to know what works and what needs clarification.

Human-Powered Dragonfly Helicopters Home

If YouTube is blocked at your school, try this MPG file (18MB)

Dragonfly Helicopters Are a Great Beginning Flight Project!

There is something empowering about making the propeller from a trashed 2-liter drink bottle; and wind up with a propeller that's superior to commercial propellers. Your flying machine will go higher than the tallest trees with no batteries (assuming you wind it). Unlike model airplanes, which can be plagued by stability problems from a slightly warped or crooked wing, helicopters always fly true. Nobody is excluded. Windup helicopters are so inexpensive that whole classes of students can make them for much less than a dollar for each project.

Q&A

Below are some questions and answers. When there are numbers, they refer to where in the video (minutes and seconds into the video) to see what the text is describing.
If you have other questions about Dragonfly Helicopters, contact me or leave a message in the comment section at the bottom of this page, and I’ll answer them.

Q. Where are the instructions for building the helicopter?
A. Click here. This is called the Eco-Empirical (Eco-E for short) design because it's made largely of recycled stuff and it's really good for experimenting with. That distinguishes it from a simpler design...

Q. Is there a simpler, faster, easier design for younger kids?
A. Yes, it's called the Easy Dragonfly Helicopter.

Q. Do we buy the Dragonfly Helicopter or make it?
A. Yes…er, both. You can make either design from a kit or buy them completely ready-to-fly (well, you still have to wind them).

Q. What if I don't want to make them from a kit?
A. At the end of the Eco-Empirical instructions there are some tips for making a propeller from stuff around the house. So, you use a steel paper clip instead of the aluminum wire that would be in the kit. It would not be variable-pitch (change the propeller angle) the way the kit is. So far, still ok. But, the kits also supply rubber that is specifically made for model airplanes and there is absolutely no comparison between that and regular office or school rubber bands. I'm not saying model rubber is a little better; I'm saying--based on lots of trials--that it's an order of magnitude better. Why spend time making a very high-quality flying machine and then power it with a low-quality rubber motor? Fortunately, you can buy small amounts of rubber.

Q. How high to the helicopters go?
A. If you wind them up enough, Human Powered Dragonfly Helicopters will go way higher than tall trees. The heavier kind made with commercial propellers do not go as high, but will still go as high as a big house or hit the ceiling of a gym, auditorium or flight hanger.

Of course, how high the copters go depend on how much you wind them up(1:13). It takes beginners some time to understand that they can wind up at least 160 turns in warm weather. But rubber loses some of its stretch when it's cold, so do not wind up as much in cold weather.

When you are ready to go beyond basic flying, there are other strategies for going even higher. You can make the rubber bands longer. I don't do that with beginners because there is more winding to do before it flies at all. But when you wind it a lot, you get more power. Experts make the rubber loop long so it's very loose. They also wind it up with a special winding device which saves time. And they stretch it as they start winding, slowly un-stretching as they wind. Serious pilots add lubrication (not oil-based) to the rubber and use geared winders so you can wind it up more. Green soap and glycerin was the traditional way; now silicone based lubricants are used also.

Q. Can you really send gliders up with the helicopters?
A. Yes, you can make a very simple paper glider that you wedge under the rubber band. As the rubber band unwinds, it pushes out the gliders. You can see how to make the gliders here and I am making a web page dedicated to making releases more consistent as people like you experiment and find eve better ways to do it.

Q. Why did you make the helicopter look like a dragonfly?
A. I didn’t—at least not intentionally. I set about to make the most efficient, highest-flying helicopter. The wings serve two purposes: to always make it go up, and to keep the body (fuselage) from spinning too much so the propeller can spin more. I discovered that long, thin wings attached near the top worked best…and—hey—it looks so much like a dragonfly!

Q. Do the rubber bands break?(1:13)
A. It is quite rare for Tan Super Sport rubber to break. In fact, most people never wind them anywhere close to their capacity. However, we send extra rubber bands with our Dragonflies just in case. You can also buy enough rubber for 6 helicopters inexpensively because we can send it in an envelope.

Q. Can you make the Dragonfly autogyro down?
A.  Yes, by twisting the wings—left up, right down as the wing ends face you—then the whole Dragonfly will turn like a helicopter once it has reached its peak and starts down(2:32). It’s pretty amazing, when launching with no wind, that even when the copter goes really high, it will land very close to where you launched. However, if there is even the gentlest breeze, it will land far away.

Q. Can you change the flight characteristics of the Dragonfly?
A. Yes. Usually the Dragonfly heads straight up. But I’ve found that as I tape the wings closer to the propeller and give the wings less dihedral (dihedral is the curve of the wings), then the flight of the Dragonfly becomes more erratic. And that can be cool because it reminds me of the way real dragonflies zigzag so abruptly!(2:55)

Q. How strong are Human Powered Dragonfly Helicopters?
A. The helicopters can bash into a ceiling with no harm. If someone can hold a paper airplane without smashing it up, then they should be able to handle a Dragonfly. The weakest part of Dragonflies is the wing. It is made of lightweight foam. If you pull it out of a bush or tree, the foam might break. But no worries, just tape it and it’s good as new.(3:06)

Q. Can you change the pitch of the propeller?
A. The pitch is set to be ideal. However, if you want to experiment, you can change it by pinching the glue joints (where the shaft glues to the prop spar, an where the prop spar glues to the blade) so they don’t break. So when you twist, it only twists the propeller spar, which is the stick part of a cotton swab stick(3:11). If you bend it enough, it will not spring all the way back to its original angle.  Obviously, if you do this too much or if you don’t stabilize the glue joints enough, something will break. But it is interesting to see how a more aggressive pitch makes the copter go higher—to a point. Then it stalls and is useless. DO NOT TRY THIS TWISTING IN COLD WEATHER!! I just discovered this the hard way. Only do this when it's warm.