Substitutes for the 2″ of 1 1/2″ Pipe

1 1/4"Slip Joint

So you don't want to buy a long piece of 1 1/2" pipe when you only need 2 inches of it. Before you make a substitute from scratch (instructions below), observant correspondent Andrew Baillie of Atlanta discovered that you could simply substitute a 1 1/4" "slip joint" (pictured below). It has the correct inside diameter and is already 2" long. Why didn't I think of that?!
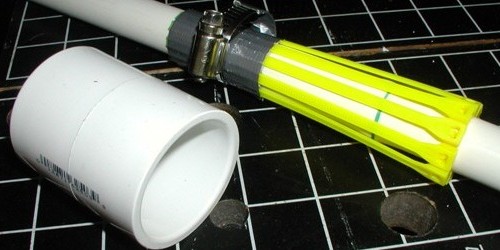
Neither the inside or the outside diameter ever actually is the inch designation of pipe. The inside diameter of the 1 1/4" slip joint--the measurement that matters-- is about 1 5/8". And if you are working with metric pipe, the inside diameter of the slip joint should be about 42 mm.

Make a Substitute from Scratch

If you cannot get either 2 inches of the 1 1/2" schedule 40 pipe or the slip joint, there is a workaround. The same tough plastic that allows 2-liter bottles to withstand high pressure can also be cut up and formed into a pipe.
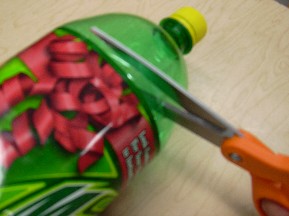
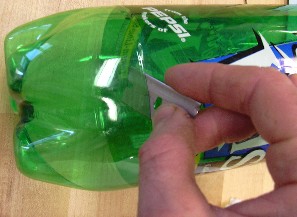
Cut into a 2-liter bottle above the label, as in the picture above.
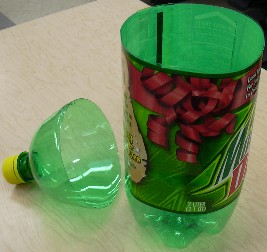
Cut around the bottle, right on the edge of the label. You will not use the top, but it does make a good funnel.
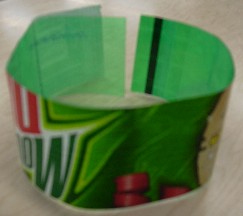
Measure and mark 50mm (2") from the top of the bottle, several places around the bottle. Cut down to a mark, then turn 90 degrees so as to cut out a strip 50mm wide.
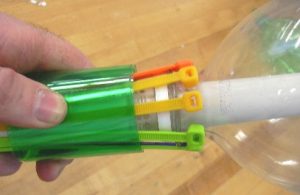
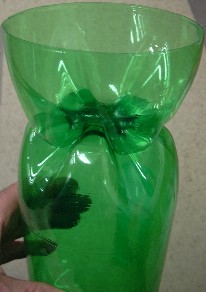
Peel off the label. The next part is easy to show someone, but difficult to explain. The bottle must be pushed onto the bulge, and ties adjusted so they fit over the handle of the bottle--as shown in the picture below. Have piece of duct tape already cut because your hands will be full when you need it.Wrap the strip of plastic that you just cut around the ties. Do not wrap it where the heads of the ties are. Wrap it fairly tightly. Don't let go or it will unravel.
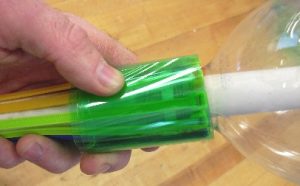
Still holding onto the wrap of plastic, slide it up and over the heads of the ties (you can see them through the green plastic in the picture below). The wrap of plastic unravel a little bit to get big enough to slide over, but do not let it get very loose. The friction as it slides over is what holds the trigger in place until the rope pulls it.
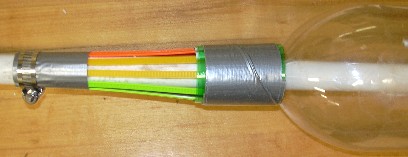
Without letting the plastic unravel, put the piece of duct tape on it so now the duct tape keeps it from unraveling. Then wrap at least 4 more layers of duct tape around. There will be lots of stress on this part when the bottle is full of pressure. When the slide trigger/pipe is slid over the heads of the ties as pictured below, you should not be able to take the bottle off.
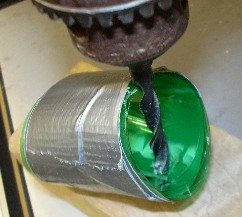
A rope must be firmly attached to the trigger you have just made so it can be pulled from a distance. Either drill a hole for the rope, or tape the rope on with duct tape. If you drill, it is almost impossible to drill from the top because the plastic squishes. Instead, angle the bit and drill into the bottom as shown in the picture below. When the hole is drilled, thread the rope through and tie it somehow.
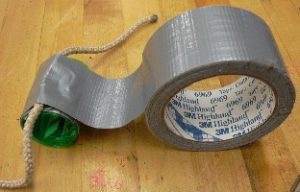
Alternately, you can tape the rope on. It is best to weave the rope through several layers of tape so it does not come off. Tape on rope with about 150mm (6") sticking out as in the picture above.

Hurling Water Balloons into Space (or at least really really high)


"Be careful and proceed at your own risk"--Slater, the ScienceToyMaker


In the early days of 2-liter bottle water rockets I brought in my first launcher to show to my ninth grade technology classes. To make a long story short, before I could stop him a student--thinking I had looked away for a moment--put an apple on top of a bottle and quickly launched it. My first reaction was anger (the apple would have injured someone if it had landed on them). But I was also astonished at how high the apple went--almost out of sight.

Video tapes of soda bottle water rocket launches show that the water is pushed out within 4 or 5 meters of the ground. From then on the bottle has very little density: not much weight for the amount of volume it takes up. Because of the relatively low density, air resistance slows down the empty bottle very quickly. To see an extreme example of this try hurling or pounding an inflated balloon as hard as you can. No matter how fast it starts out, its momentum is completely gone within a meter.

By contrast, an apple (or a water balloon) weighs more than an empty bottle for a given amount of volume. So, while there is still air resistance, momentum carries it much higher. That's why bullets for guns use lead--much denser even than water--despite the toxicity of lead.

For the highest launches, match the size of the water balloon to the thrust of the rocket. In my experience, water balloons about the size of a small apple go the highest. Bigger water balloons are easier to see and make a satisfying splash when they land.

I offer water balloons as the least dangerous thing to send up. Launching a stone with a water rocket could easily kill someone if it landed on them, and whoever did it should be prosecuted to the fullest extent of the law just as surely a person who fatally shoots someone with a gun. That is not to say that launching water balloons instead is "safe." Even a water balloon really hurts if you try to catch it. Launching water balloons requires a big, empty field or lake to aim the launch into. Young children should be under roof or absent such events.

I got some feedback about the dangers of launching water balloons from Shawn Suttonm of Nebraska, which I reprint verbatim:

I am making water rockets with my boys and came across your page, it is the best I have found and now understand the cable tie trigger...thank you for the good pictures.  I have a comment about the water balloons.  A couple of years ago while launching water balloons with a water balloon launcher we accidentally had one of the small balloons, about the size of a baseball, hit a Dodge Durango hood right where it bends down to meet the grill.  The launch angle was fairly high as we only wanted about 100 feet of distance and when the balloon hit it actually dented the hood at this bend point.  The dent was the same size as the balloon.  I do not know how high the balloon went or the height yours go.  This was in the summer and the hood was probably warm but the force of the falling balloon was incredible.  I thought I would share this expensive lesson with you.

Bottom line: be careful and proceed at your own risk.

How to Make a Water Balloon Launching Bottle

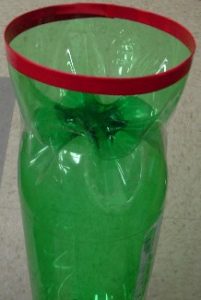
Make a special launching bottle by first cutting off the bottom of a bottle. I start the cut with a razor blade, then finish with scissors.

Fit it to another bottle (whole). The lobes interlock nicely.

Tape the top edge to make it less sharp. I used red electrical tape. I used 2" (50mm) wide clear packaging tape to hold the bottles together. It does not show up in the picture below. Everything must be dry when you apply the tape--then it's ok to get wet later.

I find that water balloons go the highest if I fill the 2-liter bottle only 1/3 of the way up with water.

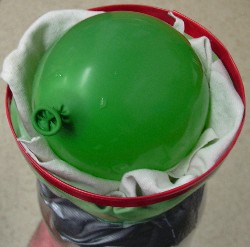
Here is a water balloon packed and ready for launch. I put a rag or something below the balloon because I'm afraid the lobes will break the balloon at launch, though I have never experimented to see if it is really necessary.

Build an Overhead Water Rocket Launcher

This is the version with the trigger mechanism. There is a simpler version here.

Sorry, no text instructions yet, only video instructions for now.

The updated directions are in instructional video form. You can see the whole video here . Alternately, you can watch one step at a time below.

Part 1: Introduction and Overview

This video lets you know what you're getting into if you want to make the overhead water rocket launcher featured on Ask This Old House during their special kids program. It uses inexpensive, readily available materials. It peeks at how the launcher works: the bump that seals the water and air pressure in the bottle, the zip-tie assembly that holds it on, and the spring that helps prevent accidental launches. And part 1 asserts that shooting a water rocket is analogous to driving a car--potentially dangerous, but safe if done with care.

Part 2: Materials and Tools.

For printer friendly supply list, click here. You can get the things you need at a building center, plus one thing at an auto parts store. The overhead water rocket launcher uses less than $10 US of actual material.

Substitutes for the 2" of 1 1/2" pipe

Observant correspondent Andrew Baillie of Atlanta discovered that you can substitute a 1 1/4" slip joint for the 2" of 1 1/2" pipe. Also you can make one from scratch. Read More>>

Part 3: Pipe and Valve

Install the Valve, Cut and Glue Pipe. You hook a bicycle pump to the launcher to pressurize the bottle. You drill a hole and install a common car tire valve. Then you can glue the plastic pipe together, which stinks (do it outside) but is not hard to do. You glue the pipe first so it will be strong by the time you are done with the rest of the launcher.

Part 4: Seal on a Bump.

I worked in Bangladesh in South Asia for an organization that promoted inexpensive water wells and hand pumps. It was there that I learned how to heat and form PVC plastic pipe. With only a candle you can create a little bump on on the small pipe that will seal in air and water while you pressurize the rocket. It's easier to make than a seal with O rings and more durable, too.

Part 5: Make the Trigger Mechanism.

An Australian water rocket enthusiast named Ian Clark came up with a simple, effective trigger mechanism that uses ordinary plastic ties (zip-ties).

Part 6: Make a Safety Spring.

A British Astronomer who--naturally--also tinkers with water rockets (sending up mini video cameras) devised a simple spring that helps prevent accidental launches. Fittingly, it's made from a 2 liter bottle

Part 7: Launch Tips

Here are launching tips like how much water and how much pressure to put in, and tipping water out of the launcher after each use. And how to modify a bottle to launch water balloons. In addition to the video version, below you can find more tips and answers, including some you won't find on the video.

Printer friendly version of the launch tips.

If the air pump locks up it's because too much water got into the launching tube and the check valve on your pump is not working. Then water leaked into the pump. The check valve is a one-way valve that is supposed to let air go out of the pump, but not go into the pump. It's on all air pumps, near where the hose goes into the pump, but it is usually not accessible for repair. You'll have to unhook the pump from the launcher and pump out the water. To prevent it from happening--short of getting a new pump--is to pump fast so there is little back flow and...

Tip out the water in the launcher after each use

If there is a leak as you pressurize the bottle you can readjust the zip ties for a better fit. If it's a hot day and you don't mind getting sprayed a little, you don't have to fix a small leak.

To adjust the launcher, loosen the hose clamp so you can slide the taped-together zip ties. You might want to mark on the pipe so you know how much you are moving them. Move them just 1/16" or so at a time, toward the bottom of the launcher to tighten the fit. If you move them too much you won't be able to get the bottle hooked on.

Very rarely, if the bottle has landed on hard pavement, the neck of the spout can crack, causing a leak.

How much water depends on what you want. You don't have to put any water in the bottle, which might be good on a cold day when you don't want to get wet. It makes a satisfying sonic boom when launched without water. Note, however that the trigger mechanism has to be well adjusted (see above) because air volume leaks out much faster than water.

If you want to get wet, you can fill the bottle up to half full with water. However, if you fill it much more than that it can be dangerous. Too much water displaces the compressed air, which is your stored energy source once the bottle is in the air. And the bottle is heavier, too, so a bottle with too much water might fall on someone before having ejected all its water.

When launching water balloons (see below) I find that a bottle 1/3 full of water works well.

How much pressure do you need in the bottle? Depending on how hard you have the bottle jammed onto the bump, you will likely need 30 or 40 psi of pressure just to get the bottle off of the launcher. And you need that much pressure to eject all the water before the bottle lands. Young kids will need some help getting the pressure high enough.

So how much pressure is too much? I talked to a bottle manufacturer who said they can guarantee the bottle will not burst up to 100 psi, but that is a new bottle, unscratched and not crushed, not left in the sun for weeks, etc. Although you can see bottles bursting at 168 psi, I stick to 70 psi maximum. If you are going to go higher, use a different kind of launcher where you are not so close to the bottle, and wear earplugs!

If your pump does not have a pressure gauge, you can unhook the air-pump use a cheap tire gauge from an auto parts store to check the pressure. With a typical bicycle tire pump, it gets pretty hard to pump after 70 psi.

If the bottle gets stuck on the launcher it could be that you need more pressure in the bottle (see how much pressure, above). Once, a bottle got stuck because the water inside was sandy. The sand lodged in between the bottle and the pipe, so even with a lot of pressure it would not launch. I was able to push off the bottle with my hand, still pointing up, of course. You can also disarm the rocket of its energy by unhooking the pump and pushing the inside core of the tire valve, which will let the air out.

What about fins on the water rocket? When we taped the Ask This Old House segment about water rockets, I was the overhead launcher construction expert. But the show’s producer, Chris Wolf, was the water rocket expert. He made some cool rockets with nose cones and fins, and they soared really high, much higher than the plain old bottles that I launch. Bottles tend to tumble around in the air, creating a huge amount of drag, so they don’t go as high. Fins keep the low profile of the nose pointing up, so the rocket goes higher.

But we found that the upside of adding fins to rockets is the downside as well. Unlike a tumbling bottle, they speed down hard and fast enough to possibly lacerate a scalp or break a windshield.

There're ideas on the internet for parachutes and other recovery devices to slow the descent of the rocket, but they're much harder to get to work than anyone thinks heading into it. So if you launch finned rockets, do it in a wide open space with no kids or cars nearby.

Launching water balloons Water balloons launched from water rockets go as high as finned rockets. Although the dense balloon would sting if it landed on you, it's unlikely that you would need stitches. I have heard of people launching tennis balls, too. The simple modification for the bottle to launch balloons is shown near the end of the video instructions. Of course you still have to launch water balloons in wide open spaces sans young kids. And it goes without saying that launching hard objects like stones could cause severe injury--or even kill someone. See Safety FAQs>>