Easy Dragon Helicopter Class pack is temporarily unavailable.
Update July 18th 2018: We are working out supply issues with the propellers. Check back in a few weeks.
Mysterious, Kinetic, Noisy, Do-It-Yourself Science Projects that Entice Scientific Investigation
Easy Dragon Helicopter Class pack is temporarily unavailable.
Update July 18th 2018: We are working out supply issues with the propellers. Check back in a few weeks.
Hi, it’s Slater.
This video is about using your hands to make, and then power, a helicopter that flies far beyond the reach of the highest trees. It’s a sort of aeronautical alchemy, transmuting stuff you have around the house into a really good flying machine. Everybody gets in the air and there’s no limit to how far you can take it. You could even morph it into an airplane, although airplanes are much more challenging to get stable flight. So master the helicopter first.
I already have two videos about making dragonfly helicopters: one design has an adjustable propeller—you can even switch it to make the helicopters fly upside-down—with the propeller pushing from the bottom. The other design uses and already-made propeller and balsa stick, so even young kids can assemble it. I’ve made that design with crowds of people and second grade classes
My friend Rick Schertle, who quite literally “wrote the book” about DIY flight projects suggested a collaboration for a dragonfly design that uses common stuff that people have around the house. Rick is writing the article for MAKE magazine and I’m making the video with a lot of visual detail.
For the fuselage we’ll use 2 plastic straws; or—if you can find it--a foam grocery tray. And we’ll need a wing to keep the fuselage from spinning. That can be paper or foam from a plate. We’ll use a small paper clip, 2 plastic swab sticks and a two-liter bottle for the propeller.
But, aye, there’s the rub—the rubber band. I get it. Common office rubber bands are around here and now. If you’re ok with a helicopter that just hits the ceiling, then school and office rubber bands will do that.
But know that model airplane rubber will fly more than an order of magnitude higher. That’s because you can wind it way more. And it’s cheap. If you don’t want to buy a lot of it, you can get a small amount in an envelope.
We’ll use these tools razor, push pin, clear tape, long nose/needle nose pliers and scissors. We want the cheap, 10 watt low-temperature hot glue gun, not the big industrial kind.
Print out the pattern 100% scale. Do not “fit to page”. You can check the size here.
We’ll start with the bearing part of the propeller assembly.
Straighten out a small paper clip for the propeller shaft. The first time bending the rubber band hook won’t go this fast. But these steps on the pattern page might make it easier. Use the very tip of the needle nose pliers at the very tip of the wire. Push your finger right against the wire to make a sharp, 90 degree bend. At each step you can compare it with drawing. After 3 bends, we need a 45 degree bend to center the square like a diamond. Don’t lose it.
Make the propeller shaft bearing by marking off a 13 mm section and cutting it, not slanted. It’s hollow, so slide it onto the propeller shaft. Save this part.
Cut a small piece out of the 2-liter bottle. Make a low-friction thrust bearing by punching a hole and cutting out a tiny washer. Using a paper punch makes one that looks better. Slide it onto the wire.
Take the cotton off that other swab stick. (Hot water makes it easier). It does not have to be exactly as long as the pattern, but do center it so you mark in the middle. Punch a hole in the middle and slide it onto the wire.
Notice the tip of the pliers are gripping on top of everything. Make the bend above the pliers-- a sharp bend. There’s a cutting part of most long-nose pliers. Cut so about 1 cm remains. (no, don’t use scissors)Use about 1 cm of tape to hold the wire on tightly.
Hey, it’s taking shape! We’ll finish the assembly by establishing a good propeller angle and cutting out the blades.
Cut out the angle gauge—(the two straight lines are the important ones). The long nose pliers have a flat part here. Tape the bottom of the pattern to the edge of the bottom of the pliers—lined up exactly. The corner angle is within the flat part—not to the cutting part. A propeller strut end goes into the flat part, but not past it. We have to get the shaft and bearing to line up parallel with the edge of the angle patter, like this. Squeeze the pliers to flatten the swab stick. (Turn around and do the other end.)
I wish that I knew a better way to keep propeller blades on securely than cutting the folds we just made—and cutting toward my fingers with a really sharp razor blade. I cover and protect my fingers. I could also use a glove. (creates 2 flaps) If you are a kid, ask an adult to help you with this.
If you’re just making one helicopter, use this pattern. Tape it on and cut out two propeller blades. If you’re making a lot, use this pattern.
What was the outside of the bottle is convex and the inside curve is concave. The concave inside of the bottle faces the propeller shaft.
When the blade is on straight, the top of the tape should be even with the end of the strut. It might be easier to cut and tape one side at a time. Cut off the extra tape and—only cutting the tape, not the bottle--cut off the tape corners. But on the tips, just cut a tiny bit off the corners so they’re not sharp.
Hey, it’s a windmill. Don’t clock somebody.
Cut off 11” or 28cm of rubber strip. Teflon scissors work best.
Tying is easy, but confusing the first time. It’s like the simplest overhand knot —just make a loop and put the end through. But we put the two ends together and treat them like one strand. Make a loop and go through. Pull a little tighter. Now we need to move the knot to the end. Hold inside the loop, right next to the knot, and pull. The knot actually moves toward the end. This does not work with regular rubber bands, but this special stuff for model airplanes is amazing.
Plastic straws are available everywhere, so we’ll use them for the fuselage. But foam grocery trays also work great, so we’ll look at that kind of fuselage too.
Mark and cut two straws to length. It’s ok to have a bit of the bendy part at the end. Tape together at both ends.
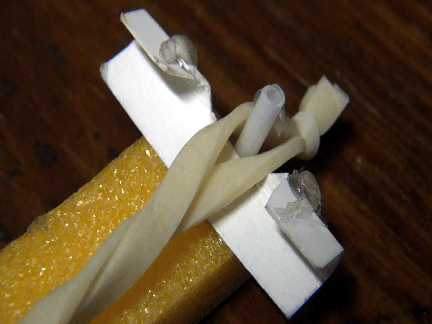
If I just glued the propeller bearing on like this, the spinning rubber band hook would hit the fuselage. We need a spacer, so mark one centimeter on the leftover swap stick but don’t cut it yet. Lay down about a cm of hot glue. The trick for getting enough strength is spreading around a layer of hot glue, but just a thin layer. Cut off flush with the straws. Now glue on the propeller assembly. Again, big blobs of glue are not good, but a thin layer, spread around, is strong. It’s easy to get glue on the shaft. Pull it off if that happens. And get rid of those pesky little hairs of glue. Your propeller should turn freely.
The hook for the other end of the rubber band has to be on the same side as the front hook. It should slant out a little so the rubber stays on. I used to glue it all the way across the back, like this. But if you might experiment with making an airplane, then it’s good to have this other straw not glued. That makes it easy to attach a tail section here. So now I only glue the hook into this straw. You can cut off the extra.
The knot always goes in the back. A bit of something soapy or shampoo to the hub reduces friction.
If you try to fly the helicopter now, the fuselage spins instead of the propeller. Let’s start with an easy, reliable wing out of a quarter sheet of printer paper, so we can get in the air. Then you might want to experiment with other, even more efficient wings. If the paper doesn’t quite fit in between the straws, cut a little off. You can cut the top corners to make it more streamlined. You might or might not need a piece of tape. And you can even improve the efficiency of the paper wing by folding flaps that counter-rotate against fuselage spinning. And of course you can decorate.
One of the things I like this project is everybody gets into the air with a really good flying machine. Then, for people who just gotta make it better, there’s a lot of exploring to be done to find the best wing design. I don’t know what the best wing is; I hope you let me know what your experiments turn up. Here’s what my experiments have found so far.
The farther out the wings extend, the more effective they are at keeping the fuselage from spinning—because of the leverage that the wingtips have. That’s where the Dragonfly name came from. Paper is not stiff enough when it’s long, so let’s try some cardboard. Well, not so good. Let’s weigh the cardboard wing: about 4 grams. That doesn’t seem very heavy, but I think we need to compare it with other things. How much do the old paper wings weigh? About 1 gram. And how much does the rest of the helicopter weigh? So the fuselage, propeller and rubber band combined still weigh less than a cardboard wing. Mystery solved: the cardboard is heavy.
I’m not saying that you need a triple beam balance, but let’s keep in mind that weight is really important. How about a wing from a foam plate? Get the cheapest kind because they weigh a little less. Cut and taped together to a long wing shape, it weighs less than cardboard and flies pretty well.
I tried making a foam wing from and egg package. It feels perceptibly thicker than plate foam and weighs more.
Still more variables to experiment with: the width and length of the wing. Like the paper wing, keeping a foam wing short might not be the highest performance—but it’s not bad—and it’s stable and reliable.
Where a long wing is on the fuselage can make a huge difference in flight stability. I find that near the middle gives more stable flight.
Slanting the wings—called dihedral—can also affect flight stability, and it seems to matter sometimes if the concave side faces toward or away from the rubber band.
I’ve discovered that if I twist each wing like this, I get auto-gyrating returns to earth, as well as better counter-rotation. Actually splitting the wings to resemble dragonflies more does not seem to affect flight.
What about making bat wings out of bamboo and tissue paper? There are lots of wing designs waiting to be invented.
Using soap or special lubricants can allow you to wind up more; as can using special winding devices.
You can even do crazy things like send up simple paper, time-release gliders—pushed out by the unwinding rubber band.
A propeller that’s not balanced will shake the helicopter. You can tell which end is heavier because it will always go down when you take off the rubber band. I prefer to make the other end heavier by adding tape, although I’ve heard of people cutting the heavy end of the propeller.
Foam plates, egg and grocery packages are made from extruded polystyrene XPS. The surface is smooth, without texture. But you’ve probably also seen expanded polystyrene, EPS foam, in packaging. You know it by the circles. EPS is less dense than XPS. This wing from EPS foam only weighs an astonishing .2 grams and goes higher than any other wing. But you have to cut it into thin sheets about 2mm or a bit less thick. That’s easy to do with a hotwire foam cutter. Making a hotwire foam cutter is not difficult; it runs off a common car battery charger or car battery; and nickel-chromium resistance hotwire is very inexpensive. As an added bonus, once you can slice your own foam wings, you can try cutting even thinner foam paper for walkalong gliders. These gliders are so light that you can levitate them like magic. You’re actually surfing them on an invisible wave of deflected air! I have a feeling that if you like flight projects like helicopters, you might also get a kick out of walkalong gliders. Check out the video description for more information.
I like to hear from people who are making the dragonfly helicopters--both if they fly great or if you are having trouble. In fact, if you are having a difficult time, I can help you figure it out, and that helps me understand how to make my instructions better.
I really like fuselages made from grocery packaging. They’re a little lighter than straws. But they are not available everywhere. And either you have to find one that’s thick enough, or tape two together. There’s a cool trick of using the side to make that spacer that allows the hook to rotate freely.
The back hook for the rubber band is easy, too.
Well that’s about it, but stay in touch. Subscribe and ring the bell if you like this kind of project. Lots more DIY science projects at sciencetoymaker.org.
I'd like to know how this project goes for you. I'm happy to answer questions about it. Feedback from you is an important way for me to know what works and what needs clarification.
Thank you for your order! Thank you, too, for recognizing the value of hands-on science projects and spreading them throughout the world.
We send most orders the next business day. Contact me, Slater if you are in a rush and we'll try to hurry it up.
This is the best video for learning to fly, despite a couple of places with rough editing. When you have gone through the instructions and practiced, contact me by e-mail or phone if you get stuck. I struggled when learning to fly because I did not have a feel for it and there was nobody to notice and correct me. When you are on your own, it's more difficult to get started. If you observe exactly what is happening and tell me by e-mail or phone, I am happy to try to help figure out what's not working. That process also helps me know where people are having trouble and make the instructions better.
While you are waiting for your order, you can practice with a rotating paper glider. It is no cost and easy to make; difficult to launch and fly, but excellent practice. I have heard from many people that foam gliders were easy after they struggled with the more challenging paper ones. Paper Walkalong Gliders are here.
When you get the hang of it, air-surfing is as easy as riding a bicycle. Once you work through the frustration of learning to fly, you will be levitating gliders as if by magic!
And if you are teaching other people how to fly, here are some hard-learned tips: Teaching groups to fly.
Again, feel free to contact me with any questions or any problems. These are a new project and feedback helps me to know what is clear and what needs better instructions.
If you have an event where you fly dragonfly helicopters or if you invent a better helicopter please send pictures or video. I will share them with the world!
My friend Jan who lives in the Netherlands makes amazing rubber-powered model planes from scratch. His work was an inspiration for making helicopters--including the propellers--from scratch.
Best price for Super Sport in small amounts. I am sending is enough for 2 helicopters, 20 inches of Tan Super Sport Rubber.
Details below.
By default we use the least expensive shipping method and IT IS SLOW! More about international postage–delivery time, faster delivery, cost, etc.–is here.
A Note About Payment
PayPal
Embedded PayPal buttons for customer convenience and security have worked well and automatically convert currencies. When you click on a button, you go to a secure PayPal page. Even if you do not have a PayPal account, you can still just use a credit card.
Checks
If you send in a check, please make it out to Slater Harrison. Feel free to contact me, Slater, with any questions.
There is a dramatic difference between regular office/school rubber bands and the rubber that's made for flying models. I provide some extra in the kits, but it's good to have plenty handy. It lasts for years if stored in a dry place away from UV light.
We do not sell large packages of rubber because FAI Model Supply already does a great job of that. Buy bulk quantities (more than 1 or 2 envelopes worth) from them. However, their minimum postage charge is $8.75, which makes small quantities from FAI very expensive. So we have stepped in the niche of supplying small amounts of rubber for significantly less than even just their minimum postage. From FAI, 1/4 pound of 1/8" rubber amounts to about 115 feet and costs $9 plus $9.79 postage (to PA).(The postage varies depending on your location.) And they have larger quantities, too.
I have bad news and good news about the EZ helicopter. For years I used cheap injection-molded black plastic propellers for the easy helicopters but they have disappeared. Kelvin.com makes a blue plastic propeller that is supposed to be the same and replace them, but the blue ones don't work for helicopters (in fairness, they might work well for airplanes, which is what they are designed for). That's the bad news.
I had already figured out how to make propellers from the curved strips of 2 liter bottles and I have instructions for those. Propellers made from soda bottles work much better than the old injection-molded propellers, but that design was for building everything from scratch. One part—the rotating, low-friction propeller bearing—is a bit challenging.
So what if I manufactured that difficult part, the propeller bearing? I have been making machines to make the parts for it and I have finished one of the 3 different machines I need. Using these pre-made bearings I have successfully made helicopters with kids in large groups and at crowded public events. I also made a step by step instructional video. And in trials in several middle schools (where students followed instructions on their own tablet computers) classes built the helicopters at their own speed (though within a class period) and largely without any help. They are a huge hit with kids. You can see the latest version of instructions here.
On a limited basis I am now selling complete kits with everything needed: bearing, balsa fuselage, propellers cut from 2-liter bottles and special “tan super sport” rubber (I try to use “off the shelf” parts whenever possible but TSS rubber really is an order of magnitude better than school or office rubber bands). You provide paper for the wings, clear tape and scissors. Or less expensively, you find your own 2-liter plastic bottles and cut strips for the propellers yourself—14 or 15 propellers from each 2-liter bottle. This video shows how to cut propellers from 2 liter bottles.
So that’s the good news. But here’s the rub. I have been distracted with other development work for months now and have not had time to build the other 2 machines to make parts. So I pay a skilled person to make the parts by hand. I can sell complete helicopter kits for $1.50USD each (or $1.25 each if you find your own bottles and cut your own propellers). When I have the other machines up and running I hope to reduce the price.
If you are interested in these helicopter kits, please contact me, Slater.
20 inches of 1/8" wide Tan Super Sport rubber band, enough for replacement for 2 helicopters.
$3 includes shipping because I can just mail it in an envelope.
Not helicopters, but walkalong gliders are another great, engaging, low-cost flight project. How do they fly?
Embedded PayPal buttons for customer convenience and security have worked well and automatically convert currencies. When you click on a button, you go to a secure PayPal page. We use PayPal for security and convenience, and you don't need PayPal account to pay via PP with a credit card.
If you send in a check, please make it out to Slater Harrison. Feel free to contact me, Slater, with any questions.
I like all feedback. If you have any pictures of video of your event, I am happy to share them with the world. I am starting a sharing page.
You can just wedge the gliders between the rubber band and body. Of all the modifications that I've tried so far to make releasing more consistent, this one seems to help a little with not much effort. It's just a bit of thin cardboard folded into sort of a channel. It keeps the gliders from tipping out too quickly.
This page is about sending gliders up with Dragonfly Helicopters. As the rubber band unwinds, it pushes out the gliders.
This challenge of releasing gliders high in the air can be as simple or complex as you want, and there’s a lot of development that needs to be done. You do not have to be an engineer or even an adult. What we do need is people who will experiment and share with the larger community. I will be happy to share your insights with the world on this page (and credit you) or link to your web-page or video, or whatever.
Here are some thoughts to get you started.
Notice that the rubber band unwinds much faster (in revolutions per minute) near the propeller, and much slower at the tail end. Theoretically, you could time the gliders depending on how far to the top or to the bottom you wedge in the gliders under the rubber band. But in my experience, the gliders launch before the helicopter has reached full height (if they drop out at all), so I always put them right at the tail.
Although in the videos I place the rubber band right at the center of the gliders, you should be able to time the release more precisely by where the rubber band is on the gliders. This is promising, but the gliders often tip. I have experimented with a thin cardboard track or wall to keep the gliders perpendicular to the body (fuselage) of the copter longer, until they are about to drop out. And it seems to help a little.
Even with the best engineering, it’s going to be a huge challenge to get consistent results. Here are some variables that I will affect when the gliders release (and if they release): how much you wind up, how stiff the gliders are (as per humidity or what kind of paper or how beat-up the paper is); how much friction there is against the rubber band vs. the Dragonfly body; how many gliders there are (affects thickness); how the gliders have been folded, how much of a gap between the rubber and body, how far in and how straight the gliders are placed…and so on.
There are so many possible ways to improve the timing mechanism! It requires people like you to experiment with ideas. Contact me, Slater, if you have questions or if you figure out how to make the timing better.
I have bad news and good news about the EZ helicopter. I used cheap injection-molded black plastic propellers for the easy helicopters but they have disappeared. Kelvin.com makes a blue plastic propeller that is supposed to be the same and replace them, but the blue ones don't work for helicopters (they might work well for airplanes, though). That's the bad news.
I had already figured out how to make propellers from the curved strips of 2 liter bottles and have instructions for those. Those propellers work much better than the old injection-molded propellers, but that was for building from scratch--quite a challenging project. What if I manufactured the difficult part: the propeller bearing? I have been making machines to make the parts for it and it's going well. I have made it with kids in large groups and at public event and I finally got around to making a step bu step instructional video. On a limited basis I am selling the complete helicopter kits for $1 each, which includes all materials: bearing, propellers, balsa fuselage, rubber motor and tool for cutting the slot. You can see the video and decide if you are interested. I will be tweaking it a bit so I do not have it as a final version on YouTube yet. But you can see it on my Google Drive here
https://drive.google.com/file/d/1sTdF1KsK_xG8X3A6xnReUfRzIk03JoXx/view?usp=sharing
Contact me. if you are interested
Below is an archive for the former page and instructions for the injection-molded helicopters
Wherein young Heroes become empowered by making and flying helicopters (whilst learning a thing or two about patience when winding them up).
Above is the instructional YouTube video. If YouTube is blocked at your school, click to stream on this highly compressed video
This video is an update, with some more tips.
Below are instructions for the easier version of Dragonfly Helicopter with an already-made injection-molded propeller. The numbers correspond to the steps, also numbered on the video.
1.) What if you just don’t have the time to make a Dragonfly Helicopter completely from scratch; and/or you’re working with young kids? The EZ Dragonfly does not fly as high as the scratch-built kind but it’s easier even for young kids to participate in building and making it goes fast enough that it works for a crowded event. It will still go as high as a gym ceiling. [You have to wind it up a lot though—a good way to learn patience. ]
2.) Put a propeller on a balsa stick. Hold it close or else this might happen. [there are a few extra sticks if that happens]
You might notice that the propeller is not quite perpendicular. It’s OK, it’s supposed to be like that. [The reason is that the propeller is made for model airplanes, which tend to ascend at too steep and angle, then stall. But if the propeller is pointed slightly down, there is less stalling, better flight for model airplanes. And it does not hurt the flight of helicopters at all] The propeller is so efficient that it will act like a windmill when air hits it. But don’t clock somebody.
3.) This is the mother of all rubber bands. From one end, cut a piece 28 cm or 11”—which happens to be the length of North American printer paper. [A piece of 8 ½ by 11 printer paper—the long way—is a fast way to measure it. But A4 is longer. Use sharp scissors to cut. Nonstick scissors (Teflon coated) work especially well]
Tying is easy, but confusing at first. The overhand is the simplest knot there is—just make a loop and put the end through. But we put the two ends together and treat them like one strand.
[By the way, mountain climbers know this as the European Death Knot!]
But we need to move the knot to the end. Pull tight gently tight. Hold inside the loop, right next to the knot, and pull. Amazingly, the knot moves toward the end. This does not work with regular rubber bands, but this special stuff for model airplanes is amazing.
4.) The rubber band hooks onto the propeller in front, and it needs another hook in back. Try to make the back hook on the same side as the front hook. Cut or pull the cotton off a swab stick. Cut some tape and stick it in the corner at an angle like this. Wrap the tape around. Cut off the extra. The knot always goes in the back. [because it tends to get caught on the fuselage] We don’t want the rubber band to cross like this because of friction; but if it does, just flip the propeller the other way.
5.) Cut the wing from the flat part of a recycled foam plate or takeout container. Print out a pattern page and cut out a double pattern. Tape it on the ends. Rough-cut off those pesky edges. The thin foam cuts easily with scissors once you’re past that. Once you have a set, you have easy tracing patterns.
Tape the ends of the rectangles together. Get the rubber band out of the way and put the wing on so it’s about 25mm from the propeller. Attach it with a couple of pieces of tape. Rub the tape so it really stays on.
When you put the rubber band back on, make sure it does not catch on the wing like this—too much friction.
It’s optional to curve the wings up—which is called dihedral. It makes the flying more stable.
Splitting the wings to look more like dragonflies does not affect the flight. Be careful not to cut the rubber band.
Decorate if you want to.
6.) Your helicopter will go higher if you dab some soapsuds, liquid soap or shampoo right here to reduce friction.
As the propeller is facing you, wind the propeller clockwise. Most people do not wind enough at first. The first 50 or so turns don’t do much. You can wind more than 150 turns.
7.) [Paper is heavier than foam and not as rigid, so it is not rigid enough to stick out far away from the fuselage. But these paper wings with lots of surface area compensate. Note that paper becomes very limp and weak in humid weather. It might stop working once it absorbs moisture from the air.]
If you don’t have thin foam, you can make the wings out of paper. Although paper is heavier and doesn’t look like a dragonfly, it’s easy and flies almost as well. Just cut a piece of printer paper into quarters. It’s best to orient the long side perpendicular to the fuselage. Whatever side the back hook is on, put the paper on the OPPOSITE side. A couple pieces of tape hold it on. I like to clip the top corners. [the top corners of paper are weak, so they can flutter around and cause problems.
You can fly the helicopters just like this. An advanced aerodynamic trick is bending flaps in the bottom corners like this. It resists spinning even more.
[Some Science of Helicopters (here is a printable version )]
As the wind from the propeller is diverted one way by the flaps, the reactive force on the wing the opposite way. If you make the flap the correct way, it makes the wing more effective for keeping the fuselage from spinning too much.
If this project works well for you, please help spread the word about a good hand-on science project. If it is not working well for you, communicate with me—Slater—about what’s happening so we can solve the problem. Also you can leave a message in the comments section below.
The Dragonfly Helicopter is a good way to understand Sir Issac Newton's famous 3 Laws of Motion. The Third Law of Motion is about how for every action there is an opposite reaction. You can feel it when helicopters throw air down (the action) and the helicopter goes up (the reaction). You can experience forward ( the action) but pay attention and you can feel a force pushing on your hands (the reaction).
Newton's second Law of Motion has to do with the relationship of Force, Mass and Acceleration. It is usually written as F=MA and can be algebraically rearranged A=F/M, etc. So the Dragonfly wings are so delicate because they are also very low mass (mass is often the same as wight on Planet Earth). That's why the Dragonfly accelerates so fast against the force of gravity. We could also increase acceleration by increasing force. We use a very high-quality model airplane rubber band for that reason and you can increase force by winding up the helicopter until it takes more force to wind. Both increasing force and decreasing mass will result in more acceleration for your helicopter.
Newton's First Law of Motion says that
(a.) objects stay still unless a force acts on them, and
(b.) they keep moving unless a force acts on them to stop.
Part b is somewhat counter intuitive because friction is such ubiquitous (that means it is everywhere) force on Earth, so it seems to slow everything down. But it is profoundly responsible for keeping Planet Earth spinning and rotating around the Sun! Your helicopter will not fly unless you make a force act on it(by winding).
Did you know that we live at the bottom of an ocean of air? We live in a part called the troposphere where all weather occurs. If you google "How High is the Sky, Krulwich Wonders" it will change the way you look at the world.
Air is a mix of gases: Nitrogen, Oxygen, Carbon Dioxide and very small amounts of other gasses. Did you know that both liquids and gasses are fluids? Colloquially we say that only liquids are fluids, but in scientific terms, fluids refer both to incompressible liquids and compressible gasses. Fluid Dynamics is the study of fluids--gases and liquids--in motion.
Did you know that air has mass, but its density is about 800 times less than water? The wings are make from Expanded Polystyrene(EPS) foam, which is also low-density. Some EPS foams are only 5 times denser than air itself.
Rubber bands use a different mechanism at the atomic level than springs do. If you google "Richard Feynman Rubber Band" there is a very interesting video, explained by the great physicist.
Dragonfly Helicopter Care : Avoid extreme heat(car dashboard) or cold(below freezing). Do not store the rubber band in sunlight. More about the Dragonfly Helicopter at sciencetoymaker.org
Eventually I hope to make a video about the science of helicopters. If you have anything to add or other feedback, please contact me, Slater, or leave a message in the comments section.
Here is a printable version of this page.
©Slater Harrison 2016 - 2018