Cartesian Diver: Written Instructions

Here are video instructions for Cartesian divers. Part 1, Part 2.

What you need:

  • Small paper clips. The vinyl-covered multi-colored ones from discount stores work best).
  • Small rubber bands. The really small ones for making pony tails are best.
  • A clear two-liter soda bottle with lid.
  • Either clear plastic straws (a little easier to work with and a little cheaper) or 5/16" outside diameter clear vinyl tubing. The tubing is available off rolls by the foot from any hardware store. The straws are used in many school cafeterias. I've never met a cafeteria lady who wouldn't share some for a good cause.
  • OPTIONAL: A tall cup of water for testing for the right density is convenient, as is coat hanger or other wire with a hook to fish out the diver if it stays sunk. See the bottom of this page for a way to make the pull-outer out of straws and paper clips.

Assembly

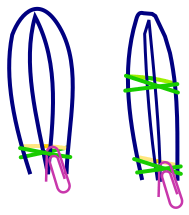
Step 1: Fold straw or tubing in half and fasten.

Straws: The straws are almost 6" long. Pinching it in the middle makes it easier to bend. Wrap a rubber band several times around the ends to hold them together. Make sure the rubber band is at the end.

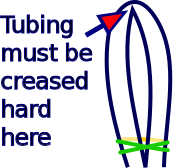
Tubing: Cut a 6" piece. Fold it in half, making a hard crease. After folding it as much as I can with my hands, I bite it to really make the fold. Otherwise it's too much of a loop to fit into the bottle. Make sure the rubber band is at the end.

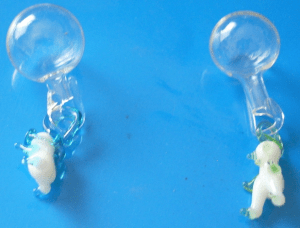
Step 2: Add weight to the diver.

Pull the outside end of a paper clip out a bit.

Hook the Paper Clip This Way
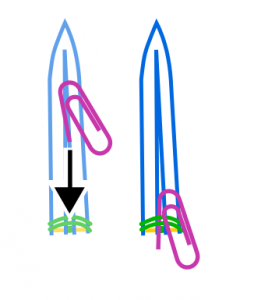
Not This Way

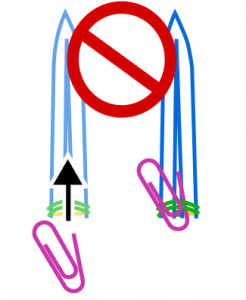
Hook the part you bent out onto the rubber band holding the straw or tube together. It is easiest if you hook it to the part of the rubber band in between the straws. The crossed out way on the right is not so good because the paper clip can fall off easily.

It is hard to say how many paper clips you will need. The idea is to get the diver to be almost all the way submerged, but not quite. The tall cup of water comes in handy here. Occasionally, the sharp bending of the straw will have caused an invisible crack. This will allow air to leak out and the diver will sink no matter what. It happens to one or two percent of the kids in groups I work with. We simply make it part of the lesson and use another straw.

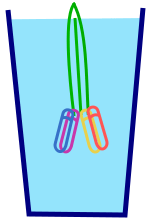
Step 3: Fill the bottle with water and test the diver.

Fill the bottle all the way to the top. It is best to avoid extremes in water temperature. Put the diver in. You might have to use your free hand to help get the paper clips past the bottle neck.

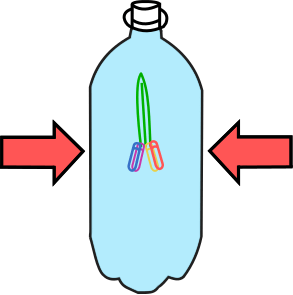
Twist the cap on. I once provided some unintentional comic relief when I forgot this during a demonstration. When I squeezed the bottle, the resultant splash caught me right in the face! Ideally, the diver will sink when you squeeze and rise when you let go. Often, however, the diver benefits from some fine tuning. And if the bottle gets droped on the floor, the diver will stay sunk. See below for instructions to get it working.

If the Diver Does Not Dive: Try squeezing the bottle harder. If that doesn't do it, add more paper clips. You can break a paper clip in half (with scissors and/or bending) and really fine tune the weight.

If the Diver Sinks But Does Not Rise: Did the bottle drop? If so, see the following paragraph. Try removing one paper clip, or replace it with half a paper clip. As noted above, in rare cases a straw could be cracked and leaking air. Replace.

When the bottle is dropped, it invariably stays sunk. The pressure shock has allowed too much water to get into the diver. You must remove the diver from the bottle and shake out the water. Then it will work again. See step 4 for an easy hook for fishing out divers.

If you are using the clear tube instead of the straw, it might get stuck where the bottle narrows at the top. Usually, just shaking the top of the bottle a little solves this problem. If it continues to be a problem, you could add a second tightly wrapped rubber band so the diver is too narrow to get caught anymore.

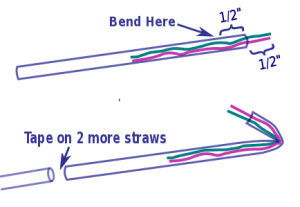
Step 4: Make a Hook Out of Straws, Paper Clips and Tape

    1. Straighten out two paper clips.
    2. Place them mostly inside a straw, with just 1/2" sticking out.
    3. Now bend the straw and the wire inside the straw, 1/2" from the edge.
    4. You have to tape two more straws onto the first to reach to the bottom.

Because the water bends the light waves (refraction) it is a bit of a challenge to see exactly where the diver is to hook it. Happy fishing!

OBSERVE

Notice that when you squeeze the bottle, the air bubble trapped in the diver compresses and the water level goes up. To explore the Cartesian diver some more, click here.

I'd like to know how this project goes for you. I'm happy to answer questions about it. Feedback from you is an important way for me to know what works and what needs clarification.

Why the Cartesian Diver Sinks and Rises

It's density, buoyancy and compression.

I love this project so much my ninth grade students and I made a giant (6' tall) Cartesian diver exhibit for our local children's museum. Of course, there weren't any soda bottles that big. We fabricated it using a rigid Plexiglas tube. For pressure, we pumped in air with a bicycle pump. It worked great, and we had fun.

When I do this project with groups of kids, I ask what happens if a stone drops in water. Every kid knows that it sinks. And they all know what happens when a piece of foam is dropped in water. Then I ask what would happen if one ton of foam were dropped into the ocean. Here there is less certainty, and it gets to the heart of what density is all about. Density isn't just about weight. It is just as much about how much space something takes up. Density is the ratio of weight divided by volume. If the density is greater than water, it sinks. If the density is less than water, it is buoyant.

I get a thrill out of seeing air compress. My kids say I'm easily amused, but after many years of knowing in theory that air was compressed into scuba tanks it was exciting to see it happen with my own eyes.

Here I will stop and refer you to a great web page about Cartesian divers. It is by a science teacher who not only did a phenomenal job of researching the history on the device, but who provides a great example of how to teach. Read about things like how student simulated a zero-gravity environment (jumping off a diving board into a pool) to test a theory about how the diver works!

Cool Variations of Divers

Here is a picture of beautiful hand-blown glass divers sent to me by Eugenia from Mexico, along with an explanation:

When I found about the Cartesian Divers, I remembered mine. But these are made of blown glass. I'm sending you 2 pictures. These I bought in Puebla, Mex. 20 years ago. I remember my father putting one of his in a white wine bottle and pushing the cork in so the diver would go down, and he controlled the depth with the cork. My brothers and me were little children and it was like magic. (There were no recyclable PET bottles to use). So my father's divers must had been 50 years old or so. We called them "tiny divers". My father was an accountant so didn't explain the science part, but I remember him as a science man, he had a lot of nice things, like the drinking bird (Photo) -(I would love to hear your explanation of how that works) and many amazing science toys.
Now I'm teaching my 9 years old son about the wonderful science things that happens around us and your page makes it easier and fun.

Professor E (aka Paul Eisenzimmer) passed on a great tip. You can replace the lid of the diver bottle with a "fizz keeper," which are available at grocery stores. Ostensibly these tiny air pumps that screw on are supposed to create high pressure inside the bottle so less carbon dioxide fizzes out of solution. However, we know that their highest calling is to pressurize Cartesian divers!

And here is an amazing tip from Eric Knispel, a science teacher at the John Burroughs School in Montana:

"Hi Slater, Wanted to share a favorite demo with you about Divers. After my 10th graders make their own as a lab activity using plastic pipettes (I ask them for 3 different colors diving in a specific order-blue, yellow, no color) I bring out my glass bottle diver."

"Using a glass bottle with flat sides (Italian dressing or whiskey bottle) I fill it completely full of water and add a diver that just barely floats. Squeezing the glass sides will give just enough pressure to flex the glass and sink the diver. It is very sensitive to temperature so on the days I find it already sunk, I squeeze the NARROW sides of the bottle and make the diver float again. (flexing the bottle into an oval increases the volume and reduces the pressure on the diver allowing it to float). The students don't believe it at first, assuming it is the heat from my hands etc."

"The divers are made from disposable pipettes, cut the stem off, glue on a few small metal nuts from the hardware store, fill with water until just floating, seal the ends with glue to keep colored water inside or leave open if no color is desired."

"PS: Mustard and ketchup packets from fast food places are the simplest and easiest divers I have ever come across. Put packet in plastic bottle of water and squeeze!" (editor's note: this is true as long as there is a little air trapped in the packet)

You can see a beautiful activity related to density that Eric has his students do if you click here. It is layers of different concentrations of saline solution (salt and water mixture). Because each concentration is differently colored, it forms a work of art!

And here is spinning variation from engineer and dad Harry Shuttleworth of the U.K. Hoping to have a picture of it soon. I've tried it and it works beautifully! I wish I'd thought of the idea.

"A few years ago I made some cartesian divers for the kids, similar to those also on your site. I also used 2l pet bottles, but I made the diver from the nozzle from a gunge gun (silicone etc), with the tip blocked, and weighted down with a 8mm nut and bolt. To get the effect of a wizards head under the cone "hat" I had dipped the bolt in a bath of hot melt glue to get a nice blob (and drew a face on). I then put small holes through the side of the hat to allow the water in."

"For additional fun, on one of them I set up the holes to be tangential, so it would spin as it pushed the water out when rising."

I'd like to know how this project goes for you. I'm happy to answer questions about it. Feedback from you is an important way for me to know what works and what needs clarification.

The Cartesian Diver

A new twist for the great classic science project.

Cartesian divers were first noted by a student of Galileo Galilee! Some people back in those days thought its mysterious dives and ascents in the water smacked of dark magic, as witnessed by the name it was sometimes called: Devil's Diver. The advent of clear plastic bottles made Cartesian divers popular in school science classes, as well they should be. What a cool way to learn about density, buoyancy, compression of gases, etc.

Unfortunately, some diver designs are either too expensive for large groups, or they hide what's going on inside the diver. For example, pen caps and modeling clay are cheap enough for everyone to make, but you can't see the air compressing and the water rushing in. Using clear eye droppers costs at least a dollar each. Not bad if you're just making one at home, but quite a bit of money if you are making them with a large group. I offer a design to fill the void, plus some variations.

In the instructional videos above, (on YouTube: Part 1 , Part 2 ) I've included scenes of groups of kids actually making Cartesian divers as well as an educational diversion: a visit to a scuba diving shop with some under water video footage.

Here you can read more about how Cartesian divers work.

Many thanks to the West Branch School, YMCA after school program and Sunken Treasure diving shop.