Step1 Cut the dowel and the PVC pipe.
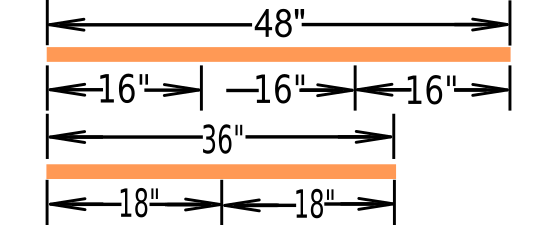 If your wood dowel is 3' (36") long, cut into two 18" pieces. If your dowel is 4' long (48") you can cut it into three 16" pieces if you're making three popguns. Use a hacksaw, or even just a hacksaw blade to cut it.
Again with a hacksaw blade, cut a 1' (12") piece of PVC pipe. Make the cut as straight as possible.
Step 2 Bevel the inside corner of pipe on one end.
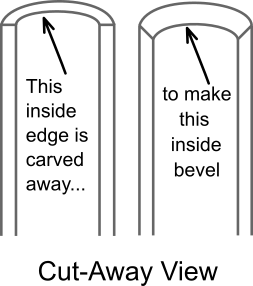 This will probably be the hardest to understand step, although once you know how to do it, it will only take a minute to do. Beveling the inside allows us to punch out perfectly sized seals (in step 3), punch out substitute "corks", and the slanting inside wall lets you get big corks in the popgun that would otherwise get stuck on the inside edge.
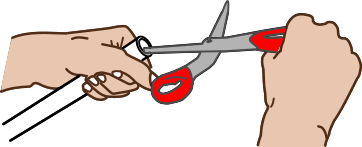 We will use half of a pair of scissors to shave off the inside corner. That does not mean we will take the scissors apart. It just means we'll use one of the pieces like a knife. I will refer to the one part we use as a scissor (singular) from now on. Why not simply use a knife? Knives that are thin enough to fit inside the pipe usually flex too much and they are sharpened at an angle that gets stuck in the plastic. Scissors, on the other hand, are narrow, rigid, and sharpened to a much more obtuse angle which shaves plastic without getting stuck.
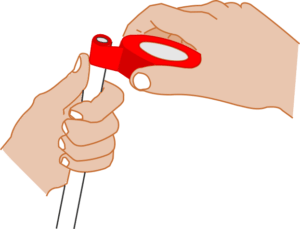
 Before starting, wrap about 6" of tape around the first 1/2" inch of one of the scissor points. You will be levering the scissor against the pipe wall. If you don't wrap up the point, it will tear up the inside of the pipe, which will cause air leakage. Note that you will using the the scissor as a "second class lever" (more about levers in the "Exploring Popguns" page). With the taped point jammed against the inside wall, and your hand exerting force on the handle, you can multiply the force to the part of the scissor that is shaving down the inside edge.
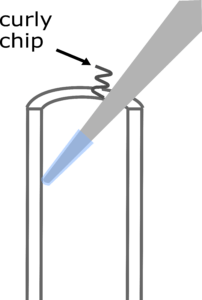
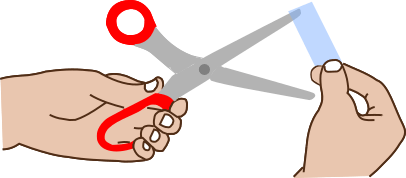
When you have looked at all the text and illustrations in Step 2 and you have some idea of what you need to do, push the taped-up point a bit into the pipe, and see if you can start scraping away a bit of the inside edge with the sharp edge of the scissors. The taped tip might slip around. Keep working with it. You know you're starting to get it when you see little curly bits of plastic in front of the edge. People who machine metals and plastics call that curl a "chip."
Continue shaving away the inside edge until the inside is beveled to the outside edge.
Step 3 Punch out seals and assemble the plunger..
 Using the beveled end of the pipe, it should be easy to punch circles out of the foam packaging tray. These will be the seals which keep air from leaking out of the pipe. Put the foam tray on a table and push the pipe down on it while at the same time twisting it. You need 3 circles.
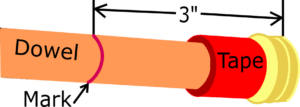
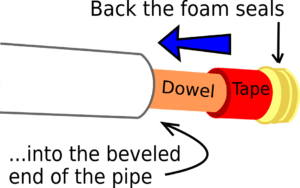
 Wrap tape (red in the illustration) around one end of a dowel, with the edge of the tape flush with the edge of the dowel. Put as many wraps of tape as you can and yet still fit easily inside the pipe. The illustration shows electrical tape. If you use duct tape it will be wider.
The tape wrap does two things: First, it keeps the dowel end from splitting open (or holds it together if it does) when we do the next thing: screw the drywall screw into the end of the dowel. Second, it backs up the seals in case the high-pressure air would blow them out.
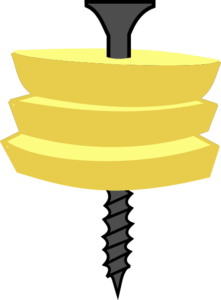
Screw the drywall screw into the centers of the three round, foam seals.
 On the same end of the dowel you just wrapped the tape, screw the drywall screw into the center end of the end of the dowel. You might want to tap the screw in a little with a hammer to get it started. Rubbing a little soap or fat on the threads of the screw make a little easier to screw in. Twist the screw in until it makes the first foam seal indent a little.
Step 4 Finish the pop gun
 You could say that the popgun is finished at this point, but trust me: spending a few minutes to keep the dowel from pulling out the back all the time is well worth the effort. We will use string and tape to make sure that about 3" of the plunger stays in the pipe.
 Start by making a mark on the plunger 3" from the end with the foam seals. Next, put the end of the dowel without seals into the beveled end of the pipe. When the dowel comes out the other end of the pipe, pull the seals just into the pipe, but no further in.
Important: Never push the seals into the pipe because they will get wrecked. Always pull them in.
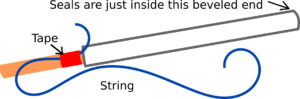 With the seals still just inside the pipe, tape a piece of string to the dowel, right next to the other end of the pipe. Tape near the end of the string, but let a couple of inches of string hang out. Don't worry about the tape being wider than in the illustration if you use duct tape.
 Now we are going to tape the other end of the string to the pipe so the dowel cannot come all the way out. Pull the dowel out until you get to the mark you made 3" from the end. While keeping that position, tape the other end of the string to the pipe, making sure the string is tight. Once again, there should be a couple of inches of string hanging out from the tape.
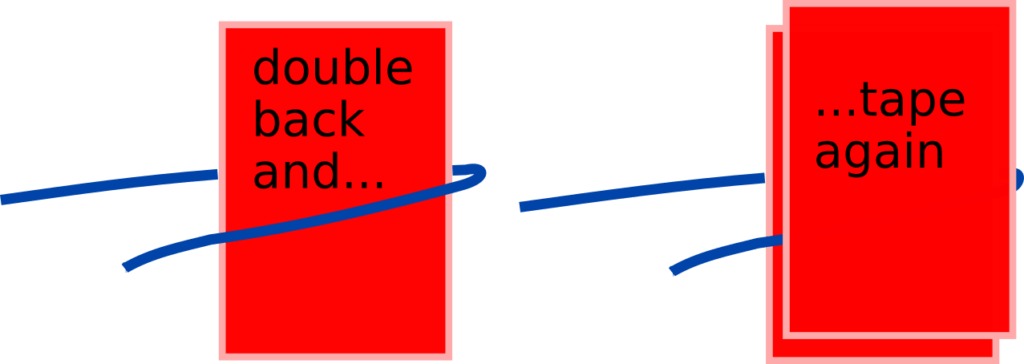 The reason we let a little bit of the string end hang out is that we are going to double it back over the tape and tape it again. This makes it very hard to pull out. Do this both where the string is taped to the dowel and to where the string is taped to the pipe. Where the string is taped to the dowel, continue wrapping tape around there until the bulge is so big that it doesn't fit into the pipe anymore. Congratulations! You have finished the popgun
Step 5 Make a foam "cork."
 This is easy and quick, just like when you punched out the foam seals, but with thicker pieces of foam. Remember pull the dowel out of the way and to twist the pipe of the popgun as you push it in. To get the foam out, you will have to pop the popgun. Make sure the dowel is pulled back as far as the string will let it. Then push it forward as fast as you can. Kaboom! Getting the foam back in again is easiest if you twist it while pushing it in.
If you already have a wine cork, you might have to bevel one end so it fits into the pipe. There are two ways to do this. You can rub the end on rough concrete or you can cut the bevel with a sharp knife. Again, you should twist it as you push it into the pipe. A tight-fitting cork is hard for young kids to pop out. You might want to consider a foam cork for them.