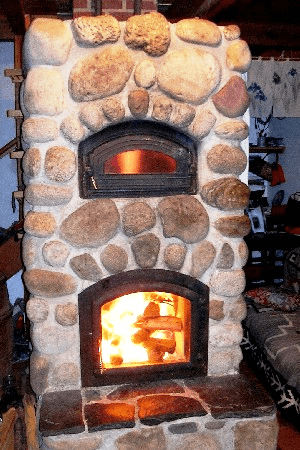
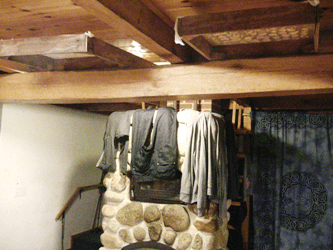
My friend Greg Kohler calls this "The Fire Channel." Fire roars through the bake oven on top, which we never tire of. After the wood has burned to coals, you can bake in the oven (although there are some ashes there). The hot combustion gases first go up all the way to the top, then split off to the sides and travel all the way back down along the side channels--giving up the heat to the thermal mass--and finally up the chimney (in back). Below I'll tell you all about the good, the bad, and just stuff I've learned over the last 25 years of using it.
Masonry Stove Index
- Intro
- Disadvantages: I love my stove but know what you're getting into.
- Operating Tips: "little" details that make all the difference
- Visiting or Talking to People who Have Masonry Stoves: a mighty good idea
- The Kind I Have vs Other Designs: You have more choices than when I got mine
- Some Construction Details
- More Information/Links
- What Mark Twain Had to Say About Masonry Heaters
Intro
When I was building my house, I decided to install a northern European style masonry heater that differs from a typical wood stove in several ways:
- You load the fire box and burn it HOT. Because the fire gets all the air/oxygen it needs the combustion is very efficient with little smoke or creosote in the exhaust gases. Then, instead of going right up the chimney, the hot combustion gas follows a long, serpentine path so it transfers most of its heat to the walls of the masonry path. Therefore, the fire lasts about 30 minutes to an hour (depending on the thickness of the wood that the fire has to burn through), but the heat soaked into the masonry mass radiates out for a day. We burn twice a day when it gets really cold (does not get above freezing even during the day).
- Except for the metal and glass door, a masonry heater does not get dangerously hot. In fact, you can lean against it and get warm quickly. It is the next best thing to a hot shower.
Disadvantages
After a quarter century of depending on my wood-fired masonry stove for all of my winter heat without huge problems, I cannot imagine returning to the noisy, unreliable furnaces that I used to have to deal with. However, the disadvantages, or things to get used to, are not lost on me.
- It takes up more space than a typical metal stove (“architectural feature” is the way one company put a positive spin on it). And you can't just plunk it on the floor. It needs a foundation to bear all that weight.
- There was an up front investment of thousands of dollars. Mine was a kit of keyed blocks that now costs around 10K USD just for the core. That did not include transporting almost 3000 pounds of weight, the footer and block foundation (the heater is very heavy), chimney--and skilled labor if you hire someone to install it. The core has be faced with a masonry material, usually brick. I used river stone, and it was more work (although even after 25 years I marvel at the beauty of river rocks). I do not have any backup heat because someone is always here, but most people would and that would be an additional expense. I think the "rocket stove" movement might be a reaction to the high cost of traditional masonry stoves. But I have to say, even though I am mostly all about practicality, watching fire burn is the exception--it's primal and magic. A rocket stove without a window to watch the fire would be a real loss for me.
And it's a bit of a whopper for the company to claim a "one-day build". Although I suppose the core could be assembled relatively fast, all that other stuff mentioned (footer, block stand, chimney, facing) takes a long time. - The wood needs to be split and seasoned (dried out). This means keeping it out of the rain, too. Actually, any kind of wood stove should get dry wood but it's especially true for a masonry stove because you have to start the fire every day--sometimes twice. Wet wood is hard to start. Furthermore, wood that's not completely dried is inefficient because it takes an enormous amount of energy to turn the moisture to steam. And not least, wet wood condenses more creosote in the chimney. I have worked out a way to load wood hours before the burn so that it warms and dries. Then it's very easy to start the fire.
Masonry heaters work best if you select wood that's all roughly the same thickness. If you have a lot of skinny wood and one thick piece with knots, it's inefficient. The big piece that take's longer to burn will keep you from closing the chimney top (see f)) in a timely manner. Instead, when loading, try to select pieces of wood for a burn that you think will be burned at about the same rate:skinny sticks in one load, big chunks with knots in another load. And even then, about half way through the burn you should use a long poker to drag any wood that's not burning fast to the front where the air intake is, to make it burn faster. Don't be intimidated, though. It took me years to learn these little tricks. - As with the "wood should be dry no matter what stove" above, this too actually applies to all wood stoves: Chimneys that go up an outside wall--exposed on 3 sides to the outside cold air, in other words--are a bad idea. In particular regarding masonry stoves, the envelope of cold air they harbor makes starting a new fire difficult because it doesn't draw properly (suck air and smoke up the chimney) until the cold air is replaced with hot air. Having a chimney inside the house gives you a warm air envelope in the chimney ready to start drawing right away. The inside chimney adds to the efficiency, acts as a heat sink and radiates out more heat that radiates into the house. Because the chimney is warmer, creosote from the exhaust gases are not as prone to condensing in the chimney. I have not had to clean the chimney. Of course, having a chimney inside takes up yet more indoor space and it can be a nightmare if you are trying to retrofit it into an old house.
- I don't know how a masonry heater would work if you don't have a floor plan is open, to distribute the heat. There are no big walls between our kitchen, dining room and living room. There is a closed off laundry room/ bathroom off in a corner of the house that is considerably cooler. When the temperature goes below 0 degrees Fahrenheit we open the faucets in the laundry room a bit to drip overnight to prevent pipe freeze.
The sales people gush that masonry stoves have a "very even heat". What does that even mean scientifically? It's true that the masonry emits a pleasant radiant heat, like sunshine--not a blast of hot air. It's true that people do like to congregate around it. It's true that the the heat migrates well to the upstairs through the ceiling (except in the previously mentioned closed-off laundry room). But when it gets really cold, the corners of the house away from the stove get noticeably cooler than near the stove. My house is 24 x36 feet, two story. - This shocked me and shocks everyone when they first hear that the damper is closed when the fire has burned down to still-glowing embers, but I'm completely comfortable with it now. The kit came with a door for the TOP of the chimney. A long wire goes down through the chimney, out a tiny hole. You open the door with the wire just before you build a fire. Then you close the door after the fire has burned down to charcoal but before the charcoal has burned out. I had a carbon monoxide alarm and fretted about it at first, but no more. On average, 170 people die of non-automotive carbon monoxide poisoning every year in the U.S. alone--from defective coal or kerosene devices. Yet I cannot find even a single example on any any CO poisoning ever from a wood-fired masonry stove.
For me, it's all become moot anyhow. All this winter I've been scooping up the coals for "biochar" instead of letting them burn away.
Looking at the literature now, it appears that maybe the chimney top is an "option" that maybe you have to pay extra for? Maybe they are trying not to agitate codes people living in the past? All I can say for sure is that a masonry stove without a chimney top damper would be ghastly inefficient. - My unit has an "air wash" glass door, which means the intake air to combust the wood rushes in from slots just above and just below the door. This keeps most of the smoke away from the glass, so we don't have to clean the glass door very often. However, the upper bake oven door does not have this feature and so blackens after a couple of burns. A very fine ash (like a powder) accumulates on the bottom of the bake oven. I sweep it into the slot so it goes down into the combustion chamber so I can deal with it with the rest of the ashes. If the chimney top is open, it is sucking air in so it doesn't spew ash into your house. I mention all of this because in the promotional video they load a pizza or something into a bake oven which is gleaming and spotless. You're gonna have to deal with some powder ash if you bake!
That said, I still like the bake oven just for the beauty of the leaping flame. I just wipe the glass with and old tissue or something when it darkens. Here is a tip. On the bottom door glass especially, when it finally does get dirty, it's hard to remove--even with a moist tissue or something (don't use a wet tissue to wipe when it's hot; the thermal shock could break the glass). To get rid of that last bit of baked-in stuff on the glass, just dip moist paper in the ashes and rub it on. It instantly cuts through the stuff. Then wipe off the ash with more moist paper. No need for some expensive wood stove window cleaner. - I bought a stainless steel coil and installed it in the heater to heat some of the domestic hot water (showers, laundry, dish-washing) for my family. It is not capable of providing enough heat to warm floors. To keep it simple and avoid circulation pumps and thermal switches, you really need a hot water tank above (mine is on the second floor) so it can thermosiphon continuously by convection. This isn't something that most plumbers ever deal with. And you have to design it to make it impossible to close a valve that would isolate the heated coil from a pressure relief valve or you will create a bomb. So, as cool as it sounds, hot water heat might be a pass for most people.
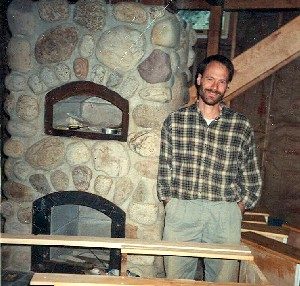
Here is a scratched picture from about 1998 when I was just finishing the stove, except for the doors. I was also making my own kitchen cabinets and drawers (seen scattered around). Both can be done as a do-it-yourself project, but neither is what you would call a "weekend project."
Operating Tips
("little" details that make all the difference)
Always have the damper on top of the chimney open if you clean out ashes via the door (some people do not, they clean out ashes from the basement, under the stove). Opening the damper draws air into the stove so ash particles that you kick up go up the chimney instead of into the house. It works like a fume hood that chemists use.
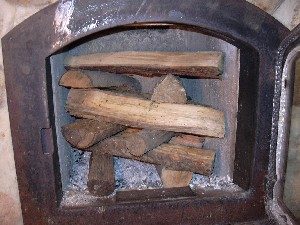
I already mentioned in (c) above to use similarly thick wood in a batch for one burn so it will all burn in about the same amount of time. But for the first two pieces of wood that I stack the rest on, I select two that are a bit skinnier than the rest. That's because the heat rises away from them and they are near the cold metal grate, so they burn a little slower than the rest. They are oriented lengthwise oriented toward the front and back, as seen in the picture above (when I took the picture I had not yet learned the trick of making the bottom two pieces skinnier).
When I put in the next two pieces of wood--90 degrees to the first two--I make sure the front piece a bit thicker than the back piece. That's because I want the pile of wood wood to lean backwards slightly. When we first started using the stove, sometimes midway through the burn, the flaming, disintegrating wood pile would collapse and hit the glass door. I don't think there was ever much danger of the wood breaking the (tempered) glass but it did damage the refractory ribbon that goes around the glass to hold it in/seal it. Wood against the door also makes a mess on the glass. So by putting slightly thicker wood in front than in back to make the pile a little toward the back, when it disintegrates it collapses harmlessly against the back wall.
If the wood pieces are too long for the firebox, you can mitigate that somewhat by laying them diagonally, 45 degrees to the walls rather than parallel.
There's a time-saving trick that you don't need to learn right away, but it will save time and hassle once you develop it. If you can time the loading of wood several hours after the previous burn is over (coals have burned out but the inside fire chamber walls are still warm/hot), then over the next hours the stack of wood gets warm and much more dried out than is possible at room temperature. You won't believe how much easier and faster it is to get the fire started. It's also more efficient heating. Even "dry" wood is about 8% water by weight. Driving off that moisture during a burn takes lots of energy. But if you drive off the moisture before the burn, it just adds a little humidity to the dry winter air (warm wood smells good, too). Drier wood also deposits less creosote inside the chimney. But if you goof and load the firewood before the coals have burned out, the still-hot charcoal touching the new wood will create smoke and stink up your house.
This year I've begun making biochar by scooping out the coals before they have burned down, so I can load the wood much sooner (even when the walls are still hot, they never cause charring, though you will smell the warm wood). I explain the biochar process in more detail 5 paragraphs down.
With the wood stacked, light the fire. WAIT, open the damper first! If you forget--and my wife and I do once or twice a year--you will know instantly as soon as you light the fire. The smoke will start going into the room instead of being sucked up the chimney. We don't even have to use kindling wood to get is started, just a few pieces of balled up newspaper or waste paper. That ease of starting is because we do things right: use dry wood, our chimney is inside for instant draw (suction of air up the chimney) and warming the wood as described in the previous paragraph. Some people start the fire on TOP of the stack of wood, I think because it smokes less as the fire starts, but we're kinda lazy that way and just put the paper at the bottom and middle.
About halfway or two thirds through the burn, when the pile collapses or looks about to collapse, we try to remember to look for pieces of wood that are not burning as fast as the others. We drag them more forward nearer the air inlets so they burn faster and catch up with the rest of the pieces.
The dampers of masonry stoves are closed when the fire has burned down to glowing embers (coals, charcoal) (see "f" above). You will know it's time where there is no more orange flame (blue, yes; orange, no). It is really important before closing to dig around with the poker--particularly in the corners and buried under ash--for smoldering ends of wood that have not burned down completely to embers. When you drag these partly-burned chunks to the front, they will finish burning with an orange flame in a short time (they are finished when they too have a blue flame). It only takes a few seconds, but if you don't find and burn those chunks before closing the damper, they will continue to smolder for hours and stink up your house with an acrid, creosote smell. Again, I speak from experience.
I know this sounds like an awful lot of stuff to remember, but it's really not. It's like anything else: it seems complicated at first and becomes easy as we acclimate.
As I mentioned above, I have started making biochar to dig into my garden and orchard as a soil amendment as well as carbon sequestration. I don a glove and scoop out the coals. I have two and switch when the first glove gets unbearably hot. The coals go into a big stainless steel pot that I've filled halfway with water. There's steam (actually vapor--steam is an invisible gas) and who knows what, but the pot is about halfway into the fire chamber, so again it sucks everything up the chimney in a way not unlike a fume hood.
I don't think this method of charcoal production is limited to masonry stoves; some form of it ought to work in other designs. I think this method much more efficient and easier than the barrel methods I've seen. As I understand it, when the other methods of production burn off the volatile compounds in the wood (everything except the carbon) they just waste the heat. I use it.
FULL DISCLOSURE: Biochar carbon has fuel value. If I leave it in the stove, it keeps burning slowly and adding more heat for hours. When I liberate it from the stove, I lose some heating. So when I remove biochar I now burn twice a day when the outside temperature goes into the 30s or 40s Fahrenheit, not just when it stays below freezing all day.
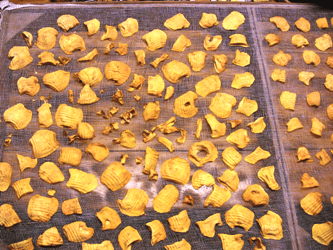
Visiting or Talking with Someone with a Masonry Heater
You are insane if you don't visit--or at least talk to--some people who have a masonry stove before committing to buy one. The businesses that sell and build them might be able to connect you with past customers. If you can travel to my house (in Williamsport, Pennsylvania) I can show you my masonry heater. Assuming that you have read through this page, I'm happy to answer questions and go into details, either by phone or e-mail. I'm Slater (rhymes with "later")
My Stove vs Other Designs
There are at least two ways to go about buying a masonry heater. I bought the core from a company in Toronto, Canada, and did all the rest of the work myself. Some people hire local masons then to build the foundation, chimney and facing, Tapcon the doors, in, etc. There are now enough masons in North America to build the heaters from scratch, on location with fire brick. I hear it takes about 3 days.
I had been reluctant to specify where I bought the core of my stove, but everybody asks, so here it is--good and bad. The company was TempCast. The reason I settled on Tempcast is because I wanted to do as much of the work as possible, yet I didn't feel confident to build one completely from scratch. At the time--in the 1990's--they were the only ones selling such a kit--large blocks that were keyed to fit together. It's likely the landscape has changed, so look around.
With the perspective of time, I am happy with the TempCast product, but there were some times I wondered if I had made a bitter mistake. There was a perceptible difference from before, when I was a prospective customer; to after I had payed my money. When the core arrived, one of the giant 80 lb. blocks had broken in two. It was the arch of the bake oven. I documented it with the shipping person. I assumed it would be replaced, but John told me to just glue it together with refractory cement. There was no way I was going to accept that particular piece broken. If it caused problems I would have to destroy the stove to get to it. So I insisted on a replacement, but was forced to pay shipping of this 80 lb block from Canada. Then, when I assembled the stove, one block was misshapen. There was a huge gap and it rocked. Again John told me to just fill it with refractory cement. It was a clear manufacturing defect and he knew about it. I did fill it (they give you a tiny little container of cement that would not be nearly enough even if everything was ok) and it seems to be ok, but that and other things like it after I had paid my money left a bad taste. I run a business and I don't treat people that way.
That said, the instruction guide was clear enough that someone like me without a lot of masonry experience could make the footer, block wall up to the first floor, reinforced pad, assemble the firebrick blocks, face it, put the door in, etc. John did answer my construction questions. And it worked out well, I have no idea what people pay for fossil fuel heat but I must be saving thousands dollars a year. And esthetically I love it. Expensive upfront but one of the best investments I ever made. Just look around and talk to lots of people before you plunk down your money. There are more options now that masonry stoves are becoming more common.
Some Construction Details
When I faced the core with rock, I first wrapped it with expanded steel lath to prevent cracking, and this worked. But I talked to another guy who faced with brick--no expanded metal behind--and it developed some ugly cracks between the bricks.
I ended up removing the rock wool from the top. I think that's a fire code thing, but it only gets warm on top and it's quite far away from the ceiling. I replaced it with a layer of bricks that further enhances the heat storage.
After a decade the wire to the upper chimney damper frayed and broke where it goes through the chimney wall. Oh what a hassle to replace that and thread it through. Now I grease the wire every week or so where it goes into the chimney and rubs a little.
Once a decade or so I go up on the roof and move the attachment point a foot or so further along so the rubbing part of the wire no longer rubs. To enable moving the wire that way, I left the wire too long at the bottom.
More Information/ Links
Below are some good links about masonry heaters. And you can find other links there about cool related subjects like old fashioned, wood fired bake ovens. Lots of gorgeous photographs to drool over, too.
This Masonry Heater Association (MHA) is the place to start. Scroll down and you'll see the member directory with contact information that make up the association. And check out the beautiful gallery. I enjoyed reading about some of the member's work in a village in Guatemala with cook stoves. Among MHA there seem to be some really interesting craftspeople.
This page is just sort of fun to see how they make a masonry bake oven--something I've always wanted to do. There are some good YouTube videos about this now.
This is a fantastic video that shows "What is a Flame?"
What Mark Twain had to say about masonry heaters :
“Take the German stove, for instance – where can you find it outside of German countries? I am sure I have never seen it where German was not the language of the region. Yet it is by long odds the best stove and the most convenient and economical that has yet been invented.
To the uninstructed stranger it promises nothing; but he will soon find that it is a masterly performer, for all that. It has a little bit of a door which you couldn’t get your head in – a door which seems foolishly out of proportion to the rest of the edifice; yet the door is right, for it is not necessary that bulky fuel shall enter it. Small-sized fuel is used, and marvelously little of that. The door opens into a tiny cavern which would not hold more fuel than a baby could fetch in its arms. The process of firing is quick and simple. At half past seven on a cold morning the servant brings a small basketful of slender pine sticks – say a modified armful – and puts half of these in, lights them with a match, and closes the door. They burn out in ten or twelve minutes. He then puts in the rest and locks the door, and carries off the key. The work is done. He will not come again until next morning.
All day long and until past midnight all parts of the room will be delightfully warm and comfortable, and there will be no headaches and no sense of closeness or oppression. In an American room, whether heated by steam, hot water, or open fires, the neighborhood of the register or the fireplace is warmest – the heat is not equally diffused throughout the room; but in a German room one is comfortable in one part of it as in another. Nothing is gained or lost by being near the stove. Its surface is not hot; you can put your hand on it anywhere and not get burnt.
Consider these things. One firing is enough for the day; the cost is next to nothing; the heat produced is the same all day, instead of too hot and too cold by turns; one may absorb himself in his business in peace; he does not need to feel any anxieties of solicitudes about the fire; his whole day is a realized dream of bodily comfort.
America could adopt this stove, but does America do it? The American wood stove, of whatsoever breed, it is a terror. There can be no tranquility of mind where it is. It requires more attention than a baby. It has to be fed every little while, it has to be watched all the time; and for all reward you are roasted half your time and frozen the other half. It warms no part of the room but its own part; it breeds headaches and suffocation, and makes one’s skin feel dry and feverish; and when your wood bill comes in you think you have been supporting a volcano.
We have in America many and many a breed of coal stoves, also – fiendish things, everyone of them. The base burners are heady and require but little attention; but none of them, of whatsoever kind, distributes its heat uniformly through the room, or keeps it at an unvarying temperature, or fails to take the life out of the atmosphere and leave it stuffy and smothery and stupefying….” — From Europe and Elsewhere
Please share your experiences with masonry stoves so I can pass it on to others.
